Photos play a crucial position as a priceless instrument for visualizing ideas and texts that can not be adequately conveyed by phrases. On this article, let’s study including picture objects within the new launch model of ActivePresenter – ActivePresenter 9.
As you could know, photos can create extra constructive responses and preserve college students engaged within the lesson as an alternative of text-based content material. In ActivePresenter 9, you’re free so as to add as many photos as you need. This may be achieved in some easy steps. The app helps including a number of picture codecs, together with PNG, JPG, JPEG, BMP, GIF, and SVG.
On this tutorial, you’ll stroll by 2 most important elements:
To start with, obtain the app to check out this function.

Add an Picture Object
Mainly, ActivePresenter 9 presents 3 ways so as to add a picture object to the undertaking. Now, carry out any of the next:
- Open the Insert tab > click on Picture
 > select a number of photos out of your pc.
 - Choose a number of photos out of your folder > drag and drop them into the Canvas.
- Open the Insert tab > Screenshot . See Take Screenshots for extra particulars.
Notice: When importing photos into Canvas, if the picture dimension is bigger than the slide dimension, the picture might be robotically resized to take care of its side ratio and displayed sharply.
Customise Added Photos
Substitute Photos
After inserting a picture object into the undertaking, it’s attainable to swap it with one other. That is helpful if you wish to change the picture however preserve all present animation results. Try the steps beneath:
Step 1: Choose the picture.
Step 2: Navigate to the Properties pane > Measurement & Properties > Picture. Then, you may change it with a picture out of your present undertaking (1) or your pc (2).
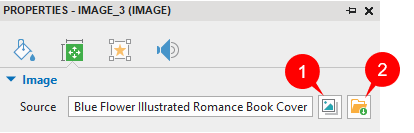
Then, the newly added picture object replaces the previous picture directly.
Notice: In case the brand new picture dimension isn’t much like the previous picture dimension, it is going to be resized to suit the previous one. So, it’s higher to exchange the present picture with a brand new picture of the identical dimension.
Edit Photos
Usually, ActivePresenter 9 offers you numerous choices to edit an added picture. Now, choose the picture, after which carry out any of the next:
- Transfer the picture to a distinct spot on the Canvas by dragging and dropping it. Alternatively, entry its Properties pane > Measurement & Properties tab > Rework part > modify the Left and Prime combo bins’ worth.
- Resize the picture by merely dragging its resizing handles. Or navigate to its Properties pane > Measurement & Properties tab > Rework part > modify the Width and Top combo bins’ worth. If the brand new dimension doesn’t fulfill you, click on Restore Authentic Measurement to revert the picture to its authentic dimension.
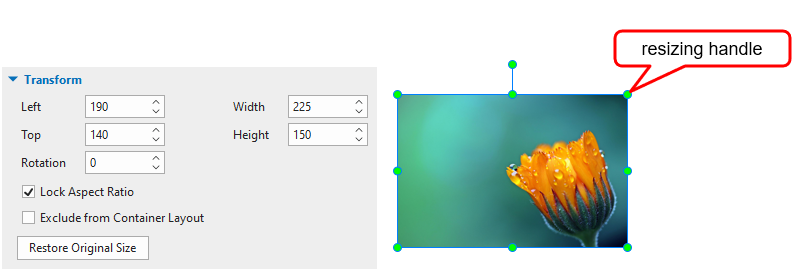
- Preserve the ratio between the width and the peak of the picture unchanged when resizing it by ticking the Lock Side Ratio checkbox.
- Rotate the picture by right-clicking it > Rotate > Rotate Proper/Left 90*. See Rotate Objects for extra data.
- Flip the picture by right-clicking it > Rotate > Flip Vertical/Horizontal. See Flip Objects for extra data.
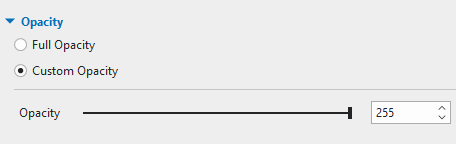
- Modify the opacity stage of the picture by navigating to the Properties pane > Fashion & Results tab > Opacity. By default, the Full Opacity possibility is enabled. Choose the Customized Opacity possibility if you wish to customise this property. Then, be happy to regulate the worth by dragging the slider or specifying a worth within the spin field. If the worth is 0, the entire chosen picture turns into clear. Rising this worth will make it extra obvious.
- Crop the picture by navigating to the Properties pane > Measurement & Properties > Crop. Check out Crop Photos and Movies for a greater understanding.
- Add animation results to the picture through the use of the Animations tab. See Animating Objects for extra particulars.
- Edit the picture extra professionally with the picture editor. To entry this editor, right-click the picture > Edit Picture… This opens the Picture editor and the Drawing tab.

Tip:
Whenever you’re achieved with modifying, in the event you want to use the picture as a background picture, right-click it > Merge into Background. Then, the picture might be merged into the background. Nevertheless, the picture’s time bar together with all associated animations (if any) will disappear.
It’s straightforward so as to add picture objects in ActivePresenter 9, isn’t it? Keep in mind to make use of photos to deliver visualization into your eLearning programs. Be happy to contact us in the event you want any help.
Associated articles: