Mastering how you can align and resize objects utilizing alignment instructions is a vital talent to have. Not solely does it can help you distribute objects in a flash. But it surely additionally helps to create a constant feel and appear on your venture.
Virtually all the time, when working with a set of objects, it’s possible you’ll must fine-tune their place and dimension. Doing this by hand is time-consuming and results in inaccurate outcomes. Thus, it’s important to grasp all accessible instruments in ActivePresenter 9 to rearrange and scale objects early on. Within the earlier put up, you knew about utilizing the Canvas Snapping features. In the present day’s article will present you the way in which to align and resize a number of objects effectively utilizing alignment instructions.
Let’s stroll by the next components:
Obtain the newest model of ActivePresenter and be taught step-by-step:


Align A number of Objects Utilizing Alignment Instructions
Aside from the Gridlines, Guides, and Sensible Guides, you’ll be able to shortly align and resize a number of objects utilizing accessible alignment instructions within the Format tab. Now, simply take the next steps to make use of these instructions:
Step 1: Choose at the least two objects on the Canvas to allow these instructions.
Step 2: Proper-click the chosen object > Align. Alternatively, entry the Format tab and click on Align.
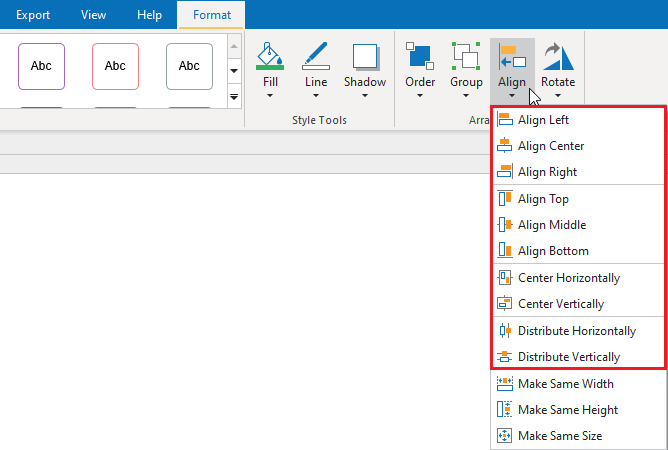
Step 3: Choose the specified command from the listing.
Hold studying to discover the performance of every command within the following components.
Align Objects with Anchor Objects
Typically, you’ve got an object’s place set completely and it’s possible you’ll need to align different parts with it. To try this, initially, you could choose at the least two parts. The final chosen one is the anchor object. It’s surrounded by inexperienced resizing handles fairly than white handles like others. To specify a special anchor object, maintain CTRL and click on any of the presently chosen objects.
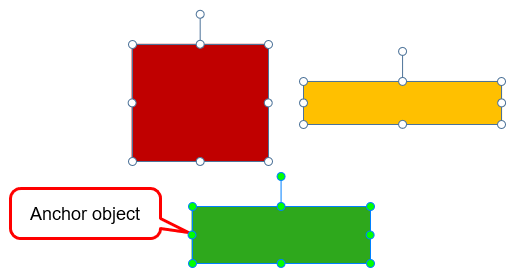
Then, you need to use one or most of the following instructions to align them as you would like:
- Align Left: Align the left slide of the chosen objects with that of the anchor object.
- Align Middle: Align the vertical heart of the chosen objects with that of the anchor object.
- Align Proper: Align the appropriate slide of the chosen objects with that of the anchor object.
- Align High: Align the highest of the chosen object with the anchor object’s.
- Center: Align the horizontal heart of the chosen objects with that of the anchor object.
- Align Backside: Align the underside of the chosen object with that of the anchor object.
Align Objects to the Canvas
As well as, you can too align one or many objects to the middle of the Canvas. Simply choose one of many following instructions:
- Middle Horizontally: Transfer the chosen objects to the horizontal heart of the Canvas.
- Middle Vertically: Transfer the chosen objects to the vertical heart of the Canvas.
Distribute Objects Evenly
In the event you prepare objects in a row or column, you might have considered trying them to have an equal distance from each other. In that case, you need to use the choices beneath:
- Distribute Horizontally: Create equal horizontal spacing between chosen objects.
- Distribute Vertically: Create equal vertical spacing between chosen objects.
Be aware: These instructions solely work when you choose at the least three objects.
Resize A number of Objects Concurrently
Moreover utilizing alignment instructions to align objects, ActivePresenter 9 additionally means that you can resize them without delay. Relying on the anchor object, you’re free to regulate the width, peak, or each of the chosen objects.
Now, do as follows:
Step 1: Choose at the least two objects on the Canvas to allow these instructions.
Step 2: Proper-click the chosen objects > Align. Alternatively, entry the Format tab and click on Align.
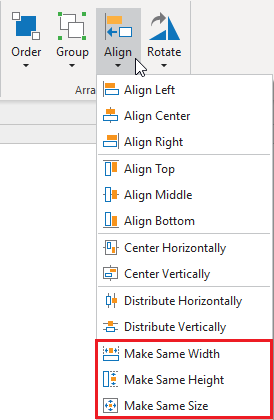
Step 3: Choose your required command from the listing.
- Make Similar Width (1): Make the chosen objects have the identical width because the anchor object.
- Make Similar Top (2): Make the chosen objects have the identical peak because the anchor object.
- Make Similar Dimension (3): Make the chosen objects have the identical width and peak because the anchor object.
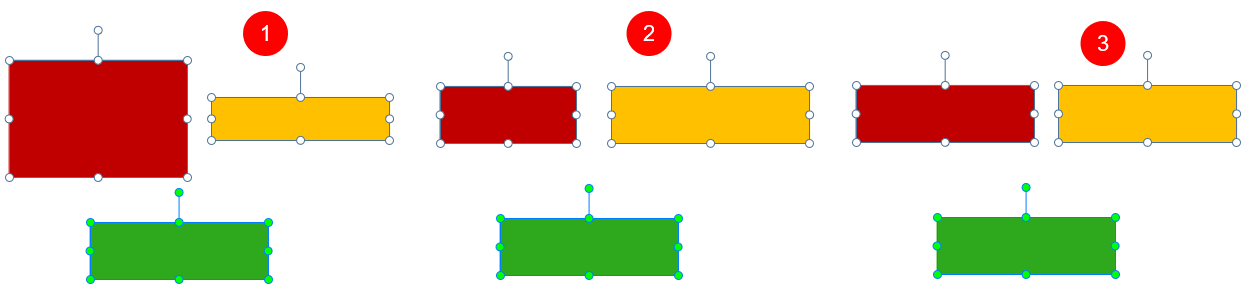
So, it’s simple to make objects which have related dimensions with only one click on.
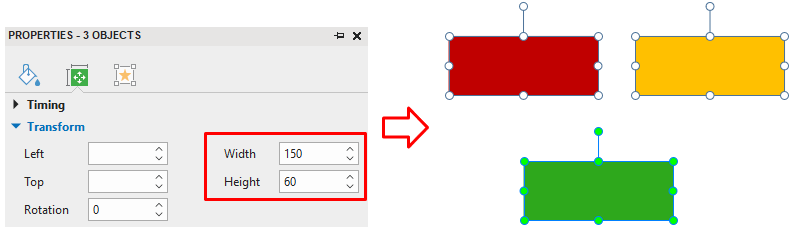
Be aware: There may be one other technique to resize a number of objects concurrently by getting into the worth manually. Simply navigate to the Properties pane > Dimension & Properties tab > Remodel part. Then, enter particular values within the Width and Top spin bins:
That’s how ActivePresenter 9 helps you to align and resize a number of objects utilizing alignment instructions. Don’t neglect to make use of these alignment instruments to work with objects with ease. Go to our Tutorials web page and YouTube channel for extra useful content material.
Associated Articles: