Recording display screen and webcam concurrently is most well-liked if you wish to create educational, software program evaluate, or response movies. This weblog will present you ways to try this in ActivePresenter.
On your data, ActivePresenter is an all-in-one display screen recording, video enhancing, and eLearning authoring software. This app is on the market on each Home windows and macOS. Concerning recording options, it means that you can file your display screen and webcam concurrently in addition to independently.
This weblog covers 5 fundamental steps:
- Set up and begin the app
- Choose display screen recording mode
- Activate the digicam and microphone
- Begin recording
- End recording
Firstly, let’s obtain the most recent model totally free to get began.
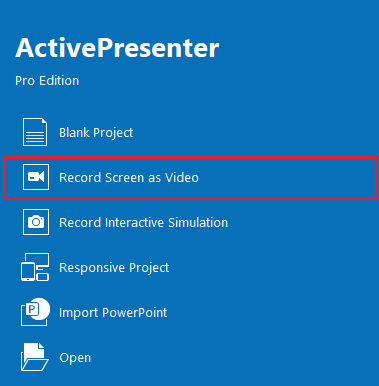
#1. Set up and Begin the App
Double-click the downloaded file and observe the instruction to put in the app. After that, it launches the app and exhibits a pop-up window requiring you to pick a theme to start out.
ActivePresenter has a pleasant consumer interface, however the first use might take time. If you’re a brand new consumer, see Introduce ActivePresenter 9 Consumer Interface upfront to hurry up your work.
#2. Choose Display screen Recording Mode
ActivePresenter gives 2 modes of display screen recording: file your display screen as video and file interactive simulation. Nonetheless, recording the webcam concurrently is just obtainable if you choose the previous mode.
On the Begin Web page, choose File Display screen as Video. If you’re within the workspace, click on the ActivePresenter button > File Display screen as Video.
Then, the Recording Display screen as a Video Mission dialog and a blue rectangle which defines captured space seem:
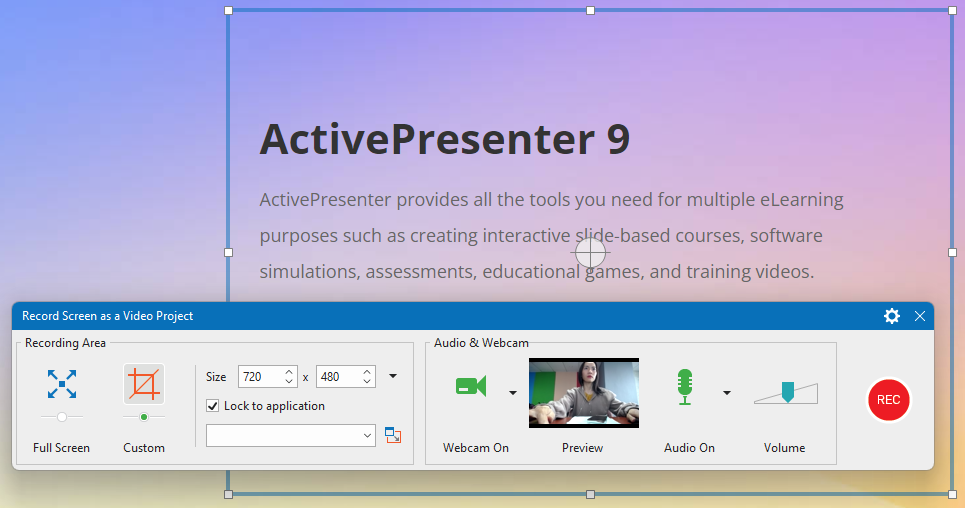
Within the dialog, you possibly can choose to seize the complete display screen or solely part of the display screen. For those who desire the latter, be at liberty to resize and reposition the captured space as you need. Simply drag the resizing handles of the blue rectangle, or enter the width and top values into the Measurement spin bins.
#3. Flip On the Digital camera and Microphone
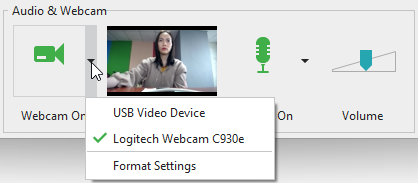
To file the display screen together with the webcam, you must activate the digicam and microphone. Within the Audio & Webcam part of the File Display screen as a Video Mission dialog, click on the digicam and microphone icons till they flip inexperienced. When you try this, a reside preview of the digicam seems subsequent to the digicam icon. Additionally, the Quantity possibility seems subsequent to the microphone icon to allow you to alter the quantity of will-be-recorded audio. In case you’ve a number of units that are being plugged in, click on the dropdown arrow subsequent to the icons to pick the best one.
Word: You must check earlier than doing it for actual to be sure you choose the best webcam/microphone they usually work nicely.
About recording audio, you could need to find out about:
#4. Begin Recording Display screen and Webcam
To start out recording, hit the REC button. Proper after that, ActivePresenter will cover the File Display screen as a Video Mission dialog and countdown to start out. The app will file all actions on the display screen which is contained in the blue rectangle, in addition to your face and audio.
Word: Throughout the recording, don’t plug or unplug the digicam/microphone to keep away from undesirable issues.
Consult with the Begin and Cease Recording tutorial for particulars.
#5. End Recording
To cease recording, do both of the next:
- Press CTRL + END (for Home windows) or ⌥⌘2 (for macOS).
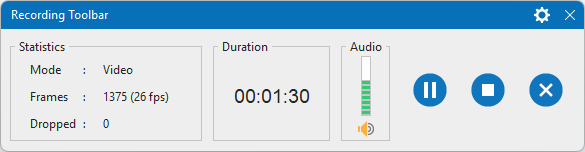
- Click on the ActivePresenter icon on the Taskbar or system tray > click on Cease Recording within the Recording Toolbar dialog.
As soon as ending the capturing section, the app transfers your recording to the editor. You will notice 2 recorded movies: a screencast and a webcam video which overlay one another. Right here, you possibly can edit each of them utilizing a variety of highly effective enhancing options. Try the Edit Display screen Recordings tutorial to be taught extra. Lastly, for those who want to export your recording, go to the Export tab > Video.
Now that you understand how to file display screen and webcam concurrently in ActivePresenter. Obtain the app and take a look at recording your first screencast alongside along with your webcam. In case you’ve any questions, tell us. We’re able to assist you.
See extra: