
ActivePresenter 9 makes it fast and simple so as to add voice-over to your screencast and eLearning course. Other than recording your voice, utilizing the built-in Textual content to Speech (TTS) characteristic is a handy method to generate audio from textual content or convert closed captions to speech.
Right now’s article covers:
Earlier than shifting ahead, don’t neglect to obtain and set up the newest model of ActivePresenter right here:


Generate Audio from Textual content
That is the primary method to convert textual content to speech in ActivePresenter 9. The app lets you generate audio from the textual content for each audio objects and different objects with connected audio.
- For audio objects, entry the Insert tab > Audio > Create New > Properties pane > Media tab > Audio part.
- For objects with connected audio, go to the Properties pane > Audio tab.
Then, the Audio tab seems as follows. (The Audio part of the Media tab is comparable but it surely has yet one more a part of playback choices.)

To create audio from textual content, take the next:
Step 1: Enter your textual content within the Textual content To Speech textual content field. If the article (shapes, textual content captions, and many others.) accommodates textual content, you’ll see the textual content obtainable within the textual content field. Nevertheless, you may freely change the textual content as you need.
Step 2: Choose a voice from the Voice drop-down record or click on Extra Voices… to entry different cloud voices. Apart from, you may choose the SSML checkbox to boost your output speech with SSML tags for SSML-supported voices.
Step 3: Click on Converse (1) to take heed to the voice and click on Cease (2) to cease listening. If you’re glad with the present settings, simply click on Generate (4) to create TTS audio. If not, go to the following step.
Step 4: Click on Settings (3) to regulate the TTS preferences. This opens the Textual content To Speech dialog the place you may specify the voice, velocity, and quantity for the TTS audio.
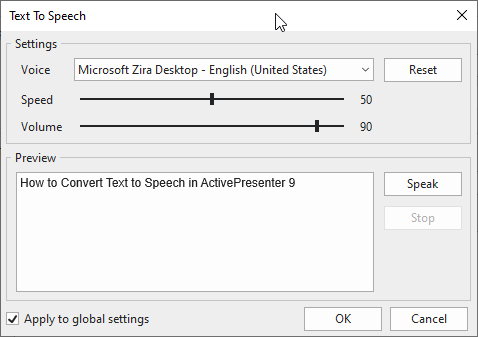
Right here, you may:
- Specify the voice, change the velocity and quantity, regulate the textual content, and click on Converse to take heed to the voice.
- If the outcomes will not be OK, change the parameters and check out once more. Repeat the performances till you’re glad.
- In case your settings will not be adequate, click on Reset and begin over.
- When you’re glad, click on OK to shut the dialog.
Step 5: Click on Generate (4) to transform textual content to speech. ActivePresenter 9 will generate the audio and fasten it to the article.
Be aware: In case the article period is shorter than the generated audio period, ActivePresenter will ask whether or not you need to lengthen the article period to match the period of the generated audio.

- Click on Sure or No relying in your wants.
- Choose At all times do that any longer to recollect your preferences. Thereby, your selection will default everytime you convert closed captions to audio with out displaying this dialog once more. If you wish to change to the opposite selection, simply click on the ActivePresenter button > Preferences > Miscellaneous > Lengthen object period to match the period of generated audio > select both Ask, Sure, or No.
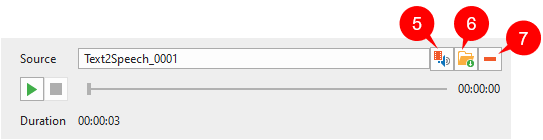
Tip: To take away the generated audio from the article, click on Take away (7). Apart from, ActivePresenter 9 additionally lets you connect audio from the present mission (5) or out of your laptop (6) to your objects.
Convert Closed Captions to Audio
The second method to convert textual content to speech in ActivePresenter 9 is producing audio from closed captions. When transformed, all CC nodes within the Timeline produce a single audio object. This audio object works identical to different regular audio ones in ActivePresenter, so you should utilize the built-in audio instruments to edit it.
ActivePresenter 9 additionally lets you use completely different voices, speeds, and volumes for every CC node. That is helpful once you need to make conversations, for instance. Apart from, utilizing batch operations will prevent time to generate audio from closed captions in some specified slides or in all mission’s slides directly.
Convert Closed Captions to Audio on the Timeline pane
You’ll be able to apply completely different settings to every CC node within the Timeline pane, after which convert all of them into audio. To do this, choose a CC node and carry out the next:
Step 1: Click on the Properties pane > Sizes & Properties > Caption.
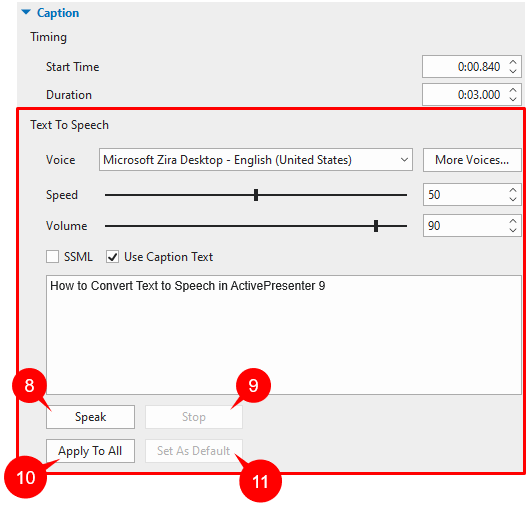
Step 2: Within the Textual content To Speech space, specify the voice, velocity, and quantity for the CC node.
It is usually potential to click on the Extra Voices… button to see different exterior voices. Nevertheless, you need to do some additional settings. This will probably be mentioned extra particularly later.
Step 3 (Non-compulsory): You’ll be able to improve your chosen voice with SSML (Speech Synthesis Markup Language). SSML tags can add pauses and different speech results equivalent to emphasis, quantity, talking price, pitch, and extra to that voice. To allow it, choose SSML examine field, after which enter your plain textual content with SSML tags within the Preview textual content field.
Be aware: You’ll be able to solely use SSML tags for SSML-supported voices.
Step 4: Click on Converse (8) to take heed to the voice and click on Cease (9) to cease listening.
Tip: Click on Apply to All (10) to use the identical settings to different present CC nodes. Or click on Set As Default (11) to use the TTS settings of the present CC node to all newly added ones
Step 5: After adjusting every CC node, go to the Timeline pane > right-click one CC node > choose Convert Closed Caption to Audio. Alternatively, entry the Insert tab, click on the drop-down arrow on the Closed Caption button > Convert Closed Caption to Audio. This converts all CC nodes in a slide into speech.
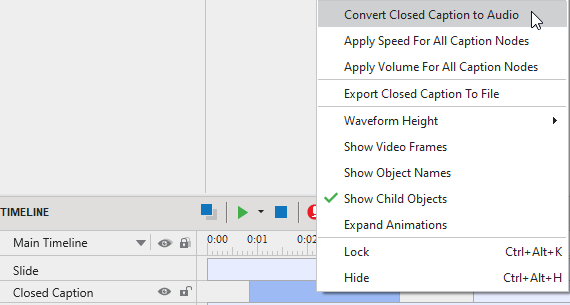
After that, ActivePresenter 9 will generate the audio and place it proper beneath the CC object within the Timeline as a single audio object.

Be aware: It’s potential to use the identical settings of both the velocity or quantity of a CC node to different CC nodes. To do this, right-click a CC node and choose Apply Pace For All Caption Nodes or Apply Quantity For All Caption Nodes.
Convert Closed Captions to Audio Utilizing Batch Operations
ActivePresenter 9 additionally gives a batch operation to transform closed captions in some specified slides or in all of the mission’s slides. Do the next:
Step 1: Click on the ActivePresenter button > Undertaking > Batch Operations > Convert Closed Captions To Audio. Then, a dialog seems as follows:

Step 2: Specify the slides (12) the place you need to convert closed captions to audio. In the event you select Specified Slides, separate the ordering numbers of slides by commas. In any other case, use hyphens to point ranges. For instance, the vary 2-4 signifies the 2nd, third, and 4th slides.
Step 3: Choose Lengthen caption period to match the period of generated audio (13) if wanted. This may occasionally trigger sync issues, so you need to try the mission fastidiously.
Step 4: Click on OK to create audio from closed captions.
That’s all performances to transform textual content to speech in ActivePresenter 9. Save your self the expense of discovering voice expertise with this helpful characteristic. Go to our Tutorials web page, and YouTube channel for extra helpful data.