Creating an FK-IK change arm in Maya with the Node Editor shouldn’t be too difficult strategy you possibly can implement to your subsequent character rigging venture.
On this article, we’ll display the FK-IK change setup for the arm of our character. However make no mistake, the identical precept will be utilized for different elements of a personality, equivalent to leg, and torso.
The idea behind FK-IK change in Maya is to create a controller that determines which set of controls (FK or IK) will likely be used to drive the motion of the character. Nevertheless with the intention to reap the benefits of this rig setup, we have now to beforehand create these separate setups (FK and IK rigs) for our character.
In case you want extra info, preserve studying..
create the person FK and IK rig setup (Overview):
So earlier than we implement the FK-IK change by the Node Editor in Maya, we have to create these particular person setups for each FK and IK rig of the arm. That features joints, curve controllers, and constraints.
Although the creation of the separate (FK and IK) setup shouldn’t be within the scope of this text, here’s a few notes on how you can strategy it.
- create three joint chains (bind, FK, and IK joints)
- create curve shapes for controllers
- and lastly all the required constraints

Observe: The method is to create the bind joints, after which duplicate the entire mum or dad node two instances. One for the FK joints and one for the IK joints. After that, rename each chains accordingly.
Observe: Then bind joints, will likely be used for bind the mesh and in consequence will drive the ultimate movement of our character.
You’ll be able to simply create the rig for the FK setup utilizing this python script.
For the IK rig setup, you simply must create an IK deal with after which mum or dad that IK deal with underneath a curve form for a cleaner controller.
Put together the nodes within the Node Editor:
Assuming you have already got the FK and IK rig setup, let’s see how we’ll create all the required connections within the Node Editor in Maya.
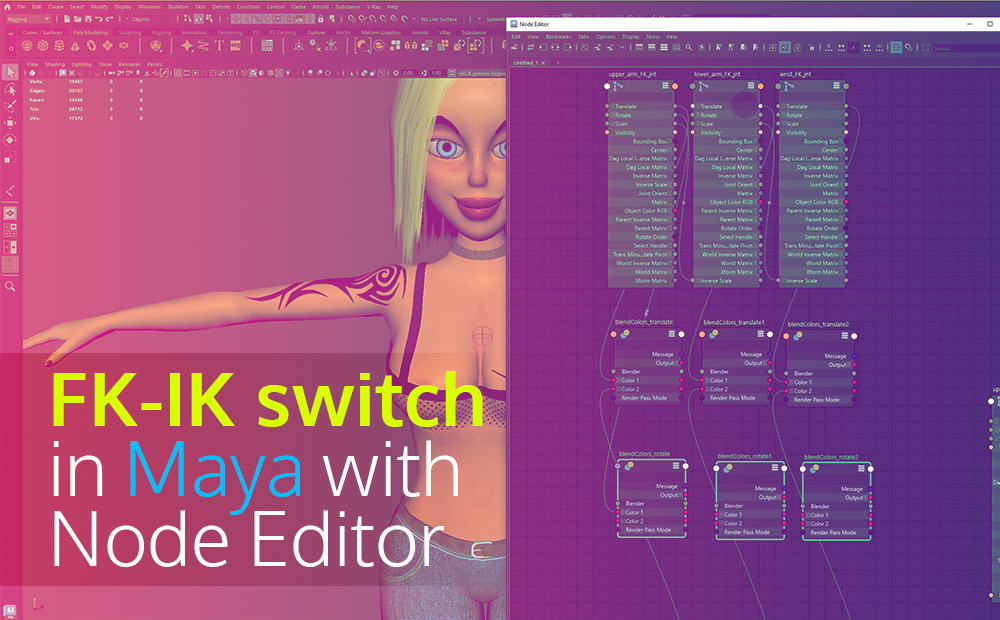
Choose one after the other all the required joints from every rig setup (bind, FK, IK) and drag and drop them into the Node Editor. We’ve got three joints for our arm (upper_arm, lower_arm, wrist).

Choose all these joints within the Node Editor and click on on the “present main attributes on chosen nodes” icon.
This may increase all of the choices for these nodes.

Make the mix connections within the Node Editor:
We have to create three new nodes twice. One time for the translate and one for the rotation parament.
Blendcolor nodes for translate:
Create three blendcolors nodes, by urgent “Tab” and write “blendcolors”. We’d like three blendcolors nodes as a result of our arm rig consists of three joints (higher, decrease, and wrist).
After you create these blendcolors nodes, increase them, with the identical icon beforehand (present main attributes on chosen nodes). Be happy to rename these paraments, for group functions.

Make connections:
Now we have to make some connections. Let’s make the FK connections first.
Join the translate parament from the upper_arm_FK_jnt to the colour 1 from the blendcolors node. The translate parament from the lower_arm_FK_jnt to the colour 1 from the second blendcolors node. And the translate parament from the wrist_FK_jnt to the colour 1 from the third blendcolors node.
Let’s make the IK connections as properly.
Join the translate parament from the upper_arm_IK_jnt to the colour 2 from the blendcolors node. The translate parament from the lower_arm_IK_jnt to the colour 2 from the second blendcolors node. And the translate parament from the wrist_IK_jnt to the colour 2 from the third blendcolors node.

Blendcolor nodes for rotation:
Create one other three blendcolors nodes this time for rotation parament. Increase them and create the connections as beforehand. Solely this time make the connection between rotation and colour 1 and a couple of, and never translate.

Blendcolor nodes connection to the bind joints:
Lastly, join all six blendcolors nodes (translate and rotation) with the bind joints.
Translate blendcolor nodes:
- Join the output from the blendcolor to the translate parament of upper_arm_bind_jnt
- Join the output from the blendcolor 1 to the translate parament of the lower_arm_bind_jnt
- Join the output from the blendcolor 2 to the translate parament of the wrist_bind_jnt
Rotation blendcolor nodes:
Join the output from the blendcolor to the upper_arm_bind_jnt
- Join the output from the blendcolor to the rotate parament of the upper_arm_bind_jnt
- Join the output from the blendcolor 1 to the rotate parament of the lower_arm_bind_jnt
- Join the output from the blendcolor 2 to the rotate parament of the wrist_bind_jnt

use FK-IK change:
If we attempt to transfer a controller both FK or from IK, we’ll understand that the controller has a half-effect. The explanation for that’s as a result of each blendcolors node we create, by default, has a worth of 0.5 on the mix parament (minimal=0 and most 1). So the end result could be that each FK and IK controllers can have half impact, it doesn’t matter what controller we moved.

So with the intention to change between FK-IK controllers for our arm, we have to change the blender node for all six blendcolor nodes we created (3 x translate, 3 x rotation). Change the worth to 1 for FK controls, and to 0 for IK controls.
We are able to try this manually by the Node Editor each time we need to change between two methods (FK -IK), by deciding on one after the other the six blendcolors nodes and altering the blender parament by the Channel Field. However as you possibly can think about this isn’t probably the most environment friendly manner to do this.
As an alternative, we’ll create a circle curve form controller and add a customized attribute on it (FK-IK change). We are going to join that customized attribute with all six blendcolors nodes for the blender parament. So once we need to change between FK and IK rig methods, we’ll try this by just one attribute (FK-IK change).
Create the FK-IK change controller arm in Maya:
We need to create a nurbes circle form to hold the customized attribute (FK-IK change).
Go to Create – Nurbs Primitives – Circle. Be happy to reposition it wherever it fits you.
Choose it and open the Channel Field. Go to Edit – Add Attribute. Give a described title for the brand new attribute, set it to drift, and lastly, set 0 worth for minimal and 1 worth for optimum.

Make the connection within the Node Editor:
Now we have now our new controller with the customized attribute, the ultimate factor we wish, is to make the connection between this tradition attribute and all six blendcolors nodes (blender parament).
Choose the nurvsCircle form you created and added to the Node Editor. Increase it and join the FK IK change parament to the Blender parament from all six blendcolors nodes.

That was it.
Each time you need to use the FK controllers, you possibly can choose the nurbs circle you created and set the FK IK change attribute to 1 by the Channel Field. If you wish to use the IK controller, set the identical attribute to 0.
Observe: We are able to additionally join the fk-ik change with all six blendcolors nodes with a set-driven key methodology.