How you can make a seamless texture in Photoshop, is kind of a very easy method when utilizing the Offset “filter”.
A variety of instances we wish a seamless texture map, for varied causes, one in every of them is for 3D work, a extra particularly for texture objective. Though there are many seamless textures we are able to obtain totally free, a whole lot of instances, none of them will work nicely for our specific challenge.
In that case, we are able to obtain a non-seamless texture map that we are able to flip right into a seamless inside Photoshop.
And the way in which to do this is thru the Offset filter. Mainly what the Offset filter does is to repeat both on X, Y, or each axis our texture map.
In that means, we are able to clearly see what the end result will probably be if we tile the identical texture in a 3D utility. And as we see what we’re going to get after repeating our texture we are able to then with varied Photoshop methods make our non-seamless texture a seamless one.
What a seamless texture map means:
A seamless texture is a texture that we are able to tile as many instances as we wish and there will probably be no seen appears. Any texture in that class must be seamless on each axis (horizontal and vertical).
So if for instance, we need to give it a couple of tiles inside a 3D software program comparable to Maya, let’s say 4 on X (horizontal) and Y (vertical) it must be tiles accurately with no seen seams.
How you can make seamless texture in Photoshop:
Open up your non-seamless picture in Photoshop.
For our instance, I’m utilizing the next brick texture from rawpixel.com artist on freepik.com.

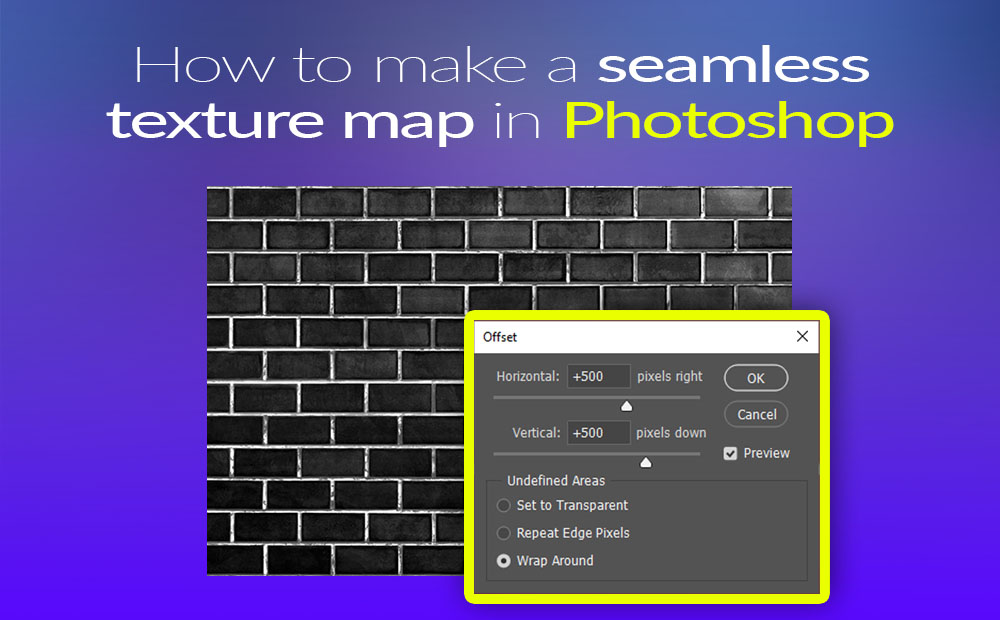
Go to Filter – Different – Offset.
A brand new window seems.
On this window, there are two sliders (horizontal and vertical) axis. As we mentioned, we wish our texture to be seamless on each axis. So we have to “activate” each and see the repeated impact on each axis. We are able to set each values of these axis as we please. Lastly, be sure you have chosen the Wrap Round choice. After that click on OK.

As we are able to clearly see there are some seams in our texture on each axis, that we’re going to eradicate, so our texture will probably be seamless so we are able to correctly use it.
For that matter, we are able to use any method we really feel extra comfy with to repair the seam points in our texture map. I’m utilizing a mixture of marque too, choice device, clone stamp device, and some others.
Be happy to look at the video beneath for more information concerning the methodology I selected for that specific picture:
After we repair our non-seamless texture map, choose it and open up once more the Offset filter, to verify if every little thing is okay, and able to export.
Be aware: We are able to verify our progress via the Offset window each time after which.
Now we now have our seamless texture map, we are able to use it in 3D purposes by growing the repeated condo with out subject.