For those who’ve ever performed video video games and appreciated the extent of consistency intimately (and even seen an absence thereof) among the many 3D parts round your viewpoint as you traversed the sport world, you’ve skilled the nice (or unhealthy) utility of an idea often known as texel density. Texel density refers back to the variety of texture pixels (texels) per unit of 3D floor space. To create a way that the assorted props and units belong to the identical world, 3D artists should keep a constant texel density throughout all of the 3D fashions.
For video video games, texel density is especially necessary as a result of it immediately impacts each the immersion of the gamers and the efficiency of the sport engine. A decrease texel density can enhance recreation efficiency however at the price of decrease texture high quality, whereas a better texel density can enhance texture high quality however can negatively influence recreation efficiency.
When creating 3D renders as stills or animations, managing texel density is simply as necessary for a similar causes, and on this article, we’ll take a more in-depth take a look at how to consider texel density because it pertains to creating 3D scenes typically, and the right way to do it in Blender utilizing an important addon by Ivan Vostrikov.
An intuitive understanding of texel density
Let’s take a look at these rock fashions:

One thing doesn’t really feel proper, does it? If we take a more in-depth look, we are able to see that the smallest rock has very crisp textures, whereas the biggest rock’s textures are blurred, and the remaining rock is at an ungainly center. These rocks all share a single UV area, however the sizes of their UV shells don’t replicate their precise measurement within the digital area they occupy.


By resizing the UV shells of every rock in accordance with its measurement, we’ll get a extra constant degree of constancy throughout all three. We are able to do that by making use of a checker texture on the fashions and resizing the shells till the checker tiles on all rocks are the identical measurement.


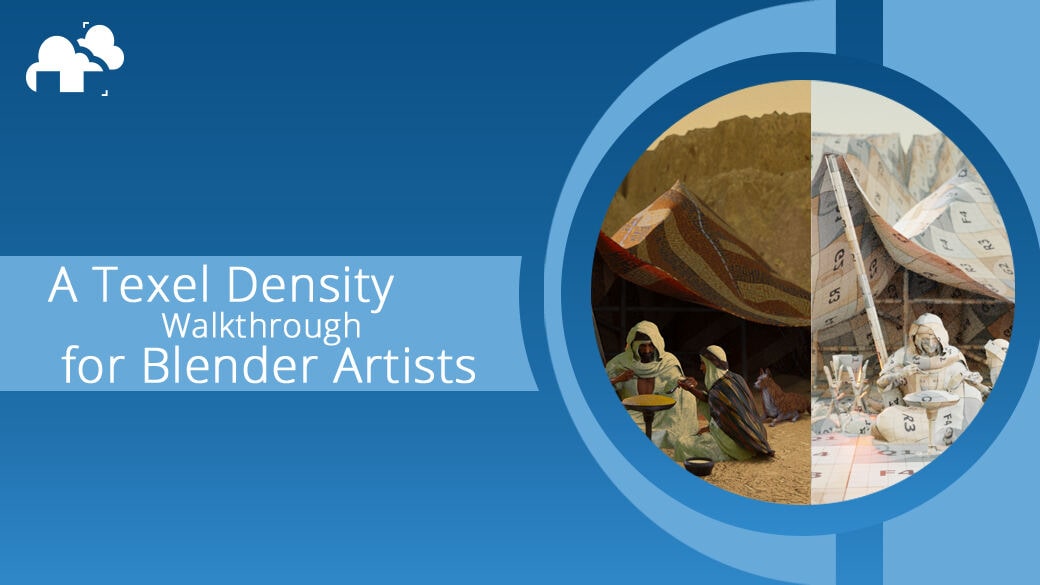
That, in essentially the most primary phrases, is texel density. Whereas the texel density of any given object or floor is an absolute worth, the true significance lies in how proportionate the densities of surrounding objects are to it. As an instance, let’s say we had been getting ready to create a render based mostly on a picture we discovered on Pinterest:

Texel density in scene creation
As we make our plans, it will profit us afterward to find out what texel density to work with as early as now. For this picture, the bottom may function an excellent start line because it’s comparatively near the place the digicam can be. Let’s begin by making a airplane with a checker map texture 4096 x 4096 pixels in measurement:

The feel element at this measurement and digicam vary appears adequate, so let’s go together with it! Now that we’ve some extent of reference, we might begin creating our fashions and unwrapping them. Let’s assume that’s over and executed with.
Right here’s our scene at this level:

For this text, we’ll be working with the foreground parts and the characters’ clothes, however we’ll save the mountains and the characters themselves for a future article about UDIMs. Keep tuned!
We may approximate the texel density for every of the weather based mostly on our checker mapped floor airplane, however that will be tedious and because of the work of Ivan Vostrikov, pointless! As a substitute, we’ll use his useful Texel Density Checker addon, which is obtainable at no cost, however definitely value leaving a donation for!

Let’s pull up the addon from inside our UV Editor:

We’ve got our floor airplane’s UV shell occupying your entire UV grid, and we all know our checker texture has a 4K decision, so we’ll set our Texture measurement accordingly and (arbitrarily) have our items at pixels per meter.
By hitting “Calculate TD” we are able to see that our shell occupies nearly 100% of the 0-1 grid, and has a density of 524.665 px/m. Let’s hit “ Calc-> Set Worth” to ascertain this worth as the purpose of reference for our different UVs:

Now if we choose some other unwrapped mesh, we are able to use the “Set My TD” button to scale the UV shells or islands in proportion to the reference worth.

Beginning with the tent flaps, let’s choose all of the islands within the UV Editor and select “Common” for the “Set Methodology” discipline within the texel density checker panel. Selecting common will scale the entire chosen islands proportionally to the worth that was set.

Let’s do the identical for the tent poles.


For the reason that poles are a lot smaller in comparison with the bottom, the islands have shrunk correspondingly, and we’re now left with a variety of empty area within the UV Grid, which might be a waste of texture area. Listed below are some methods we are able to optimize issues:
1. Change Texture Dimension
If we needed a devoted set of textures to this mesh, we may scale back the feel measurement.

By altering the Texture Dimension from 4096 to 2048 and hitting “Set My TD” once more, we are able to make use of extra texture area.
2. Set Customized Texture Dimension
A measurement of 1024 would have been ultimate, however the islands had been just a bit too large for the grid. We may set a customized measurement to get round this, however that will imply having to work round any unpredictable tiling throughout our texturing section.

3. Share UV Grid with different fashions.
Sharing the UV Grid with different meshes is the optimum strategy to maximize texture area and scale back the quantity of maps your render engine must compute throughout rendering. This makes the venture file lighter and render sooner, although by how a lot is determined by the variety of fashions within the scene that use picture textures. If we had been to animate this scene and use a web based render farm to render out frames, this methodology would assist immensely in driving down bills.
The draw back of this method nevertheless, is that texturing every mesh that shares this UV grid would require extra manoeuvring in our texturing utility, particularly if the meshes are supposed to have totally different floor traits.
In any case, we’ll use this tactic for our demonstration.
A be aware about UV format
When utilizing Texel Density Checker, there might be cases the place setting the texel density on a number of islands directly results in overlapping UVs. A workaround for that is as follows:

Use Blender’s annotate instrument to mark the size of a shell. Then use the Pack Islands operation to make sure that every thing is laid out properly.

After, merely scale the islands down till the shell you used as reference aligns along with your mark.

For the sake of brevity, let’s take a look on the closing UV layouts for all of the objects that had been achieved utilizing the steps outlined to this point, (with just a few adjustments right here and there to some seams in meshes for higher format).


Here’s a density verify for the render:
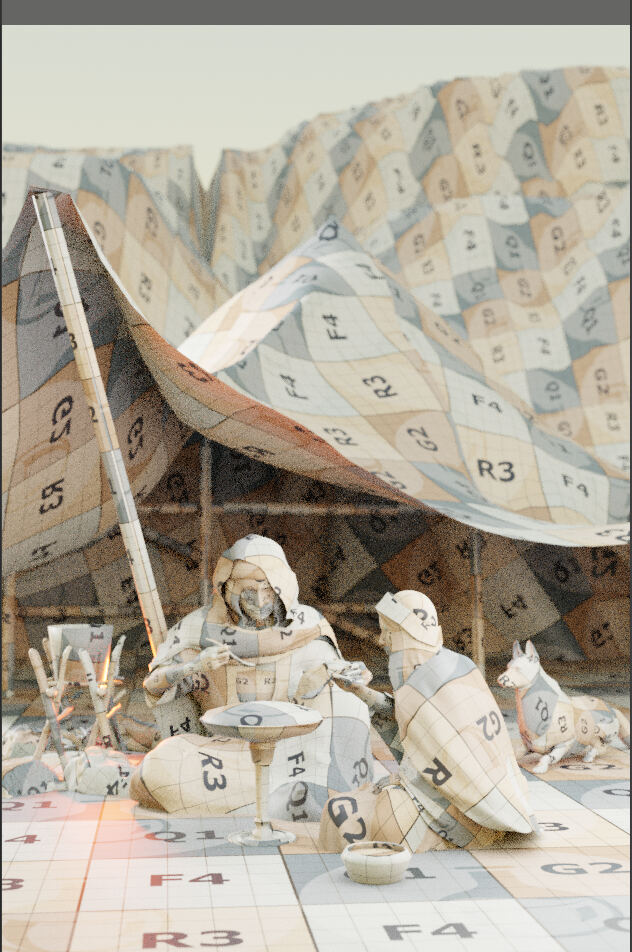
Each component that we labored on within the shot has a constant Texel Density!
And right here’s an preliminary render to function our work in progress:

Parting phrases
Whereas the idea of texel density is extra steadily mentioned amongst recreation artists, hopefully this text has proven how important it’s for 3D rendering typically, in addition to the right way to begin incorporating it into your observe in Blender. Take into account nevertheless, that outdoors of making property for video games there are a lot much less technical constraints imposed upon you, and so the age-old knowledge of “if it seems good, it IS good” bears remembering. I hope this text was helpful to you, and as all the time, Joyful Rendering!