
INTRODUCTION
Hiya, my title is Libor Batěk, and I am a CG artist from the Czech Republic. With over 20 years of expertise within the trade, I’ve labored on TV commercials, animated options, and video games in varied roles together with 3D generalist, lookdev artist, and supervisor. At the moment primarily based in Prague, I dwell and work right here, dedicating my time to creating 3D artwork for private enjoyment and taking over occasional artwork commissions. These days, I’ve been actively concerned within the skilled growth of open-source VFX/animation pipelines for software program corresponding to Blender, Maya, and different DCCs (ynput).
On this article (due to Blendernation!), I want to share the numerous suggestions and tips I’ve realized over time as an alternative of offering a boring step-by-step breakdown. I imagine that the readers are proficient artists and already conversant in utilizing Blender, so it is not essential to information them each step of the way in which. I hope you discover this info helpful on your subsequent nice venture!
So let’s get began!
INSPIRATION
Sooner or later, I got here throughout an article on the internet concerning the ugliest canine on this planet, and it sparked an thought in my head. I started trying to find footage of poor and ugly canine and located one which I actually preferred. There are such a lot of instructions you’ll be able to take with regards to non-pretty canine. I even found a canine nicknamed “Mr. Comfortable Face,” which I liked a lot that I made a decision to make use of the title for my character as nicely. It is a bit twisted and absurd, however it matches the character and general temper completely!

Initially, I had deliberate to create a head bust sculpture with all the gorgeous pores and skin wrinkles, scars, and hair as a technique to take a look at the brand new node-based hair system in Blender. I assumed it might be a fast venture for testing functions solely. Ultimately, it turned out to be rather more than that.
PROCESS
Initially, it was only a fast sculpt research, as you’ll be able to see under (roughly an hour of sculpting in Blender). I began with the default sphere and used a couple of sculpt brushes for blocking. More often than not, I relied on the common brushes like “Clay Strips,” “Draw Sharp,” “Scrape plus Easy,” “Elastic Deform,” and “Clay” as my important brushes.
NOTES
Utilizing the grease pencil’s “Annote” device instantly gave me the concept of what I needed to attain later. I extremely suggest utilizing this device not just for notes throughout work however for all inventive functions.

Tip: Talking of inspiration, all the time carry a notepad with you and jot down something that catches your consideration. You by no means know, it would turn out to be your subsequent huge thought or venture! The worst-case situation is dropping a vivid thought identical to a dream proper after waking up!
SCULPTING
After I had already shared the tough sculpt on social media, I continued engaged on the mannequin and sculpted it additional. It primarily concerned spending extra time observing the reference and sculpting, specializing in transitioning from huge to small types. Leaping from one space to a different has confirmed to be an excellent observe in sculpting typically. This manner, you’ll be able to construct the general kind and make changes when wanted. It is also extra pleasant since you’re not locked into one small element for a very long time, conserving your mind engaged.
I’ve to confess that figuring out the ultimate viewing angle additionally helped me keep away from spending pointless time on components that would not be seen within the closing art work—sure, a little bit of dishonest right here and there! Keep in mind, it is necessary to make use of your time and vitality correctly.

Tip: Plan your venture forward nicely, take your time, and put together a “battle plan” so that you could focus your work on necessary elements. Use blocking with proxy objects to shortly get an thought, after which “fill within the puzzle items” with extra detailed objects later.
CHARACTER-DESIGNING
As time went on, I instantly acquired an thought for a medium shot portrait with the higher physique and a punk rock model characterization. Do not ask me why, it simply got here to me, and I merely adopted that imaginative and prescient in my head.

I positioned these “puzzle items” one after the other till I ended up with a personality mannequin and a washroom setting that evokes a rock membership or pub.

Tip: Put in as a lot story as doable into each ingredient current in your art work. These little particulars lead the viewer and make them need to know extra concerning the topic. For instance, why do you assume I included flies? What’s the level? What do they impart to the viewer? Asking related questions helps create higher, story-driven artwork.
TEXTURING
For texturing, I used Substance Painter due to its ease of use and pace. Portray PBR-based textures is, I’d say, a weaker side of Blender. Substance was primarily used for the character, whereas the setting and props had been carried out in Blender/Affinity Photograph utilizing procedural shaders by SanctusLibrary (a paid add-on from Blender Market).
There is not rather more to say about it as a result of it is a fairly customary course of. I stored it so simple as doable, so I did not use UDIMs. As a substitute, I used extraordinary 4K single texture sheets for separate components. I caught to the “rule of kiss” as some sensible artist as soon as stated: Preserve it easy, silly!
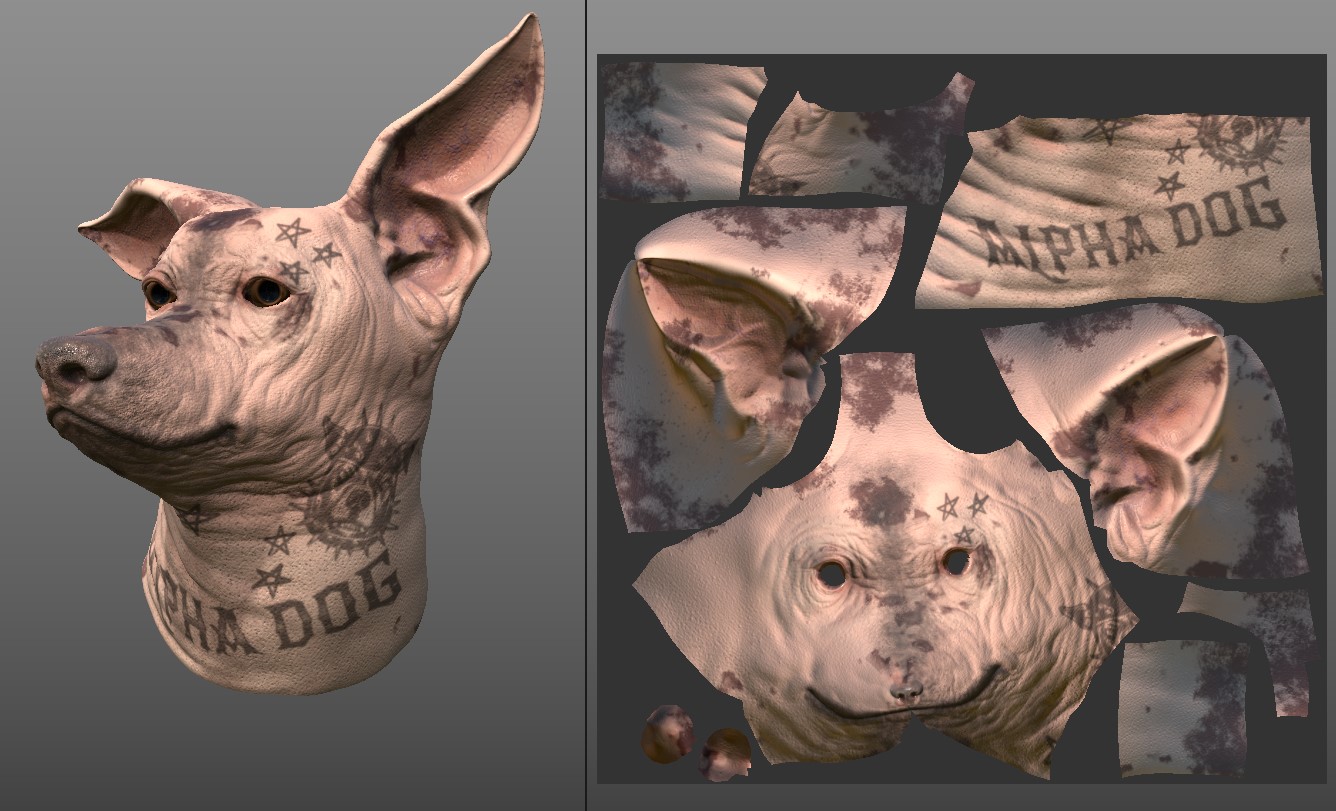
One texture sheet for the pinnacle of the character.

One other texture sheet for the jacket, with a separate one for the t-shirt, and so on.
Tip: When texture portray in Substance Painter, I principally use fill layers with masks into which I paint the areas of affect or paint cowl. This permits me to alter any parameter of the filling shade or texture of the layer afterward with none points and alter the masking anytime. It is a non-destructive strategy in comparison with direct portray with shade (alla prima) with out utilizing masks, which tends to be very tedious when modifications are wanted.
Talking of texturing, there have been quite a lot of graphic patterns concerned within the surfacing section, significantly on the wall tiles. I modified the graphic parts a number of instances to seek out the correct quantity of them, their measurement, and their placement within the composition.

Additionally, its ideation and creation took fairly a little bit of time, portray them by hand (utilizing Affinity Photograph and Rebelle app for simulating leaking/dripping shade results).
LIGHTING
When all of the textures for the scene had been carried out, I constructed a lighting rig for the scene. More often than not, I used space lights for his or her gentle high quality and pure feeling. I slowly constructed up the complexity and nuances, ranging from the primary strongest key gentle and including very faint small gentle sources to behave as native fill lights right here and there. Once more, following the observe of ranging from massive to small. It is value mentioning that individuals usually overlook about atmospherics/volumetrics, which contribute loads to the scene, so I additionally used the Principled Quantity shader in my scene. I additionally used some geometry objects as bounce playing cards or shadow casters, much like an actual studio setup.
Tip: Selectively turning off the contribution of lights to volumetrics is useful. In my scene, solely the mirror fluorescent gentle tube was contributing to the volumetrics, whereas the remainder of the lights weren’t (see pic above). Overlook what’s right in the actual world and bend the foundations to your inventive wants. There aren’t any guidelines, simply instruments!
Under, you’ll be able to see the development of my gentle setup, though it could not comply with the lighting course of chronologically, so take it with reserve. Nonetheless, this breakdown animation may very well be helpful for you.

Tip: When lighting a scene, isolate every gentle so you’re completely conscious of what every gentle contributes to the scene. Additionally, by no means gentle a scene in opposition to a black background, however use a pure one; in any other case, you’ll expertise worth shifts later when the background is current.
HAIR-MAKING
The final a part of the creation in Blender was the hairdo and hairs typically. It was the unique goal of the entire art work 🙂 As I discussed, I used the brand new Blender node-based hair instruments for that. There is not a lot to say about it, apart from the truth that it actually opens up many potentialities when doing hair any more in Blender, due to the brand new toolset for hair.

I used separate hair curve objects for every sort of hairdo and hairs for higher and simpler management. I used an alternate groom mesh (hidden for render) with a decrease polycount for flexibility, with out being restricted by the character mannequin itself. Every hair curve object had a unique density of kid hair and settings/kinds of modifiers.
Tip: When creating hair curves, use “Duplicate as Occasion” (Alt+D) for secondary hairs. This manner, you’ll be able to groom the unique hair curves and the situations can even replace. You may differentiate them through the use of modifiers. It is good for layering a number of hairs pushed by a single groom. As proven within the instance under: the “Hair” node drives the form, and the “Hair Messy” follows it, even when it is scraggly and far sparser. This manner, every time the primary hair mass modifications, the secondary sparse hair follows the grooming.

It was then only a matter of tweaking the hair modifiers and groom curves till I used to be pleased with the tip end result. Once more, stepping again from the work for a while helps tremendously. Then it was time for the ultimate render and fine-tuning it in 2D composition.
HANDLING WIP
An excellent observe is to take notes throughout the creation course of, noting what must be addressed, much like what a consumer or artwork director would do. Preserve doing it, and you’ll obtain higher outcomes. Right here you’ll be able to see my notes on what’s lacking or wants consideration/decision. Additionally, notice how drastically totally different this older model picture regarded. Thanks to those sorts of notes and observe, new ranges had been reached, to not point out the expertise gained. One of the best ways is to step away from the work, take your time, and are available again. Name it a luxurious, however if in case you have it, it is a huge win-win in the long run, imagine me!
Under is certainly one of my work-in-progress photos with self-made notes in Affinity Photograph to maintain issues on monitor. Despite the fact that not all of the notes made it to the ultimate art work, it’s nonetheless very useful to get to the end line!

DETAILING
Often, there are hidden particulars within the picture that are not seen to the viewer at first look. Nevertheless, spending time on these brings believability and credit score to the art work.
Phrases of knowledge: As my grandpa as soon as stated, “No one will ever ask you ways lengthy the factor took to make however who did it!” This counts for something you do in life! Take it or depart it 🙂
Including floor high quality and story to the objects within the scene by incorporating put on and tear, humorous parts, and even some message is important to attain the aforementioned targets.

Talking of particulars, I initially modeled the wall tiles as bodily objects, utilizing precise tiles. Nevertheless, after making an attempt the Sanctus Library addon, I instantly bought it and switched to a completely procedural wall tiles materials as an alternative.
In some screenshots, you’ll be able to nonetheless see the geometry-based tiles, however they weren’t used within the closing render. Including little tales right here and there may be the important thing to a profitable art work, such because the fly sitting on the sunshine tube, evoking a nasty and smelly rest room setting for the viewer. It is a small contact, however it counts.

FINAL RENDERING
The ultimate art work is 95% straight from Blender’s render and compositor, with a contact of compositing carried out in Affinity Photograph. I made slight shade corrections, added lens results like vignette, and included lens dust/flares across the neon gentle tube. I additionally adjusted the distinction barely inside the eyes to make them extra vivid, with slight highlights as if caustics had been taking place inside them.
Tip: Flip your art work horizontally for a recent view and make inventive selections usually. It is simple to get used to a sure orientation and turn out to be blind to any points or parts that might not be working nicely.
RENDER – Mr. Comfortable Face

Thanks on your consideration!
Hope it was fascinating, and also you realized one thing new. Have a pleasant day!
Concerning the Artist
Libor, an skilled CG artist specializing in 3D work for TV commercials, animated options, and video games, at the moment primarily based in Prague, Czechia.
