
Resolve 18 is full of some actually fascinating options that may take your edit to the following stage. Watch the video or learn on to learn to successfully use the Floor Tracker and Depth Map results in your workflow.
For this tutorial, we’ll be utilizing this stunning mountaineering shot beneath. You’ll learn to use the Floor Tracker to take away the path marker that’s painted on the rock, and the Depth Map impact to paint grade the sky in a different way from the foreground on this picture. Let’s begin with eradicating the path marker.

Floor Monitoring
Open up your results browser, discover the Floor Tracker and drag it into the node tree. The Floor Tracker has two inputs – enter one is for the picture that you’re monitoring and trying to patch. Enter two is for the patch that you simply’re going to venture onto the Floor Tracker. In the intervening time, feed enter one and enter two the identical picture, it’ll change into clearer why we’re doing that later.
When you choose the Floor Tracker node, the OpenFX overlay is robotically chosen in your viewer. As proven within the picture above, by clicking on the preview of the clip, you possibly can create the boundary of the floor observe. On this case, we’ve intentionally chosen to do that on the final body of the clip, as a result of the digicam’s pushing nearer and also you get one of the best view of the path marker on the final body of the clip.
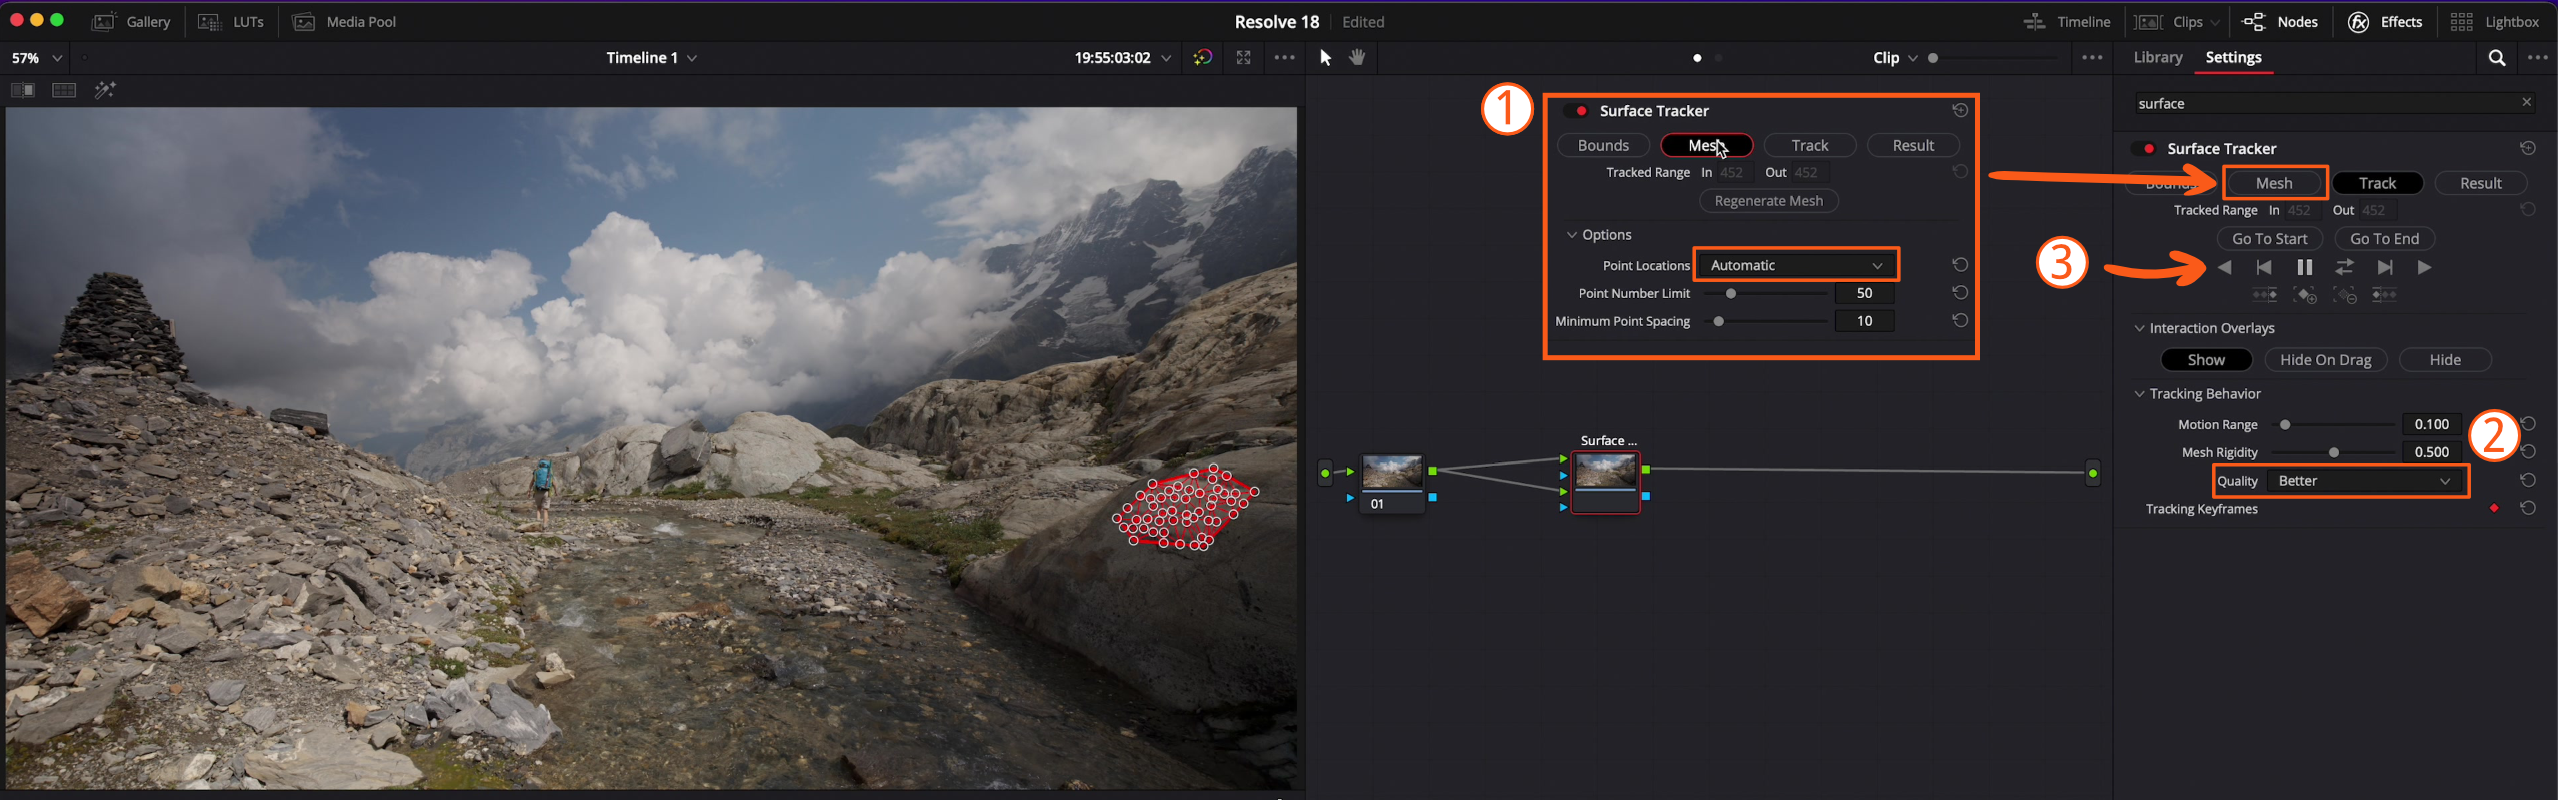
Subsequent, head over to the mesh tab. There’s two alternative ways for Resolve to generate this mesh: the primary is automated (1), the second is utilizing a uniform grid. For this instance, stick to automated level areas, as a result of there’s loads of good crisp options for Resolve to trace. Now, go to the observe tab, and alter the standard from quicker to higher (2). And since we’re on the final body of video, you’ll need to click on observe backwards (3).
Now, we will head to the outcomes tab. The Floor Tracker is presently set to warping enter two onto enter one (4) – it’s mainly taking a snapshot of that second enter, only one single body, and warping it onto that floor because the video performs out.
Which body is it utilizing? For the time being, it’s presently utilizing the primary body, so change the overlay supply to our reference body. Since you began the observe from the final body of the video, by default, that body has been set because the reference body (5). You may see right here that reference body is body 452 (6). It’s fairly simple to vary your reference body, simply place the playhead and click on, set to present.

At this level, you is likely to be questioning why the path marker is simply as seen as ever. It is because we’re now going to reposition the overlay that’s being utilized to the Floor Tracker, to lastly get the impact we would like.
You may shift the overlay utilizing sliders, or alternatively, simply by clicking and dragging on the canvas (7). Whenever you transfer the canvas round watch out, should you click on and drag on the pink traces, you’ll warp or distort the picture. However should you click on someplace within the center, it’ll simply do a easy translation.
We’ve received a pleasant clear patch of rock below the path marker, so transfer the overlay up to make use of the clear rock to patch the path marker. Modify the softness so that you don’t get a tough edge on the Floor Tracker’s bounds (8). Lastly, pipe the patch via a corrector node (9), and use a bit little bit of gamma to match the rocks higher.
Depth Mapping
Subsequent, let’s take a look on the Depth Map impact. Begin by dragging the impact into your notary. For the time being, the Depth Map impact is a bit bit processor intensive, so prepare to attend some time and to place up with slower playback.
As you possibly can see by the preview subsequent to the colour wheels, it’s accomplished a reasonably good job of figuring out the depth within the scene. As a result of that is an OpenFX node, it’s not a corrector node, so you possibly can’t apply any corrections to it.
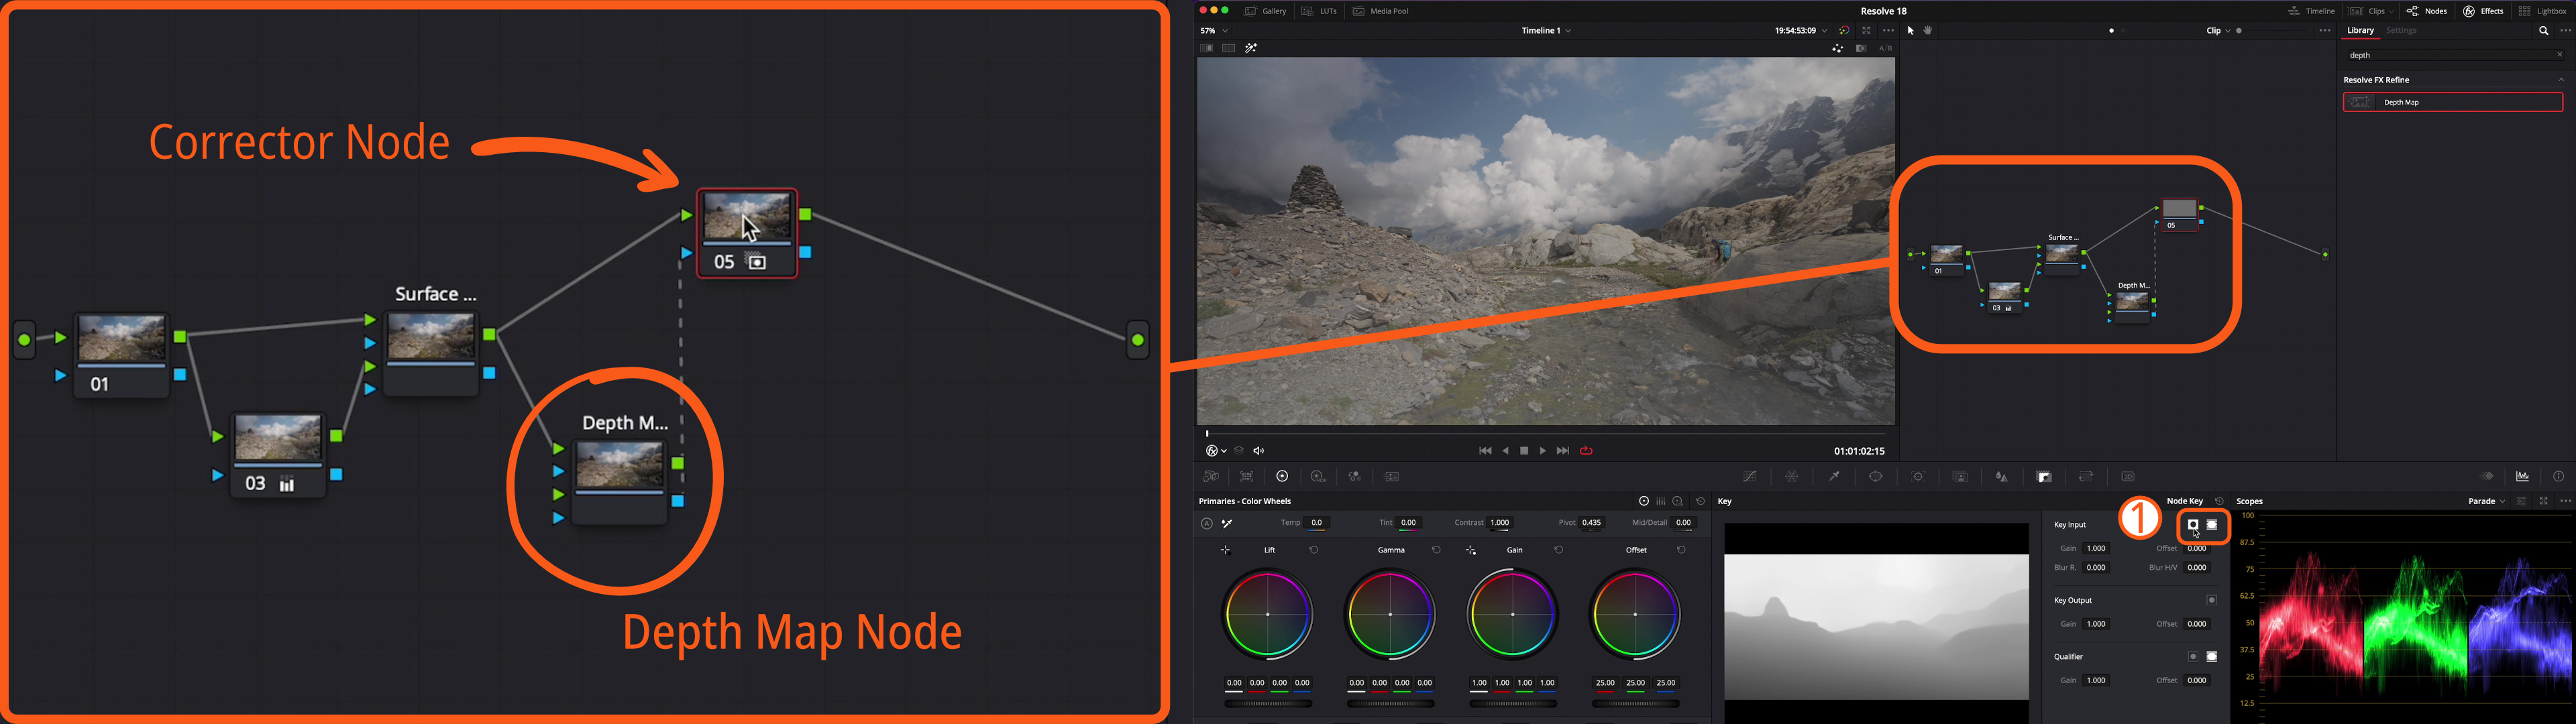
What it’s essential do is ship the alpha channel from this node to an strange corrector node, after which you should use it to make changes. If you happen to head over to node 5 and activate spotlight mode, you’ll see that it’s simply deciding on the foreground of the picture – that’s simple for me to repair within the node key controls, you possibly can simply invert the important thing (1).
This isn’t significantly useful in the mean time – though it’s deciding on the sky, it’s additionally deciding on plenty of the foreground. You’ll discover although that the foreground turns into extra clear the nearer we get to the digicam.
Let’s head again to the Depth Map node. Flip your preview again on (2), and examine the field ‘alter map ranges’ (3). By manipulating the close to restrict and the far restrict, you can also make the Depth Map extra aggressive.
It’s mainly an alpha map – white represents components of the picture which can be going to be opaque. Black represents components of the picture which can be going to be clear (with the caveat that you simply’ve flipped the important thing in your corrector node). Flip the Depth Map preview again off and return to corrector node quantity 5 and drive some cyan and blue into the gamma (4).

Subsequent, seize one other corrector node, connect with the alpha channels, and choose an influence gradient (5). Use this simply so as to add a bit little bit of a gradient to the sky, so it will get darker as you go up (6). Regardless of how far down you drag this gradient window, the grade is just not going to have an effect on the foreground of the picture since you’re utilizing the Depth Map to manage its opacity.
The Closing End result
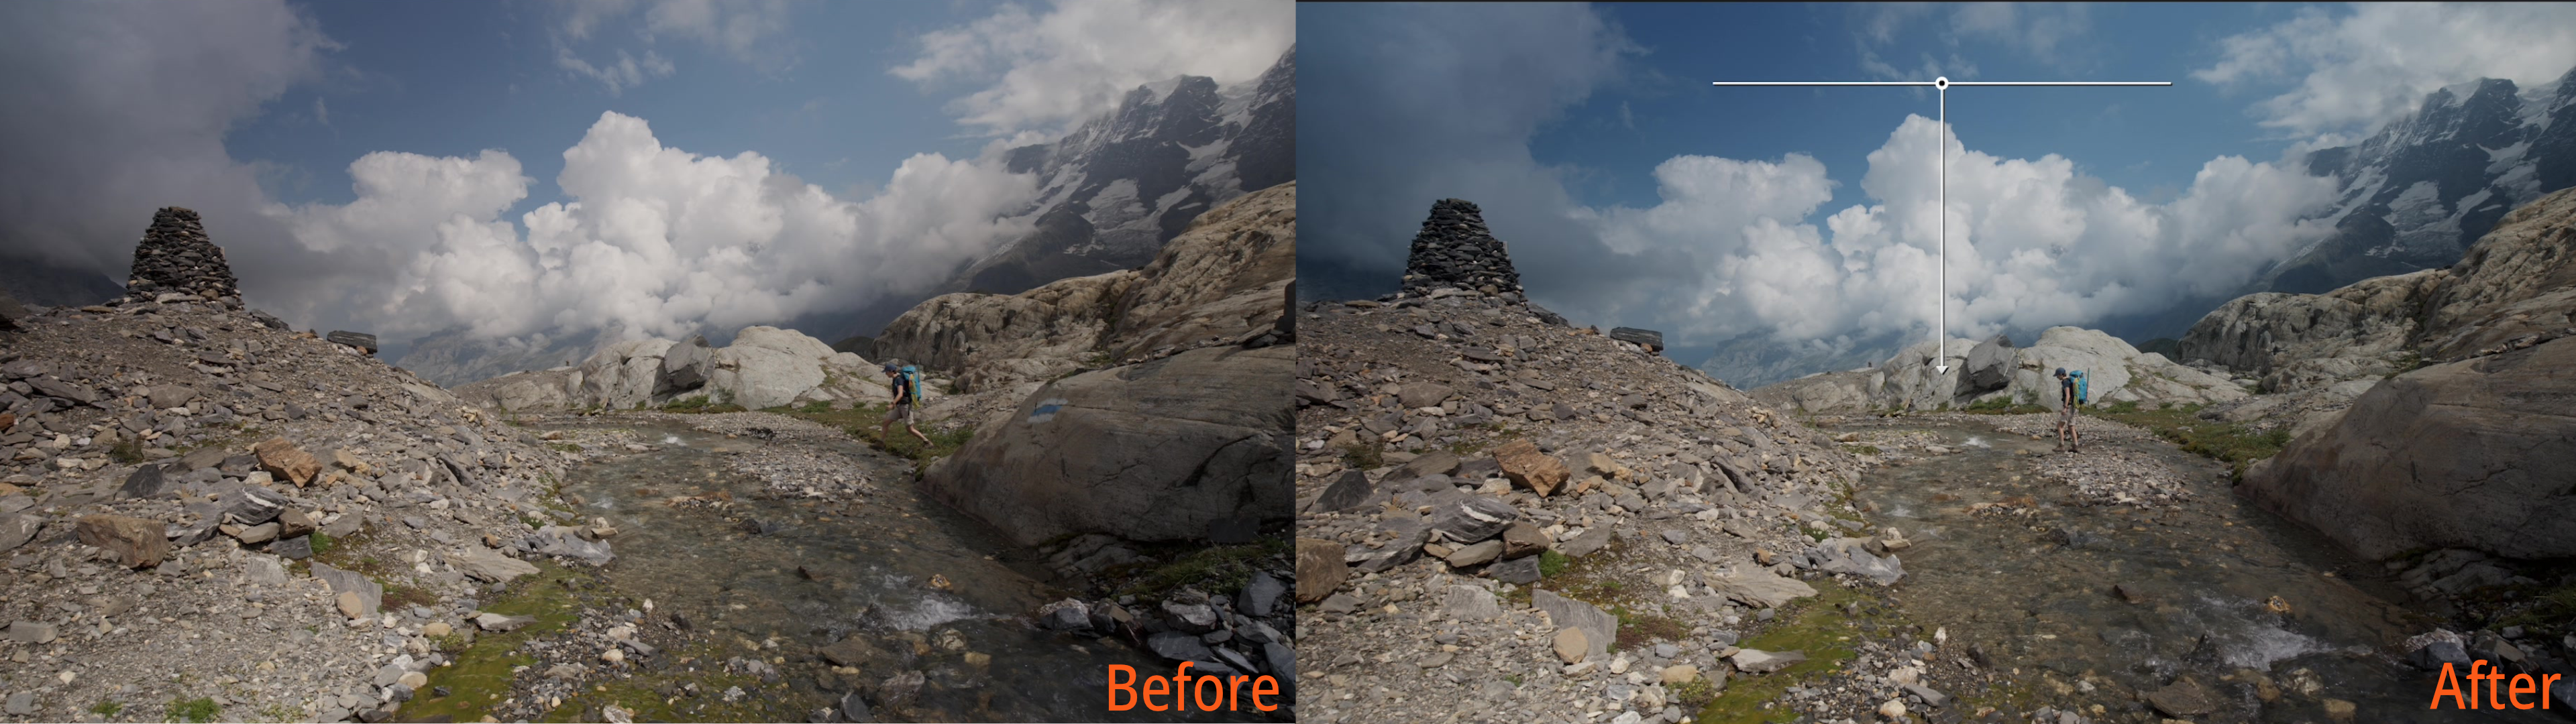
This completes our enhancing for this shot – you possibly can see the clip earlier than enhancing, and a preview of the brand new clip beneath. When enjoying again the footage we discovered you get about six to eight frames per second on an M1 Max MacBook Professional. Possibly this may get a bit bit higher with subsequent releases that make the impact extra environment friendly, however for now that is greater than adequate so that you can preview the results of the grade.
Bettering the Floor Mesh
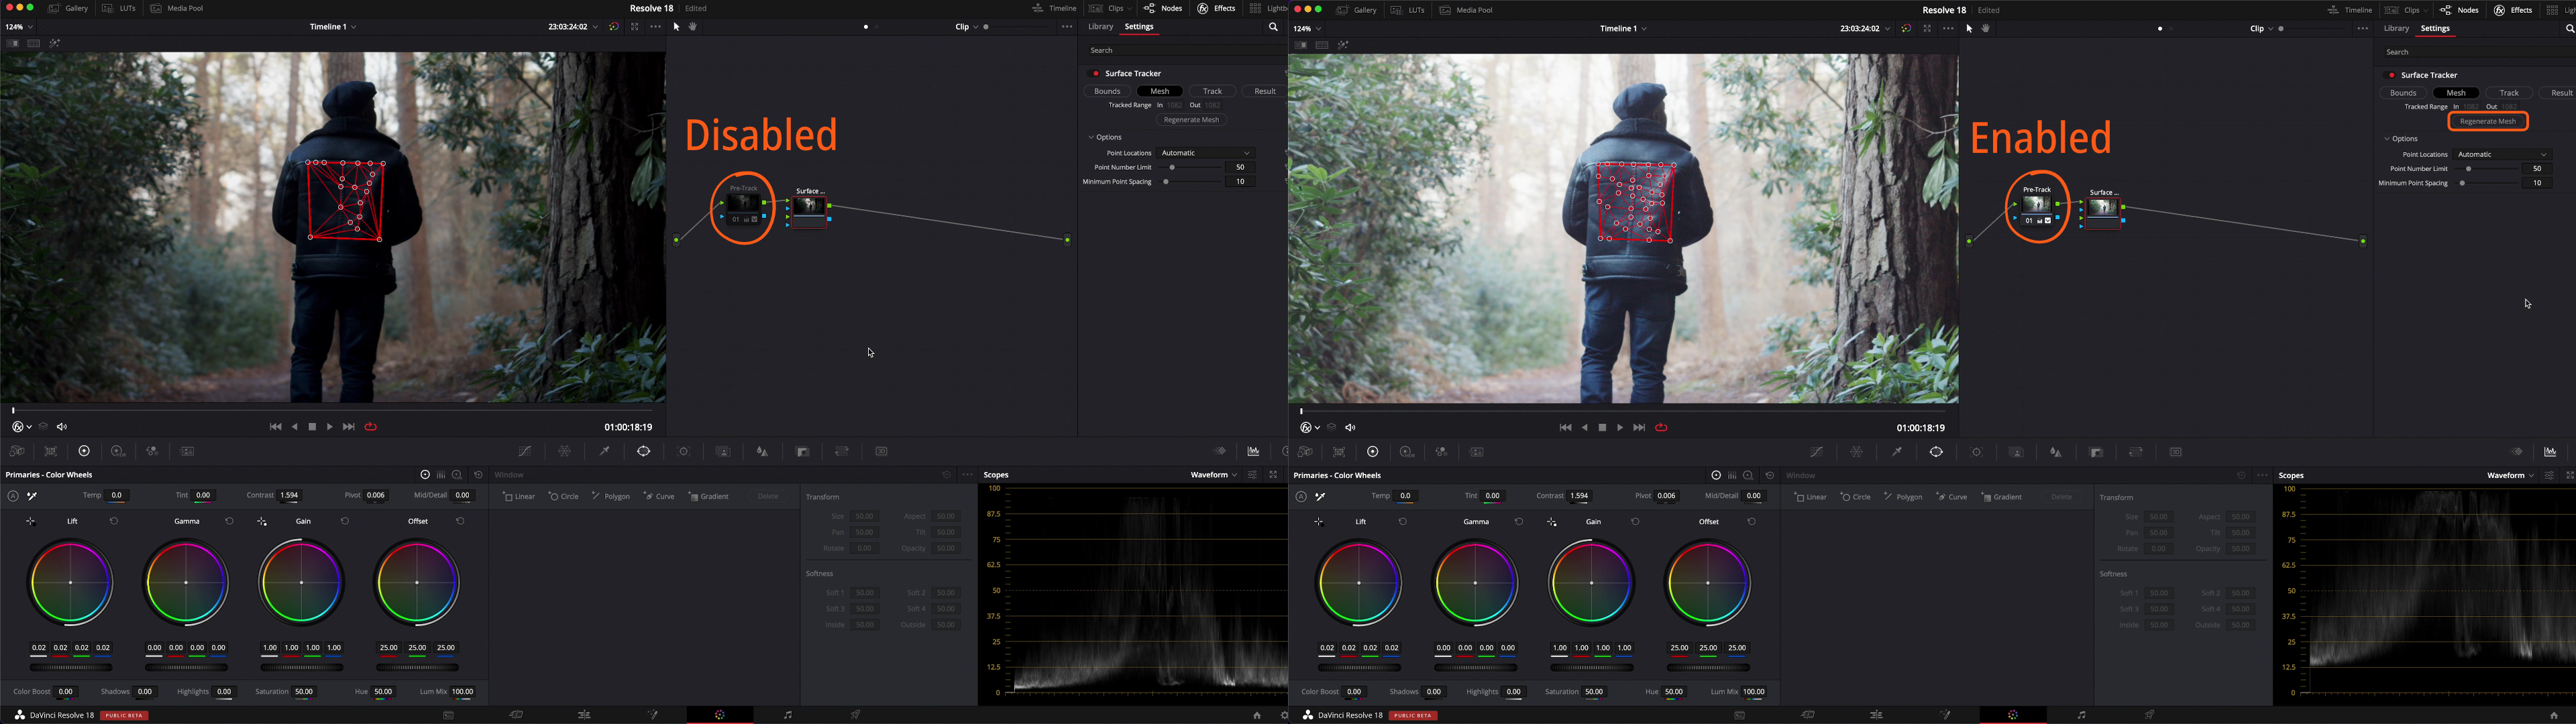
Listed below are another clips that permit us to have a look at the Floor Tracker and Depth Map impact in numerous eventualities. The Floor Tracker doesn’t use your unique supply media, it makes use of no matter adjustments that you simply’ve made in any of the corrector nodes which can be upstream from it. Which means there are issues that you are able to do that make your picture simpler or tougher to trace.
To display, within the clip proven beneath, each time you click on ‘Regenerate Mesh’, Resolve will analyze the picture and create a mesh based mostly on the factors of curiosity it finds, such because the jacket.
Look what occurs should you activate the upstream node that improves the distinction and the visibility of the jacket. Whenever you come again into the mesh tab and hit regenerate mesh, you’ll see that it identifies far more factors as part of its mesh.
On flat photographs just like the one beneath, the Depth Map impact is incredible for isolating foreground topics.
Strive the isolation instruments – on this case the topic is within the foreground, so you’ll lower the goal depth (1). The plugin received’t offer you a pixel good masks, so it’s not an alternative to correctly rotoscoping somebody out. However should you head again to the Depth Map, you possibly can activate the map finesse put up processing controls and add a bit little bit of blur (2). Now you can manipulate simply the foreground of this picture.

Combining Nodes
Depth Map does a very good job even with complicated scenes just like the one beneath. In Depth Map, you possibly can see the mannequin strolling, the entire signal posts, the and the bus that’s passing. These alter map ranges controls are actually, actually good, however there are different methods that you could manipulate the Depth Map.
For instance, should you pipe its output to an strange corrector node, you possibly can then manipulate that Depth Map utilizing curves. There are eventualities the place you may discover {that a} extra intuitive manner of enhancing it.

Wrap Up
When utilized appropriately, Depth Mapping and Floor Monitoring are highly effective instruments that may make colour grading and different post-processing results so much simpler!
If you happen to’re all in favour of getting began with Resolve, take a look at our newbie coaching. For extra tutorials about inventive enhancing on the whole you’ll want to go to our coaching web page.
There, you possibly can obtain free enhancing guides together with top quality video programs created by our crew {of professional} Hollywood editors.