
Launched virtually a yr in the past, the Mini 3 Professional continues to be a very fashionable Mini drone. As such, it’s straightforward to fly and excellent for learners. It’s light-weight, moveable, and excellent for journey bloggers and social media content material creators alike. Additionally, for extra skilled operators, it has a number of “professional” options that make it an amazing backup for skilled work.
The “Professional’ within the Mini 3 Professional, partially, is because of its 1/1.3-inch CMOS digicam with the ability to take 48 MP footage in addition to shoot video in resolutions as much as 4k 60 FPS, amongst different issues.
On this article and the included YouTube video, we are going to go over easy methods to change the assorted photograph settings inside the DJI Fly app, by getting out of Auto and into Guide Mode, utilizing the digicam to its fullest potential.
DJI Mini 3 Professional Picture Settings
The Mini 3 Professional comes with a digicam that, out of the field, shoots 12MP nonetheless photographs, which is identical megapixel rely because the iPhone 14 and iPhone 14 Plus.
Digging deeper into the settings, you’ll see that the Mini 3 Professional may shoot 48MP stills, just like the iPhone 14 Professional and Professional Max. We’ll talk about easy methods to entry this capturing mode, shortly.

If you need to know extra about drone images basically and a extra in-depth dialogue of a number of the terminology used on this article, be at liberty to move over to our article Drone Pictures: Newbie’s Information to Getting Began.
Picture Mode
For this text and video, we’ll make our settings adjustments in Picture Mode.
To entry Picture Mode, whereas within the DJI Fly app:
STEP 1: Press the icon above the shutter button on the best.

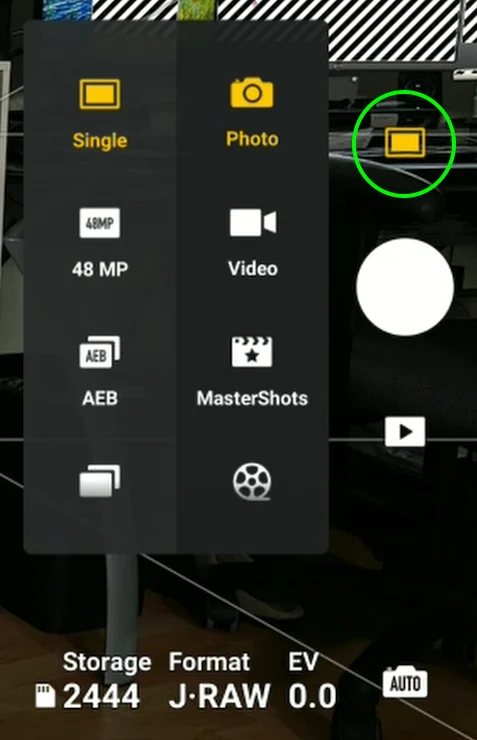
Right here you’ll see Picture, Video, Mastershots, Quickshots, Hyperlapse, and Pano.

STEP 2: Select the Picture possibility/icon.
Nonetheless Pictures Modes
When selecting Picture Mode, you’ll see that there are numerous nonetheless images modes that may be set on the left aspect of the Picture Mode space, much like some discovered on normal DSLR and Mirrorless cameras. These modes are:
- Single – a single-shot photograph
- 48 MP – Utilizing Quad-Bayer Expertise, 48MP are produced on the 12MP sensor, creating sharper pictures
- AEB (Auto Publicity Bracketing) – shoots 3 or 5 bracketed frames at 2 publicity values. Utilized in HDR photograph merging
- Burst – takes as much as 7 photographs inside a number of seconds
- Timed Shot – set a timer (between 2 and 60 seconds) and the Mini 3 Professional will take a photograph when the timer expires
To vary between these nonetheless images modes, merely select the one you’d like to make use of.
Professional (Guide) Mode
To get probably the most out of your photographs, you’ll wish to take management again from the Mini 3 Professional (Auto Mode) and go into Professional Mode.
To modify to Professional Mode:
On the underside proper of the Reside View display, you will note an space the place the digicam settings are situated.
In Auto Mode, you’ll solely see the next digicam settings obtainable: Format (J, J+R) and EV (Publicity Worth).

STEP: Faucet the digicam icon that claims Auto and it’ll then mechanically change to Professional Mode.

After getting into Professional Mode, you’ll see that there at the moment are fairly a number of choices obtainable so that you can modify.
Be aware: After switching into Professional Mode the display could go darkish, because the settings is not going to be adjusted for the present lighting situations.
On the underside of the Professional Mode display, you’ll see J+R, 16:9 or 4:3, WB, S, F, ISO, and MM. Apart from MM (handbook metering) and F (the mounted aperture of 1.7), all of the choices are adjustable and help in getting the right publicity and the very best image attainable.
To vary these values, merely press the world on the backside of the display.
J+RAW
J+RAW denotes JPEG and RAW, that is your image file format. If you happen to faucet J+RAW it is possible for you to to change to both JPEG solely or hold the format as each J+RAW (JPEG and RAW), with the Mini 3 Professional capturing and saving each codecs concurrently to the SD card.
16:9 or 4:3
That is the facet ratio of the image you’ll be taking. Relying in your possibility (16:9 or 4:3), that format will present right here. You may change the ratio by tapping on this quantity.
Though the 4:3 ratio picture doesn’t take up your complete Reside View display, if you’re trying to get probably the most out of the Mini 3 Execs picture sensor, select the 4:3 possibility. You may crop the picture to the size you’d like to make use of in photograph enhancing software program.
W (White Steadiness)
White stability evens out the colour temperature in a photograph to make the picture’s coloration look extra pure and more true. That is finished by making the picture Cooler or Hotter, from 3000k (kelvin) to 8000k.
Within the DJI Fly app, the White Steadiness is not represented by Sunny, Cloudy, Incandescent, and Customized, because it was within the Go4 app. White Steadiness is now adjusted utilizing a White Steadiness slider. The slider is in numerical kelvin values.
Tip: You may also forgo manually altering the kelvin (okay) values and simply select Auto. In Auto, the Mini 3 Professional will attempt to resolve what White Steadiness values are finest for the present capturing situations.
S (Shutter)
This controls how lengthy or how quick the shutter is open. Decrease numbers let in additional gentle, whereas Greater numbers decrease the sunshine allowed into the digicam.
When taking footage, you should utilize the shutter pace to manage the brightness of the sunshine within the picture.
The shutter can be used to control movement blur in movies, one thing we are going to talk about in our video article.
ISO
ISO is the worth of measure for a digicam’s sensitivity to gentle. As you enhance the ISO quantity (the bottom being 100) the brighter your picture can be.
Remember that the upper the ISO is raised, the extra noise or grain is launched into the picture. The Mini 3 Execs ISO vary is between 100 and 6400, for each photographs and movies.
When attainable, hold the ISO at 100 and, as talked about prior, use the digicam’s shutter pace to regulate picture brightness.
MM (Guide Metering)
That is much like the Publicity Worth (EV) in Auto mode. Nonetheless, not like the EV in Auto Mode, you can’t change the Guide Metering worth in Professional Mode.
Guide Metering is a value-based information that tells you when your publicity is right based mostly on the ISO and Shutter.