Understanding methods to add and customise shapes on a slide is likely one of the constructing blocks of studying ActivePresenter 9. When you change into skillful in form, you are able to do a lot extra. Discover the fundamental manipulation with shapes by at present’s tutorial.
This text covers:
Earlier than going forward, let’s obtain ActivePresenter by clicking the button under:

Overview of Shapes
As you may see, ActivePresenter affords customers an unlimited variety of shapes. Actually, even a textual content caption you add to a slide is a form with a No Fill and No Line property basically.
All shapes are positioned within the form gallery. This gallery consists of 5 sections representing 5 teams of ready-made shapes, specifically Fundamental Shapes, Callouts, Strains and Arrows, Block Arrows, and Stars. Every group has many shapes with totally different types. And right here is the ActivePresenter 9 form gallery.
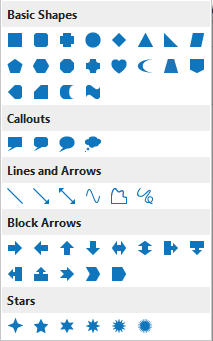
- Fundamental Shapes: This part comprises widespread shapes such because the oval, triangle, dice, coronary heart, and so forth.
- Callouts: This half affords speech and thought bubbles.
- Strains and Arrows: These are straight and curved traces, with or with out arrowheads. Moreover, there are alternatives for creating freeform paths and scribbles.
- Block Arrows: This part affords you a complete assortment of arrow shapes.
- Stars: This half contains many various kinds of stars.
Normally, the shapes’ preliminary coloration, line coloration, textual content coloration, and font are decided by the theme used for the present slide. Nonetheless, you may customise these properties utilizing accessible instructions. We’ll focus on these strategies within the latter a part of this tutorial.
In addition to, the app enables you to order, align, and group a number of shapes as you do with a traditional object.
Add a Form
Firstly, let’s say you wish to insert an octagon form. Right here’s how:
Step 1: Entry the Insert tab > Shapes ![]() . Alternatively, click on on Shapes within the Dwelling tab.
. Alternatively, click on on Shapes within the Dwelling tab.
Step 2: Choose a form you need and click on anyplace on the Canvas.
Tip: You may insert a form into a number of slides on the identical time. See Inserting and Deleting A number of Objects to be taught the process.
Customise Form Properties
Change Form Appearances
After inserting a form, it’s straightforward to alter its look in ActivePresenter 9. Simply observe the performances under:
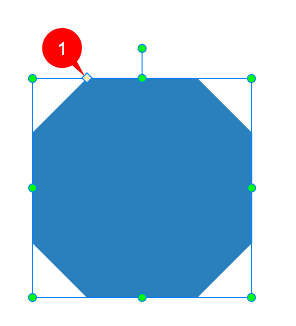
- Change the scale of the form by dragging the yellow diamond (1).
- Transfer the form to a distinct spot on the Canvas by dragging and dropping it. Alternatively, entry its Properties pane > Dimension & Properties tab > Rework part > alter the Left and Prime combo containers’ worth.
- Resize the form by merely dragging its resizing handles. Or navigate to its Properties pane > Dimension & Properties tab > Rework part > alter the Width and Top combo containers’ worth.
- Rotate the form by right-clicking it > Rotate > Rotate Proper/Left 90*. Or, drag the rotation deal with. See Rotate Objects for extra data.
- Flip the form by right-clicking it > Rotate > Flip Vertical/Horizontal. See Flip Objects for extra data.
Add Textual content to Form
ActivePresenter 9 additionally permits you to add textual content to the form. Do any of the next:
- Click on inside the form to enter textual content.
- Click on the form and press F2 in your keyboard.
- Proper-click the form and choose Edit Textual content.
Customise Form Types
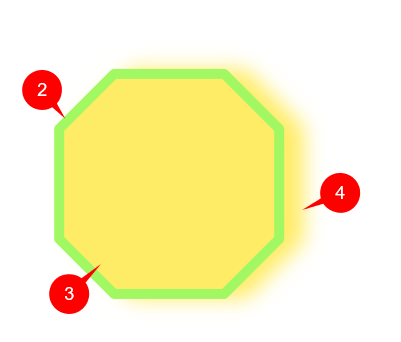
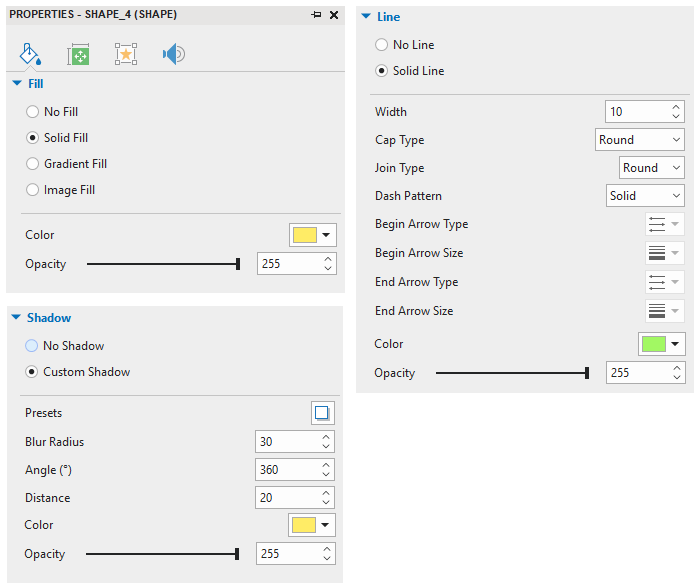
Usually, every form has three fundamental properties: Line (2), Fill (3), and Shadow (4). So, to customise the look of shapes, simply change any of those properties.
ActivePresenter 9 affords you 4 methods to customise form kinds:
- Customise the theme used for the present slide. Check with Easy methods to Work with Themes for additional data.
- Use the Format Painter instrument. Check with Apply Formatting Types for element. (hyperlink phần bài của Hằng
- Apply ready-made kinds.
- Change every property of the form manually.
Now, let’s learn to use the third and fourth strategies intimately.
Use Prepared-Made Types
To fashion shapes utilizing ready-made kinds, take the next steps:
Step 1: Choose a number of shapes.
Step 2: Do any of the next:
- Choose any fashion within the Fast Types field that shows accessible within the Format tab. To have extra kinds, click on (5). Or click on (6) to indicate the Theme Types gallery.

- Choose Fast Types within the Dwelling tab. This opens the Theme Types gallery. Subsequent, click on any fashion you need.

Word:
- Types within the Theme Types gallery differ in line with the theme used for the present slide.
- The Format tab is a contextual tab that solely seems when you choose a form or variants of form objects.
Use Type Instruments or Properties Pane’s Instruments
Now, you may change every form fashion manually utilizing any of the next methods:
- Use instructions within the Dwelling tab or Format tab.
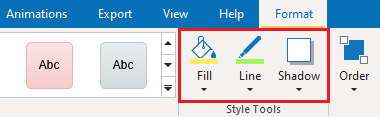
- Work with the Fill, Line, and Shadow sections within the Type & Results tab of the Properties pane.
In each these strategies, instructions are quite common. So, styling a form comes naturally to you, for certain.
Tip: If you’re finished with customizing a form, right-click it and choose Set as Default Form. That manner, the present formatting might be set as default and used every time you insert a brand new form within the present undertaking. However, you should utilize Object Settings to avoid wasting all the item properties and reuse them later. As well as, holding the item in Object Template is an effective way as nicely.
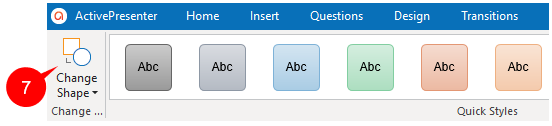
Change and Take away Shapes
Change a Form to One other
ActivePresenter 9 permits you to change a form whereas remaining its formatting. To get it finished, carry out the guides under:
Step 1: Choose the form.
Step 2: Click on Change Form (7) within the Format tab > choose any form you need. Then, the brand new form replaces the previous one.
Take away Shapes
As you could know, shapes are annotation objects. Therefore, to take away shapes, let’s apply the identical approach as once you take away regular objects. That’s, you simply want to pick out the shapes and do any of the next:
- Press DELETE on the keyboard.
- Proper-click it > Delete.
For extra data, see Copy, Minimize, Duplicate and Delete Objects.
So, you’ve identified all the straightforward steps so as to add and customise shapes in ActivePresenter 9. Contact us should you want any assist.
Associated articles: