Getting the right shot is made simple with Apple’s stay pictures. They carry your pictures to life by turning them into gif-like 1.5 second movies that seize the moments earlier than and after snapping a photograph. As a substitute of getting one static picture, it captures the true life motion and background sound so you may select the exact second in time of your greatest shot.
However displaying the total scene of a Dwell Picture on social media or with an android person is not possible with out first changing your Dwell Images to a video.
Preserve studying for a fast how-to information to make a Dwell Picture a video plus tricks to make your movies stand out.
- What’s a Dwell Picture?
- Why convert Dwell Picture to video?
- Easy methods to make a Dwell Picture a video in 3 simple steps
- Easy methods to edit Dwell Images on-line with Animoto
- Tips about find out how to edit a Dwell Picture
What’s a Dwell Picture? {#what}
Dwell Images are 1.5-second movies that seize the moments simply earlier than and after hitting the shutter button. These GIF-like movies seize the motion, vitality, and sound that went into your photo-worthy second.
Apple then chooses what it thinks is the perfect body from that video and makes it the “Key Picture”. In the event you don’t just like the Key Picture, you may simply select a brand new one from the numerous different frames inside your Dwell Picture.
Dwell Images had been first launched in 2015 with the iPhone 6S. Most iPhone customers at this time ought to have entry to this function by merely clicking the “LIVE” button inside the digital camera app. We’ll share extra on that under.
Why convert Dwell Picture to video? {#why}
The method of taking pictures a Dwell Picture is similar as taking a traditional static picture nevertheless it presents a lot extra to work with! Fairly than one blurry, crooked, or unflattering picture, Dwell Images allow you to select a particular second when your topic regarded its greatest. They seize the laughs behind the digital camera, the music within the background, and the subtleties of blowing wind or mild peeking by way of the clouds.
As a substitute of snapping a number of pictures again to again, Dwell Images prevent vitality and cupboard space and allow you to get the right shot.
Whether or not taking an #ootd picture, capturing moments at a live performance or recital, or sharing the awe of a phenomenal view, it’s a protected wager to take a Dwell Picture. The difficulty is that once you share these to social media or with a non-Apple person, they don’t robotically share as a video. As a substitute, they solely see the Key Picture and not one of the motion and vitality that surrounds it.
Immediately, just about all social media platforms choose video. Fortunately Dwell Images function a two-in-one picture and video. By changing your Dwell Images, you may share these particular “behind the scenes” moments wherever and with anybody. It’s a greater approach to inform your story and a greater likelihood at stopping viewers mid-scroll. As soon as transformed to a video, you may share it with anybody on any system.
Easy methods to make a Dwell Picture a video in 3 simple steps {#how}
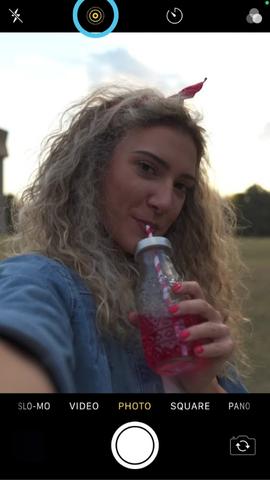
Earlier than we get forward of ourselves, let’s talk about find out how to take a Dwell Picture. Dwell Images are captured in the identical method as taking regular pictures on the iPhone. First, navigate to your digital camera. Then, ensure that the “Dwell Picture” icon (the concentric circle icon between the Flash and Timer icons) is yellow. As soon as this function is turned on, merely hit the shutter button to seize your Dwell Picture!
When you’ve taken your Dwell Picture, you’re able to convert it to a video and begin sharing! You may know it is a Dwell Picture if it has the “LIVE” icon within the higher left hand nook, however you may lengthy faucet on the picture to verify. Navigate to the Dwell Picture that you simply’d wish to convert then observe the directions under.
Relying on what model of iOS your cellphone is working on, the format could also be completely different however the icons ought to stay the identical.
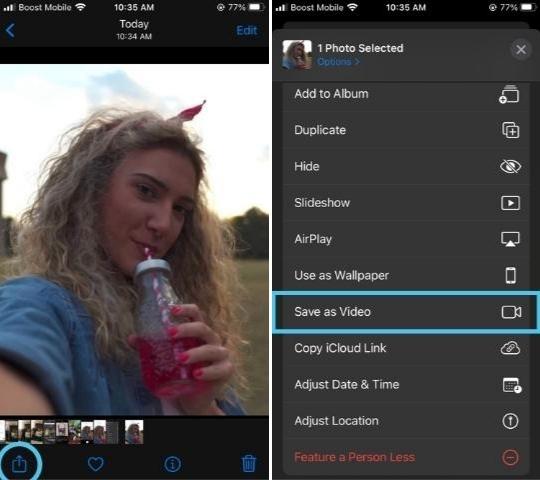
Launch your Images app and select the Dwell Picture that you simply wish to share.
Faucet the share button.
Scroll right down to the choice that claims “Save as Video.” Your video will probably be saved to your Digital camera Roll and within the Video album.
And identical to that, you’ve gotten a video clip that may be shared far and large! You’ll be able to share the video as-is, sew it along with different video clips to make an extended video, or trim and edit your video as you please.
Easy methods to edit Dwell Images on-line with Animoto {#Animoto}
With Animoto, you may flip your 1.5 second Dwell Images into skilled movies free of charge, full with animations, textual content, music, and extra! Whether or not you wish to create a slideshow video to recap your wedding ceremony or journey overseas, or flip product photographs right into a shareable product video, you are able to do so all inside Animoto. To start out creating high-quality movies out of your Dwell Images, observe these easy steps.
1. Convert your Dwell Picture to video:
Your digital camera reel is a gold mine of video content material! See the steps above to show your Dwell Images into movies.
2. Select a template: Select any of our free templates as a leaping off level. Or, begin from scratch to create a video that’s 100% distinctive from begin to end.
3. Add your video to Animoto’s on-line video editor: Add as many video clips and pictures as you’d like! If there are any gaps in your story, you may fill them in with licensed content material from our Getty Photos inventory library.
4. Personalize your video: Now comes the enjoyable half. When you’ve chosen a template and uploaded your content material, you may customise almost any facet of your video! Drag and drop your Dwell Picture movies into our Media blocks then edit your movies by trimming, including filters, adjusting the quantity, and extra. You’ll be able to add textual content on or beside your media and select the colours and fonts that greatest inform your story. Make your video extra cohesive by including a licensed music monitor and even recording a voice-over to draw and retain your viewers’s consideration. Preserve studying under to discover ways to do that and extra.
5. Obtain or share your video: When you’ve adjusted and customised your movies to your liking, it’s time to begin sharing! Click on on the “Export” icon to decide on the way you wish to share your video. You’ll be able to obtain it on to your system or click on the “Share” icon to share it on to your required e mail or social vacation spot.
MAKE A VIDEO
Tips about find out how to edit a Dwell Picture {#edit}
When turning your Dwell Picture right into a compelling {and professional} video, you’ve gotten a whole lot of choices! Listed here are eight methods to edit your Dwell Images and create a video you could be pleased with with Animoto.
1. Trim video clips to take away undesirable elements
Take away undesirable elements of your video like shaky videography or loud background noises by trimming your video. To do that, add your video into Animoto. Then, drag and drop it into your required Media block. From right here you may click on in your video clip then click on the scissors icon to take you to the Trim Video window. Drag the video buffers on both finish of your clip to make the video shorter or longer.
2. Add transitions to maneuver by way of clips seamlessly
Have a number of clips that you simply wish to sew collectively? Use a number of Media blocks! You’ll be able to select your video transitions by clicking on the “Design” icon after which clicking on the “VIDEO SETTINGS” tab. From right here you may select from any of our 13 completely different Video Fashion transitions.
3. Add textual content to make your movies extra partaking
Use textual content to name out sure options of your video or clarify the story behind them. Click on on the “Add textual content” button so as to add textual content containers to your video. You’ll be able to drag and drop the textual content into the right spot, select a colour that stands out, and choose a font that matches your model or private aesthetic.
4. Apply filters to customise the look
Make your video clips look cohesive by making use of video filters. To do that, click on on the “Design tab” and scroll to the underside to the “Filter” part. Select from any of the filters to immediately edit all of your video clips and convey all of them “on model.”
5. Add music to evoke emotion
Music may also help attract an viewers. Fortunately with Animoto, we now have over 3,000 licensed music tracks so that you can select from so your video won’t ever be taken down for license infringement. To start out looking our library, first click on on the “Audio” tab. As soon as within the Audio tab, you may type our library of music by temper, style, tempo, and extra. Preview the songs by hovering over the track along with your mouse. Apply them to your video by clicking on the monitor. Try this video for a whole step-by-step information to including music to your video.
6. Add a voice-over to attach along with your viewers
Communicate on to your viewers by recording and including a voice-over monitor to your video! This can assist your video stand out and make it conform extra with TikTok and Reels tendencies that additionally use voice-over tracks to talk with their audiences.
7. Add a CTA to compel your viewers to take a particular motion
One of the best movies are actionable! Ensure to clear a daring, clear, and actionable name to motion on the finish of your video. You are able to do so by including a textual content field. Ensure to make your textual content daring, vibrant, and straightforward to learn.
8. Select the right video facet ratio for various platforms
Whereas almost each social media platform prefers video content material to static, the perfect facet ratios can differ. With Animoto, you may select the precise facet ratio to your desired social vacation spot and rework your video with one click on. Use the Sq. 1:1 ratio for Fb, Instagram, and LinkedIn, the Panorama 16:9 ratio for YouTube, Fb, and LinkedIn, or the Vertical 9:16 ratio for Fb, Reels, TikTok, and Instagram Tales.
That’s a wrap
Ensure to activate Dwell mode in your cameras to seize your most genuine, partaking, and thrilling content material but. Then, take your movies to the following stage with Animoto’s free video maker!
Do you’ve gotten any questions? Need extra video inspiration? Tune into the Animoto weblog for extra how-tos and video concepts or be part of our Animoto Social Video Advertising Neighborhood at this time.
MAKE A VIDEO
Dwell picture to video FAQ
Easy methods to activate stay pictures?
To activate Dwell Images, first navigate to your digital camera. Then, ensure that the “Dwell Picture” icon (the concentric circle icon between the Flash and Timer icons) is yellow. As soon as this function is turned on, merely hit the shutter button to seize your Dwell Picture!
Easy methods to loop a stay picture?
With iOS 15, you may flip your Dwell Images right into a loop, bounce (boomerang), or lengthy publicity by following these steps.
-
Open a Dwell Picture within the iPhone Images app
-
Faucet the phrase “Dwell” from the highest left
-
Choose Loop from the drop-down menu to create a video loop that replays repeatedly
Can I convert a stay picture to a GIF?
When saved as a video file, Dwell Images are basically a 1.5-second GIF or video. Sadly, there isn’t any approach to flip a .mp4 file right into a .gif inside the iPhone Images app. To do that, you must use a third-party program resembling giphy.
{
“@context”: “https://schema.org”,
“@sort”: “FAQPage”,
“mainEntity”: [
{
“@type”: “Question”,
“name”: “What is a Live Photo?”,
“acceptedAnswer”: {
“@type”: “Answer”,
“text”: “
Live Photos are 1.5-second videos that capture the moments just before and after hitting the shutter button. These GIF-like videos capture the movement, energy, and sound that went into your photo-worthy moment.
Live Photos were first introduced in 2015 with the iPhone 6S. Most iPhone users today should have access to this feature by simply clicking the “LIVE” button within the camera app.
”
}
},
{
“@type”: “Question”,
“name”: “Why convert Live Photo to video?”,
“acceptedAnswer”: {
“@type”: “Answer”,
“text”: “
The process of shooting a Live Photo is the same as taking a normal static photo but it offers so much more to work with! Rather than one blurry, crooked, or unflattering photo, Live Photos let you choose a specific moment when your subject looked its best. They capture the laughs behind the camera, the music in the background, and the subtleties of blowing wind or light peeking through the clouds.
Instead of snapping multiple photos back to back, Live Photos save you energy *and* storage space and help you get the perfect shot.
”
}
},
{
“@type”: “Question”,
“name”: “How to loop a live photo”,
“acceptedAnswer”: {
“@type”: “Answer”,
“text”: “
With iOS 15, you can turn your Live Photos into a loop, bounce (boomerang), or long exposure by following these steps.
1) Open a Live Photo in the iPhone Photos app
2) Tap the word “Live” from the top left
3) Select Loop from the drop-down menu to create a video loop that replays again and again
”
}
},
{
“@type”: “Question”,
“name”: “How to turn on live photos?”,
“acceptedAnswer”: {
“@type”: “Answer”,
“text”: “
To turn on Live Photos, first navigate to your camera. Then, make sure that the “Live Photo” icon (the concentric circle icon between the Flash and Timer icons) is yellow. Once this feature is turned on, simply hit the shutter button to capture your Live Photo!
”
}
},
{
“@type”: “Question”,
“name”: “Can I convert a live photo to a GIF?”,
“acceptedAnswer”: {
“@type”: “Answer”,
“text”: “
When saved as a video file, Live Photos are essentially a 1.5-second GIF or video. Unfortunately, there is no way to turn a .mp4 file into a .gif within the iPhone Photos app. To do this, you need to use a third-party program such as giphy.
”
}
}
]
}