
Working with the idea of house in After Results is hard. On this video tutorial, we break it all the way down to phrases a newbie can perceive.
Simply because you know the way to drive a automotive doesn’t imply that you know the way it really works.
The identical goes for Adobe After Results. Certainly, you will get by simply fantastic creating animations with out figuring out the ins and outs of how this system features. Sooner or later, nonetheless, you’ll hit a couple of roadblocks.
All through my first few years of utilizing After Results, I typically encountered an issue and had no thought the best way to troubleshoot. Even after researching a repair on YouTube, I’d nonetheless not absolutely perceive why the repair labored.
This was primarily resulting from my lack of awareness regarding one of the crucial basic facets of AE—how house works.
The Composition House
One of many key work areas in After Results is the composition panel. That is the place you view and manipulate your visuals spatially, and it’s referred to as Composition House.
Visible parts are mapped out throughout composition house through the Cartesian coordinate system. Named after Seventeenth-century French thinker and mathematician René Descartes, Cartesian coordinates assist you to discover objects on a aircraft by calculating their distances from varied axes.
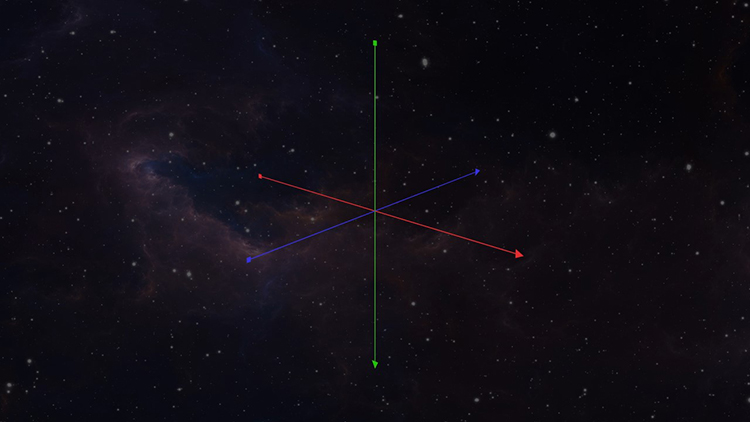
Adobe After Results makes use of a three-dimensional coordinate system. The X-axis goes horizontally to the suitable, the Y strikes vertically down, and the Z-axis strikes away from the comp view. The place these axes meet known as the origin level, with a worth of 0 for every axis. After Results locations the origin level within the high left-hand nook.
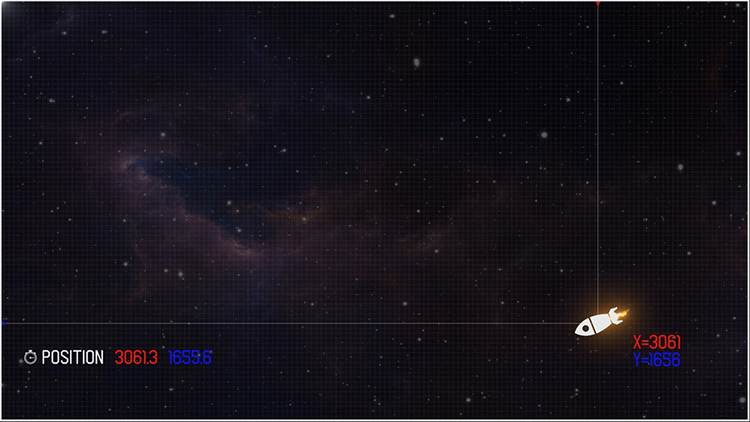
One of the best ways to visualise that is to take a look at the Place parameter of a layer as you progress it across the composition. A layer’s Place parameter reveals the placement (coordinates) of the layer in Composition house. The primary quantity signifies the place on the X axis, and the second quantity the Y.
Extra particularly, the Place attribute reveals the place the layer’s Anchor Level is situated in Comp house.
An Anchor Level is strictly what it appears like. It’s the purpose the place the layer is anchored to a composition. Any scale or rotation adjustments you make to the layer will originate from the Anchor Level. It’s a important parameter that you want to perceive the best way to use.
Layers Want Their House Too!
Whereas the Place parameter adjustments as you progress a layer round, the Anchor Level coordinates keep the identical. It is because the Anchor Level parameter reveals its location relative to Layer house.
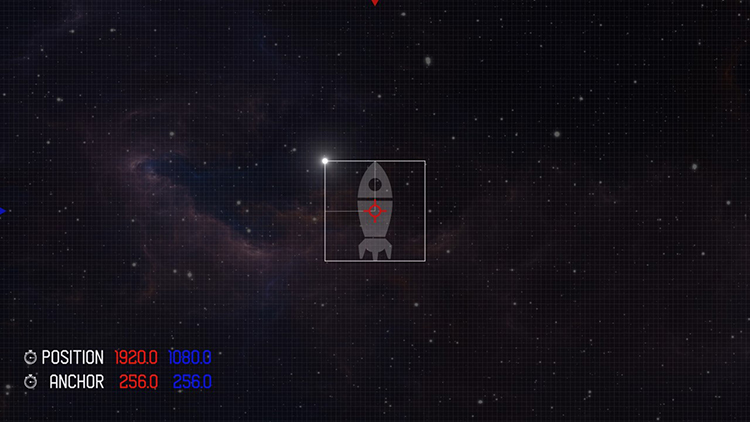
As with the Composition house, Layer house has an origin level situated within the high left nook of the particular layer. The Anchor Level displays its location relative to this layer house. A fast technique to see that is to easily sort in (0, 0) for the Anchor Level and watch your entire layer shift in order that the Anchor Level is now within the high left.
Ideally, this isn’t the way you wish to transfer the anchor level round, because it fully adjustments the place of the layer. To manually transfer the Anchor Level, seize the Pan Behind software. Maintain the Management modifier key to snap the Anchor Level as you progress it alongside in Layer House.
So to recap, the coordinates of an Anchor Level parameter present the place the Anchor Level is situated in that exact Layer’s coordinate house. The Place parameter of the identical layer will mirror the place the Anchor Level is situated in Composition house.
Objects in Movement
When an asset is animated by house, you may see the movement path within the composition panel by merely choosing the layer. In case you can’t see your entire movement path, go to the Panel Menu and select View Choices. Right here you may activate Movement Paths in addition to Movement Path Tangents.
In case you nonetheless can’t see the complete path within the comp panel, go to Edit > Preferences > Show, and choose All Keyframes.

Use the choice software to maneuver keyframes by house, and add keyframes to the trail with the Pen software—the small dots on the trail assist visualize the animation’s precise velocity. The extra dots on the trail, the extra slowly the item will animate throughout the display screen. And vice versa—the additional the dots are unfold aside, the sooner the animation turns into.
As you add keyframes to a path, you’ll additionally see them present up within the timeline panel. Naturally, these are positioned relative to the place you added them in house on the movement path. You’ll discover that the animation isn’t fairly as clean as earlier than. It’ll typically jitter when hitting the brand new keyframes.
To maintain issues fluid, seize these center keyframes within the timeline, right-click and choose Rove Throughout Time. Now you may retime the animation by merely shifting the beginning and finish keyframes.
The Rework Impact
One more technique to transfer a layer round in house is through a Rework impact. Go to Window > Results & Presets after which choose Distort > Rework. As soon as utilized to my layer, I’ll see a brand new set of properties which embody Place and Anchor Level parameters.
Take a detailed look, and also you’ll see that these properties are relative to Layer House.

You may manually reposition them utilizing a cool crosshair characteristic subsequent to the Place and Anchor Level parameters. Or, with the impact chosen, you’ll have the ability to see and transfer the symptoms round straight within the composition panel through management factors.
If you wish to get loopy with repositioning, add a number of Transformation results to the identical layer.
Raster vs. Vector Graphics
It’s necessary to know that these results with management factors will act in a different way relying on the kind of layer you’re making use of them to. When working in After Results, there are usually two classes or kinds of layers: raster and vector graphics.
A raster graphic is basically a group of pixels. In case you scale a raster up above 100%, you’ll begin to see the sides of these pixels. So if the decision of a picture is low, you may not have the ability to scale it to the dimensions you need with out shedding high quality.
Vectors, nonetheless, don’t have the identical scaling situation. It is because they’re made up of vertices and segments. Raster graphics are usually picture recordsdata, like PNG and JPEGs. Vectors embody textual content and form layers and property created in Adobe Illustrator.
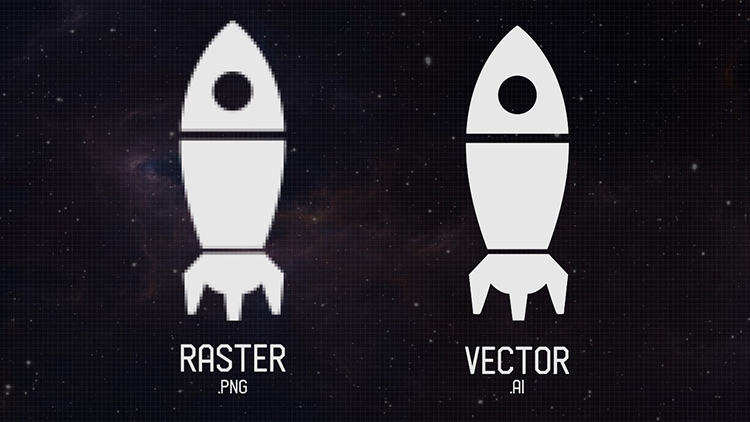
I’ve a raster and a vector model of my rocket layer on this instance. The raster on the left is a PNG file, whereas the vector on the suitable is an Adobe Illustrator file. Scaling each up will reveal how the raster loses high quality.
Once more, results with management factors act in a different way between raster and vector graphics. For raster, these results are utilized in layer house. For vectors, they’ll learn composition house.
One other straightforward technique to visualize that is drop a Nook Pin impact and watch the management factors snap in place.
Form Layers
Form layers play a big function within the After Results world, and issues can get complicated should you don’t perceive how they’re arrange. They don’t seem to be solely vector graphics, but in addition handled as teams that may nest inside one another.

For instance, utilizing the form software to attract out a form will create a brand new form layer. The form, nonetheless, is positioned in a “group” with its personal transformation properties separate from the precise form layer’s rework properties. The Place of the form group is measured from the placement of the anchor level of the containing form layer.
As if this wasn’t complicated sufficient, the Anchor Level of a form layer isn’t measured from an origin level within the high left of layer house. As an alternative, its origin level is the middle of the comp. And THIS may even be modified should you dive into Preferences > Basic and choose Middle Anchor Level in New Form Layers.
Navigating 3D House
I do know that is focused at inexperienced persons, however you may’t actually discuss house with out relating the best way to navigate 3D house. The trick to figuring out the best way to keep oriented in house is to grasp the instruments.

When switching a layer to 3D, you’ll see a colourful 3D gizmo seem. This useful software provides you whole management over the layer. Axes are color-coded, and shapes on the gizmo provide you with fast reference to widespread transformation properties. When manipulating a layer, tooltips present dimensional info that lets you get a layer precisely the place you need it in house.
Flying a digicam across the composition is one other ability set to grasp. As soon as once more, the digicam management instruments make it straightforward. Three completely different units of instruments assist you to orbit, dolly, and pan the digicam. A drop-down menu for every software lets you specify the way you need the digicam to fly in house. Orbit round a scene, a focal point, and even your cursor.
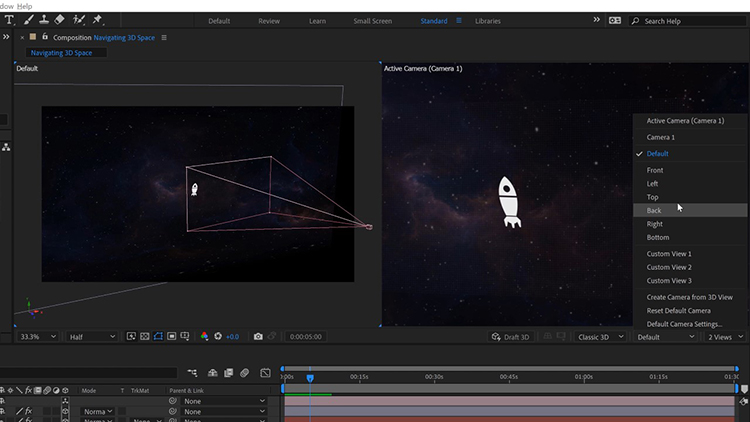
When you begin flying round your comp, issues can shortly develop into complicated. Keep oriented with the varied view angle of the comp panel. The dropdown menus on the backside left of the comp panel assist you to even open up a number of view angles on the similar time.
I often open up two views and change one in every of them to the default digicam. This offers me a chook’s eye view of all the things in my challenge, together with different digicam layers.
Dad and mom Simply Don’t Perceive
Final however actually not least might be one of the crucial used options in Adobe After Results—parenting.
Whenever you need one layer to stay to a different, it doesn’t make a lot sense to animate each layers. That might merely be an enormous waste of time. As an alternative, you may guardian layers collectively.
However what really occurs to a layer’s transformation properties when it’s parented to a different layer? It additionally retains your challenge extra organized and simple to work with.
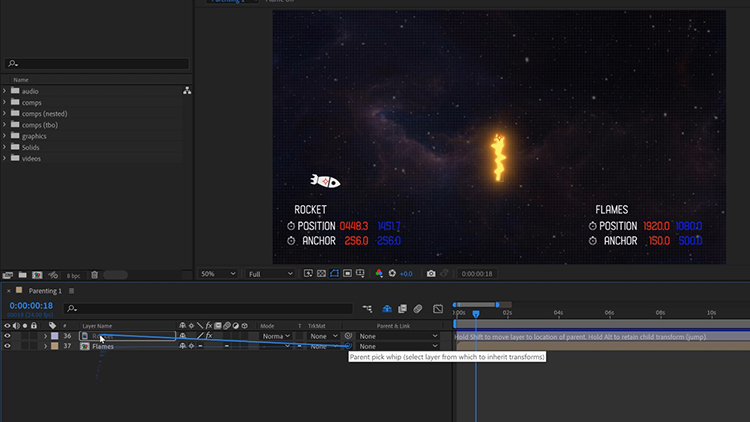
On this instance, I’ve created some animated flames and parented them to my rocket layer. Which means the rocket is the guardian and the flames layer is the kid. Now the flames will comply with the rocket, and I merely have to get them within the right place.
As soon as parented, the flames now present a Place parameter relative to the Origin Level of the guardian layer as a substitute of Comp house.

If I maintain Shift whereas parenting the flames, the rocket’s transformation properties will override the flames’ parameters. It’s primarily like a copy-and-paste. The fantastic thing about that is that the flames will completely scale and rotate to match the rocket. They’ll additionally snap straight over the rocket’s anchor level, and never the Origin Level of its layer house.
Okay, I hope the following tips get you off on the suitable foot in your After Results journey. In the event that they do, please share them with people and unfold the goodwill.
For extra articles on After Results and Movement Graphics try the hyperlinks beneath!