
Within the following tutorial, you will learn to create a vector brick wall utilizing a brick sample in Illustrator. If you happen to desire to observe together with a video tutorial, do not miss this new video from the Envato Tuts+ YouTube channel:
What You may Study in This Illustrator Tutorial
- How one can save the colours of a vector brick sample
- How one can make a brick sample in Illustrator
- How one can save a brick sample in Illustrator
- How one can apply a brick sample in Illustrator
What You may Want
You will want to obtain the next textures in an effort to full this brick sample in Illustrator:
1. How one can Create a New Doc and Set Up a Grid
Hit Management-N to create a brand new doc. Choose Pixels from the Models drop-down menu, set the Width and Top to 850 px, after which click on that Superior Choices button. Choose RGB for the Shade Mode and set the Raster Results to Display screen (72 ppi), after which click on the Create button.
Allow the Grid (View > Present Grid or Management-“) and Snap to Grid (View > Snap to Grid or Shift-Management-“). You will want a grid each 10 px, so merely go to Edit > Preferences > Guides & Grid, enter 10 within the Gridline each field and 1 within the Subdivisions field. Strive to not get discouraged by all that grid—it would make your work simpler, and understand that you may simply allow or disable it utilizing the Management-“ keyboard shortcut.
You must also open the Information panel (Window > Information) for a dwell preview with the dimensions and place of your shapes. Remember to set the unit of measurement to pixels from Edit > Preferences > Models. All these choices will considerably improve your work velocity. Now that you just’re set, let’s have a look at how one can create a brick sample for Illustrator.


2. How one can Save the Colours of the Brick Vector Sample
Step 1
Decide the Rectangle Device (M) out of your Toolbar after which concentrate on the colour settings. Choose the stroke and take away the colour, after which double-click the fill and change the present coloration with R=152 G=34 B=24.
Transfer to your artboard and create a easy form. Decide the Choice Device (V), maintain down the Alt key, and click on and drag your form so as to add a duplicate. Transfer it to the suitable and change the fill coloration of this copy with R=232 G=124 B=66.


Step 2
Decide the Mix Device (W) and easily click on your two shapes to create a brand new mix. Maintain it chosen and go to Object > Mix > Mix Choices. Choose Specified Steps and set it to 5, after which click on OK.


Step 3
Ensure that your mix continues to be chosen and develop it by going to Object > Mix > Develop. Maintain the ensuing group of shapes chosen, and transfer to the Swatches panel (Window > Swatches).
Click on that New Shade Group button, verify the Chosen Art work field, and click on OK so as to add a brand new group of colours containing the colours out of your chosen shapes. When you create this coloration group, you may delete the shapes out of your artboard.


3. How one can Make a Brick Sample in Illustrator
Step 1
Decide the Rectangle Device (M) and use it to create a 140 x 40 px form. Fill it with R=232 G=124 B=66 and preserve it chosen. Swap to the Direct Choice Device (A), concentrate on the management panel, and set the Corners radius to 4 px.


Step 2
Ensure that your brick form is chosen and go to Impact > Distort & Remodel > Remodel. Set the variety of Copies to 3 and drag the Transfer-Horizontal slider to 150 px, click on OK to use this impact, after which go once more to Impact > Distort & Remodel > Remodel.
This time set the variety of Copies to 8, drag the Transfer sliders to 70 and 50, and remember to verify that Replicate X field. Click on OK, and this would be the begin of your vector brick wall.


Step 3
Ensure that your vector brick wall continues to be chosen and develop it by going to Object > Develop Look, after which press Shift-Management-G thrice to Ungroup the ensuing teams.


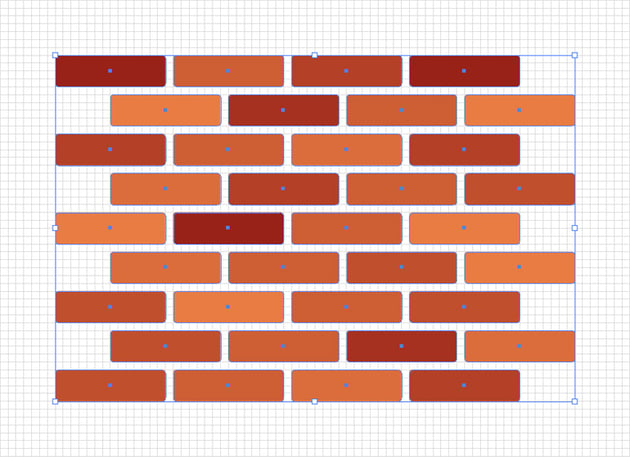
Step 4
Decide the Choice Device (V), maintain down the Shift key, and click on the three shapes highlighted within the following picture to pick out them, after which change the present fill coloration with the primary coloration out of your coloration group.


Step 5
Proceed with the 2 shapes highlighted under and fill them with the second coloration out of your coloration group.


Step 6
Choose the 5 shapes highlighted within the following picture and fill them with the third coloration out of your coloration group.


Step 7
Proceed with the six shapes highlighted under and fill them with the subsequent coloration out of your coloration group.


Step 8
Choose the shapes highlighted within the following picture and fill them with the fifth coloration out of your coloration group.


Step 9
Lastly, choose the 5 shapes highlighted within the following picture and fill them with the second final coloration out of your coloration group.


Step 10
Choose all of the shapes that make up your vector brick wall and press Management-G to Group them.


4. How one can Stylize a Brick Sample in Illustrator
Step 1
Ensure that your group is chosen and add a duplicate in entrance (Management-C > Management-F). Flip this new group right into a compound path (Object > Compound Path > Make or Management-8) and fill it with black (R=0 G=0 B=0).


Step 2
Ship your black compound path to the again (Shift-Management-[), keep it selected, and go to Effect > Path > Offset Path. Set the Offset to 2 px, click OK, and then go to Effect > Distort & Transform > Roughen. Set the settings as shown below and click OK.


Step 3
Make sure that your black compound path is still selected and go to Effect > Distort & Transform > Transform. Drag that Move-Vertical slider to 3 px, which will move your selection 3 px down. Don’t forget to click OK to apply this effect.


Step 4
Make sure that your black compound path is still selected, focus on the Appearance panel (Window > Appearance) or the control panel to lower the Opacity to 30%, and change the Blending Mode to Soft Light.


Step 5
Reselect your group of brick shapes and go to Effect > Distort & Transform > Roughen. Set the settings as shown below and click OK.


Step 6
Using the Rectangle Tool (M), create a 450 x 400 px shape, fill it with R=102 G=34 B=24, and place it exactly as shown below. Take a closer look at the grid to be sure that you’re placing this rectangle in the same location.


Once you’re done, send this shape to the back. You can either right-click it and go to Arrange > Send to Back or use the Shift-Control-[ keyboard shortcut.


5. How to Apply a Texture to a Brick Pattern in Illustrator
Step 1
Open “Texture 11” from this pack of Vector Grainy Textures, copy it (Control-C), and paste it (Control-V) on top of your vector brick wall. Make it black and use the settings from the control panel to adjust the width of this texture to about 850 px.


Step 2
Make sure that your texture is still selected, lower its Opacity to 50%, and change the Blending Mode to Soft Light.


Step 3
Open “Texture 10” from the same pack of Vector Grainy Textures, copy it, and paste it on top of your vector brick wall. Make it white again, and use the settings from the control panel to adjust the width to about 850 px.


Step 4
Make sure that your white texture is still selected, lower its Opacity to 50%, and change the Blending Mode to Overlay.


6. How to Save a Brick Pattern in Illustrator
Step 1
Go to the Layers panel (Window > Layers) and select that bottom rectangle. Copy it (Control-C) and paste a copy on top of your design (Shift-Control-V).
Keep this copy selected and remove the fill color, and then send this invisible rectangle to the back (Shift-Control-[).


Step 2
The edges of the invisible shape added in the previous step will serve as the bounds of the pattern tile that you’re about to save. Use the Selection Tool (V) to select all your shapes, and simply drag them into the Swatches panel to save them as a pattern.


7. How to Apply a Brick Pattern in Illustrator
Create a new shape, make sure that the fill is active, and apply your brick pattern from the Swatches panel.


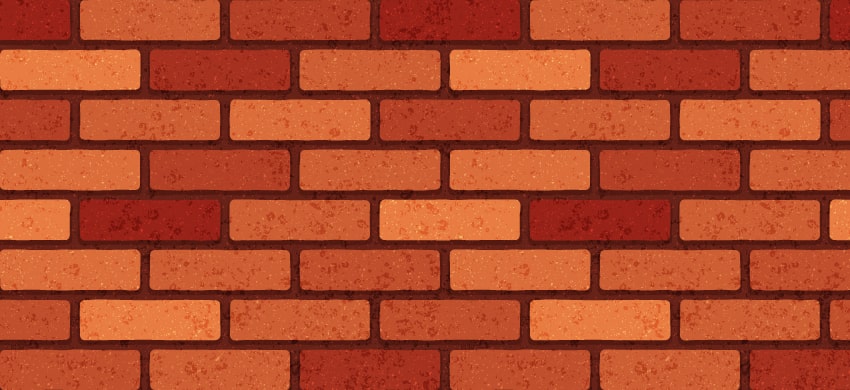
Congratulations! You’re Done!
Here is how your vector brick wall should look. I hope you’ve enjoyed this tutorial and can apply these techniques in your future projects.
Feel free to adjust this brick pattern for Illustrator and make it your own. You can find some great sources of inspiration at Envato Elements, with interesting solutions to improve your vector brick patterns.


5 Popular Patterns From Envato Elements
Envato Elements is an excellent resource for brick pattern vectors and textures. Here’s a short list of some of the most popular assets that you can find.
Vector Brick Wall Textures (AI, EPS, PNG)
Cut the hassle of learning how to make a brick pattern in Illustrator and use these grungy vector brick wall textures instead.


Halftone Brick and Stone Wall Textures (AI, EPS, PNG)
Go vintage with this set of vector brick wall textures. These 100% vector designs can be easily resized without losing quality.


Old Brick Wall Textures (JPG)
Here’s a set of high-resolution old brick wall textures that can be used to put together mesmerizing designs.


Black and White Brick Wall Textures (JPG, PNG)
Go black and white with this massive collection of brick wall textures. These can be pretty useful if you wish to add subtle brick wall backgrounds.


Brick Wall Textures (JPG)
Here’s another set of brick wall textures that might save you some time and improve the look of your final designs.


Want to Learn More?
We have loads of tutorials on Envato Tuts+, from beginner to intermediate level. Take a look!