With primary enhancing instruments for audio/video like minimize, copy, delete, and crop, ActivePresenter 9 helps to create nice movies in a breeze. Let’s take a look at in the present day’s article for extra particulars.
As you already know, ActivePresenter 9 is an all-in-one display recorder, video editor, and eLearning authoring software. Subsequently, the app provides many highly effective but easy-to-use options to make demo movies, interactive simulations, eLearning video games, coaching programs, and many others. Particularly, ActivePresenter permits you to edit each imported and recorded audio/movies. Proper after the seize part, the software program takes you to the editor the place you possibly can edit what you’ve recorded. Alternatively, you may also import audio and video into ActivePresenter and edit them as regular.
Earlier than we go forward, obtain and set up the most recent model of ActivePresenter:


At this time’s article covers:
The next components will give you extra details about what a variety is and learn how to apply these primary enhancing instruments to your audio/video. Let’s start!
Outline a Vary
To allow the fundamental enhancing instruments for audio/video, just remember to created a variety in ActivePresenter 9. In case you haven’t chosen a variety, these buttons are disabled and you can’t click on them.
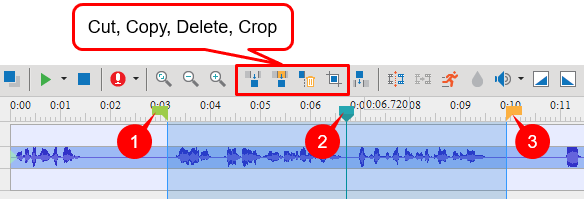
- Begin Marker (1): The inexperienced marker represents the start line of the chosen vary.
- Playhead (2): The blue line signifies the timestamp that you’re at present choosing.
- Finish Marker (3): The orange marker signifies the ending level of the chosen vary.
The Begin Marker and the Finish Marker assist to outline a variety. Simply click on to put the Playhead at any place within the Timeline pane. Then, you possibly can choose a variety by both dragging the Begin Marker or the Finish Marker. If you drag a marker, the Playhead will keep it up. The chosen vary is highlighted in mild blue shade to assist simply acknowledge it. To clear the choice, double-click the Playhead wherever on the time axis.
Notice:
- These primary enhancing instruments for audio/video act in a different way relying on whether or not or not you choose an object. If you choose an object, the instruments have an effect on that object solely. If not, they have an effect on the slide and all objects falling into the vary (your complete slice of the vary).
- To get a greater view of the timeline, zoom in or out by holding down CTRL whereas scrolling the mouse wheel up or down, respectively.
Fundamental Modifying Instruments for Audio/Video
On this half, we’ll stroll you thru 4 primary enhancing instruments for audio/video:
Now, let’s check out every of them.
Reduce Vary
Typically, even whenever you work fastidiously, errors occur from time to time whenever you report the display. A giant mistake could require you to begin over and re-record the whole lot. In the meantime, a tiny mistake solely wants an “undo” then you possibly can proceed recording as if it by no means ever occurred. In that case, simply minimize the error out from the video/audio and also you’re accomplished. So, the Reduce Vary is without doubt one of the primary however highly effective instruments for enhancing audio/video.
Carry out some quite simple steps beneath to chop and take away undesirable fragments from the video/audio:
Step 1: Choose a video/audio that comprises undesirable fragments. After that, outline a variety.
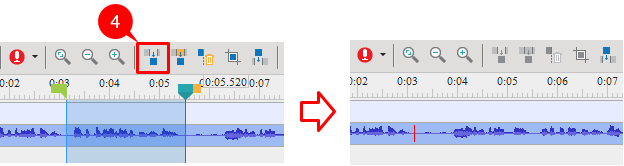
Step 2: Click on Reduce Vary (4). Alternatively, press CTRL+SHIFT+X to take away the vary.
Then, a pink stripe seems to point out the place the 2 remaining components of the video/audio are joined collectively.
Step 3: Paste the minimize content material into the identical or one other slide. To do this, transfer the Playhead to the specified place and press CTRL+V.
Copy Vary
After studying about slicing a variety in a video/audio. Let’s get to know learn how to use the Copy Vary button to repeat components of objects that fall contained in the vary. Then, you possibly can put them on the clipboard. So, comply with the steps beneath:
Step 1: Choose a video/audio. Then, make a variety.
Step 2: Click on Copy Vary (5) or press CTRL+SHIFT+C to repeat the vary.
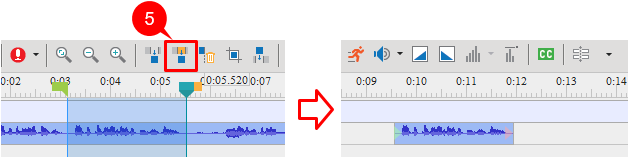
Step 3: Paste the copied content material into the identical or one other slide. To get it accomplished, place the Playhead on the desired place and press CTRL+V.
Delete Vary
Let’s say eradicating errors is a primary process whenever you edit movies. So, use the Delete Vary button to take away any undesirable audio/video components. That is one other one of many primary enhancing instruments for audio/video that ActivePresenter provides you. Simply do as follows:
Step 1: Choose a video/audio. After that, outline a variety.
Step 2: Click on Delete Vary (6) or press CTRL+DELETE to get it accomplished.
As might be seen, a pink stripe seems to point out the place the place you chop the vary.

Notice: The Delete Vary button works similar to the Reduce Vary button, aside from one distinction. Whereas the previous is used to delete the content material contained in the vary, the latter “cuts” the content material from the vary and locations it on the clipboard, then you possibly can paste it the place you need. In brief, Delete Vary stands for eradicating whereas Reduce Vary stands for reallocating.
Crop to Vary
Typically you report further footage firstly and finish of a recording. When enhancing video/audio, you need to trim out these fragments, that’s to take off both finish of the video/audio. In consequence, ActivePresenter provides you a primary software to unravel this challenge.
Now, let’s use the Crop to Vary button to take away the whole lot exterior the vary. Right here’s how:
Step 1: Choose a video/audio that you simply need to trim out further content material. Then, outline a variety. Deliberate to maintain the principle content material within the vary.
Step 2: Click on Crop to Vary (7) or press SHIFT+DELETE. That manner, solely the half falling contained in the vary is retained.
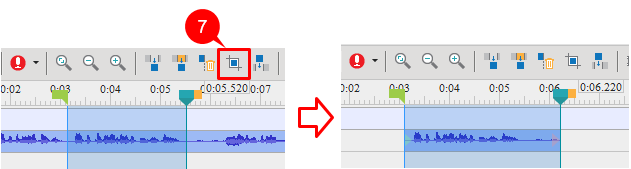
As talked about above, these primary instruments additionally work when you choose no objects in any respect. In that case, they have an effect on all of the objects falling into the vary. For instance, should you click on Crop to Vary whereas choosing no objects, you keep solely the slide content material contained in the vary and delete all the remainder.
In brief, that’s all about 4 primary enhancing instruments for audio/video ActivePresenter 9 provides you. Make use of them along with different superior instruments to create gorgeous initiatives. As well as, go to our YouTube channel and Twitter for extra helpful tutorial movies and helpful data.