Including a watermark to a number of photographs (bulk) in Photoshop has by no means been simpler than now by utilizing the Watermark 3 plugin. And the very best half is free. You’ll be able to obtain it from Adobe Cloud.
It’s quick, environment friendly, and as we stated it’s utterly free. In fact, there’s a Professional model (paid), with extra capabilities and choices, in case you are .
In a nutshell, the principle distinction between the free and paid variations is:
- Within the paid model, we will export in lots of codecs, than JPG which permits the free model.
- Additionally, within the paid model, we will resize our watermark with extra choices.
- And lastly, we will use actions within the paid model.
If the JPG possibility, which is the one picture format that the free model permits to export will not be a deal breaker for you, you may be simply effective with the free model.
What’s a Watermark and Why We Want It:
A watermark is an additional layer of textual content signature or our emblem, that we put with consistency on high of our photos-images.
Principally, once we share our work on-line, both as a Photographer, Graphic Designer, Illustrator, 3D Artist, and so on. we by some means want a layer of safety in opposition to theft so as to get the right credit score for our work.
Watermarks additionally act as a model id. Once you share your work with others both on-line or offline, your emblem or your textual content signature might be recognizable by others over time.
The watermark it may be discrete or not, relying on the aim of it. For instance, it could possibly hover the entire picture with a little bit of transparency, so the picture will be moderately seen, or it may be as discrete as a small portion of the picture in a nook.
Obtain the Watermark 3 Plugin in Photoshop:
Initially, we have to obtain the Watermark 3 Photoshop plugin.
Open up Photoshop and go to Plugins – Browes Plugins. This can open the Artistic Cloud Desktop software. Now, the outcomes are already filtered by software program “Photoshop”. Discover and click on on the set up button under the plugin.

We will additionally navigate and discover the plugin by means of net looking, as an alternative of utilizing the Artistic Cloud Desktop app. We will achieve this from right here.
Lastly, full the set up. As a way to activate it, simply enter your e-mail. After that, underneath the Plugins bar, in Photoshop you will note the Watermark 3 plugin.

Including a Watermark to A number of Pictures, in Motion:
Now we’ve downloaded and put in Watermark 3, let’s see how we will add a watermark to a number of photographs in Photoshop.
1 Step (Open the Watermark 3 plugin:):
Go to Plugins – Watermark 3. A brand new window, with plenty of choices. Choose the A number of Pictures possibility.
In our instance, we need to add a watermark in bulk, so there may be no want for us to open all the pictures in Photoshop. Having no doc opened in Photoshop might be effective.

2 Step (Deciding on watermark possibility):
As we already stated, we will set as watermark both a textual content signature or our emblem. In my case, I’ll select the Brand possibility, which in my case can be part of my emblem.
So underneath the Supply tab, choose Brand, and click on on the Select file button.

3 Step (Deciding on folders):
Go to Pictures tab and choose the Supply Folder, as a way to choose your complete folder (the place it comprises all the pictures you need to add a watermark on).
After that, choose the Goal Folder and choose a vacation spot the place the brand new photographs (added a watermark) might be saved.

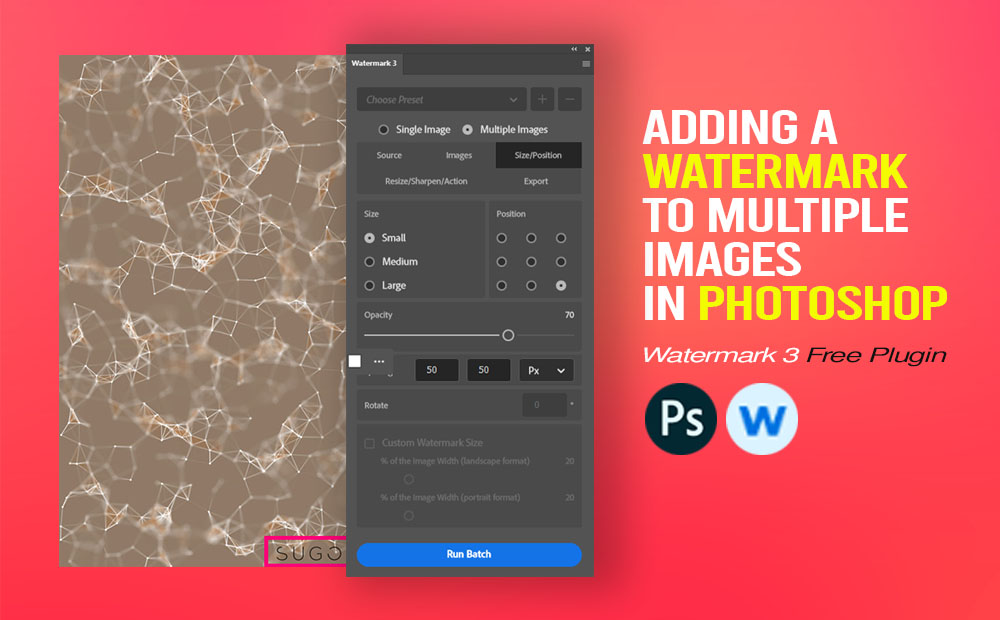
4 Step (Dimension-Place):
Within the Dimension/Place tab, you’ll be able to alter because the identify suggests the scale and the place of the watermark, plus the opacity of it. Since these choices are just about self-explanatory I gained’t go into depth. My settings are under:

5 Step (Run Batch):
We’re all set. We will hit the Run Batch button. After that Photoshop will routinely open every one of many photographs that was contained within the supply folder, add the watermark, and shut them. It’ll work like actions in Photoshop. Be happy to try “The highly effective perform of Droplet in Photoshop” for that matter.
The time of the method relies on the worth and the dimension of the pictures it has to course of. When it’s accomplished, Photoshop will present you a message that the batch run has been profitable.
To see the brand new photographs with watermarks on them, simply navigate to the brand new folder (goal folder) we set beforehand.
You’ll be able to see one instance of the exported picture under:

Conclusion:
Watermark 3 is a extremely helpful plugin for including watermarks with ease. As you’ll be able to see, with just a few clicks we exported our photographs with watermarks.
In our instance, we added a watermark to multiply photographs. We might in fact add a watermark in a single picture as properly.
In fact, there may be different technique as properly, as a way to add watermarks to your photographs.
Thanks for studying up, see you within the subsequent article.