
All-in-one Information of ZBrush CC Pose Supervisor (Early Entry of CC to ZBrush Posing Pipeline)


ZBrushGuide founder, Pablo Munoz Gomez offers away an entire course in 3D character creation. From concepting in Krita to sculpting in Character Creator 4 (CC4), he takes us on a experience of turning 2D ideas into articulated 3D characters with the strategic use of ZBrush and AccuRig. Discover methods to arrange a humanoid character in ZBrush for simple rigging and posing with the ZBrush CC Pose Supervisor, a free plugin developed by Reallusion in collaboration with Maxon and ZBrushGuide. Don’t wait — get began now with early entry to the plugin right here!
*Observe to readers: For the reason that publication of this text, the plugin known as “ZBrush CC Pose Supervisor” has been rebranded as “Pose Instruments”. All references to ZBrush CC Pose Supervisor on this article ought to be understood to confer with Pose Instruments or CC to ZBrush Posing Pipeline.)


Pablo Munoz Gomez is a famend 3D idea and character artist, with a ardour for schooling. 3D sculpting, visible growth, and different mixed-media type the pillars of his inventive ardour which he channels via the assorted platforms that he owns, together with ZBrush Guides, 3D Idea Artist Academy, and 3D Snippets Venture. Due to his huge on-line following, he is ready to attain artists from around the globe and assist them advance in quite a lot of 3D-related disciplines.
The workflow I’m going to point out you thru the video collection is an actual recreation changer in the case of posing and managing poses in ZBrush because it permits you to hold all of your subdivision ranges whereas testing and prototyping all types of poses!
Pablo Munoz Gomez – Founding father of ZBrush Guides
This text is part of a transcript collection primarily based on Pablo’s tutorial movies and the next content material is offered in his personal phrases.
Index:
▪ Design Characters with Thumbnail Sketches
▪ Sharpening & Remeshing the 3D Sculpt
▪ Auto-Rigging ZBrush Character with AccuRIG
▪ Rig Tweaks and Manging Poses
▪ZBrush CC Pose Supervisor for Lightning Quick Posing
Design Characters with Thumbnail Sketches
Let’s create a full-body character mission from scratch utilizing ZBrush and CC4!
To begin off, I might be specializing in the ideation course of and generate some concepts for the character. The purpose is to create a personality that may be rigged utilizing the CC4 AccuRig function and take a look at its integration with ZBrush.


I started the method by sketching numerous tough concepts utilizing Krita. I solely spent round thirty seconds on every sketch, simply sufficient to get the gesture and the final form of the volumes, with none element. You should utilize any device you favor, however I like utilizing Krita due to its experimental brushes. I additionally use Procreate once I simply need to take a extra relaxed method.


The setup is easy, with a lightweight grey background and utilizing a tough brush to sketch pure black on a brand new layer.


I then did a second go to determine the volumes contained in the silhouette. I used some ideas, similar to utilizing “alpha clip” to limit my brushstrokes to the silhouettes, customizing the comb so as to add a little bit of “moist mixing“, imagining a single key mild from above every character, utilizing a barely darker grey for the foreground, and even at this stage, defining concepts for the supplies.
From all of the sketches I created, I settled on one silhouette that I felt had stability and a few areas for further particulars. I then refined the silhouette on a bigger decision to make use of as a reference for the character design.


For individuals who may not be as snug with 2D sketches, I’ve some methods to assist get began with 3D sketches. You should utilize CC4 to morph a base silhouette, take a screenshot or render the picture instantly, fill the layer with black, and paint over it with further shapes.


An alternative choice is to place collectively a ZSphere armature in ZBrush, pose it utilizing the Rotate device, add primitives, and render a BPR. You possibly can then use the alpha and invert it to black, and begin portray on prime to refine the silhouette.


Setup the 3D Idea in ZBrush
With a extra outlined thought of what I wished to create, I used a base mesh from CC4 simply to get a tough thought of the proportions. The purpose of the mission was to make use of a unique topology anyway, so I ended up Dynameshing and sculpting it in ZBrush.

I cut up the physique into varied elements just like the palms, legs, head, and physique, after which used Dynamesh and sculpting brushes to deliver the silhouette nearer to the reference sketch. I additionally added a few further items utilizing cylinders for the neck and the wrists of the go well with, and outlined the cuts and panels with the “cutter brush” from my H.R. Giger tribute pack.


At this stage, it was very sketchy and low-resolution, however I used to be capable of assign polygroups to the physique go well with primarily based on the cuts I made with the cutter brush. This not solely allowed me to check the palette with a fast polypaint coloration but additionally guided the ZRemesher course of in a while.


The subsequent step was to start out the sharpening course of and cleanup of the varieties. I elevated the Dynamesh decision of all subtools to add extra particulars and refine the cuts and panels. For instance, with the pinnacle, I elevated the Dynamesh decision to outline the secondary shapes and add folds across the aspect of the face, neck, and mouth. I then used ZRemesher to generate a cleaner topology for the pinnacle and sculpting brushes so as to add particulars and polish the pinnacle.


The method for the physique go well with was the identical, utilizing the polygroups to information the loops of the ZRemesher course of after which utilizing PanelLoops to generate the cuts contained in the panels and polish the floor a bit extra. I additionally used the polygroups to masks some areas and add wrinkles to provide a touch of the several types of supplies on the go well with.


For the ultimate step, I duplicated your complete mesh of the physique go well with, used choice instruments to isolate some polygroups and deleted the remaining, after which used Dynamic Subdivision so as to add thickness to generate the additional hard-surface objects. I used IMM brushes to create the tube connectors, and took benefit of the polygroups so as to add wrinkles and folds utilizing a customized brush from the Material and Material pack.


Concerning the design of the area creature, I wished to push the AccuRig device inside CC4 and check out new issues, similar to a low heart of gravity, three fingers on every hand, and a mix of hard-surface and delicate deformation elements. I additionally wished to hold the neck piece fully strong when doing the rig.


Sharpening & Remeshing the 3D Sculpt
At this level of the method, I’ve accomplished the setup and sculpting of the character in 3D, it’s now time to maneuver on to the textures. I’ll briefly speak about how I approached planning and baking the high-resolution mesh into the low-resolution mesh and the way I used Substance 3D Painter to create the feel units of the creature.


Let’s begin with the planning course of. Organizing the property is a crucial step to guarantee that the baking and texturing phases go easily. I began by having a high-resolution mesh with all the small print and a low-resolution mesh with UVs. To simplify the method, I attempted to maintain the variety of subtools in each excessive and low-resolution meshes to a minimal, ensuring that they match. I additionally separated the objects primarily based on the fabric or texel density to have extra management over the small print.


An essential factor to bear in mind when merging subtools is that in ZBrush, you possibly can solely mix objects with the identical variety of subdivision ranges. When you have completely different ranges, you’ll need to make them the identical earlier than merging. One other essential factor to recollect is to guarantee that the UVs swap within the Merge part is enabled to maintain your UVs. In my case, I had overlapping UV islands, so I used Ryzom UV to pack them and replace the UVs of the low-resolution mesh.


Subsequent, I exported the low- and high-resolution variations of the mannequin, preserving the identical identify on the subtools and solely altering the suffix from “_low” to “_high”. In Substance 3D Painter, I used the Match by Title choice to bake the small print from the high-resolution mesh to the low-resolution mesh.


As soon as the baking course of was accomplished (only a few minutes of computing time), I generated the bottom coloration palette for each bit of the character:


You may need observed that there are already some particulars and patterns on this blocking of the colour palette. It is because a number of the base supplies I used are substances that include sure particulars just like the hexagonal sample on the inexperienced areas or the padded stripes on the stomach space.
Subsequent, I spent a while including some put on and tear and adjusting the brightness of the colours. The change is perhaps delicate, however while you add all these subtleties collectively, you’ll get one thing fairly cool. I then centered on unifying the bottom colours and ranging the roughness just a little bit. My purpose was to keep up the brilliant and saturated colours that I believed would go effectively with the character’s stylization, but additionally hold them inside the identical hue vary.


There’s a easy trick that I like to make use of in Substance 3D Painter, which might override the hue. You possibly can create a fill layer on prime of your stack of layers in any texture set you need, and switch off the whole lot however the coloration channel. Then you possibly can right-click and replica the layer, and go to a different texture set, right-click an empty space, and click on on the Paste Layer as Occasion possibility. This fashion, it’s best to have a layer that solely impacts the colour of every texture set, and you’ll change its settings, and it’ll replace throughout your texture units. The opposite cool factor you are able to do is change the colour and set the mixing mode to one thing like delicate mild, after which play with the opacity to fine-tune the impact. Simply control your black and white colours in order that they don’t get overly tinted with the overlaid coloration.


For the pinnacle and palms textures, I used the Stylised Pores and skin Good Materials useful resource that I developed for certainly one of my earlier 3DSnippets initiatives (the Viking). I merely tweaked a couple of settings to regulate the power of the bumps and the colours. I wished to maintain a quite simple and stylized texture for the creature, so I prevented any patterns that could possibly be distracting.


Along with the good materials, I created three layers (two of that are instanced) to fluctuate the colour and add a little bit of darkness primarily based on the ambient occlusion. Lastly, I added a pair extra layers and one other good materials to sharpen a number of the smaller pores/bumps and make the reds of the bottom coloration pop a bit extra.


Auto-Rigging ZBrush Character with AccuRIG
So now, I’ve the character prepared with UVs, textures, sculpted particulars with subdivision ranges, and a symmetrical pose. I even have the whole lot that makes up this character in 4 subtools.


Earlier than we begin rigging in CC4, there are some things to bear in mind. You don’t need to have UVs or textures, however having them beforehand makes the workflow simpler.
It’s essential to have CC4 put in and the GoZ related for sending issues backwards and forwards between ZBrush and CC4. And it’s all the time a good suggestion to save lots of each the ZBrush recordsdata (ZTools) and the CC4 initiatives as you’re employed, simply in case it is advisable return to a earlier stage.
Now, the primary and solely step is to click on the All button subsequent to the GoZ on the Device palette. This sends all of the subtools, not simply the chosen one (which is what occurs with GoZ). You may need to pick the exterior utility in case you have a couple of connection within the GoZ Settings, through which case, choose Character Creator 4.


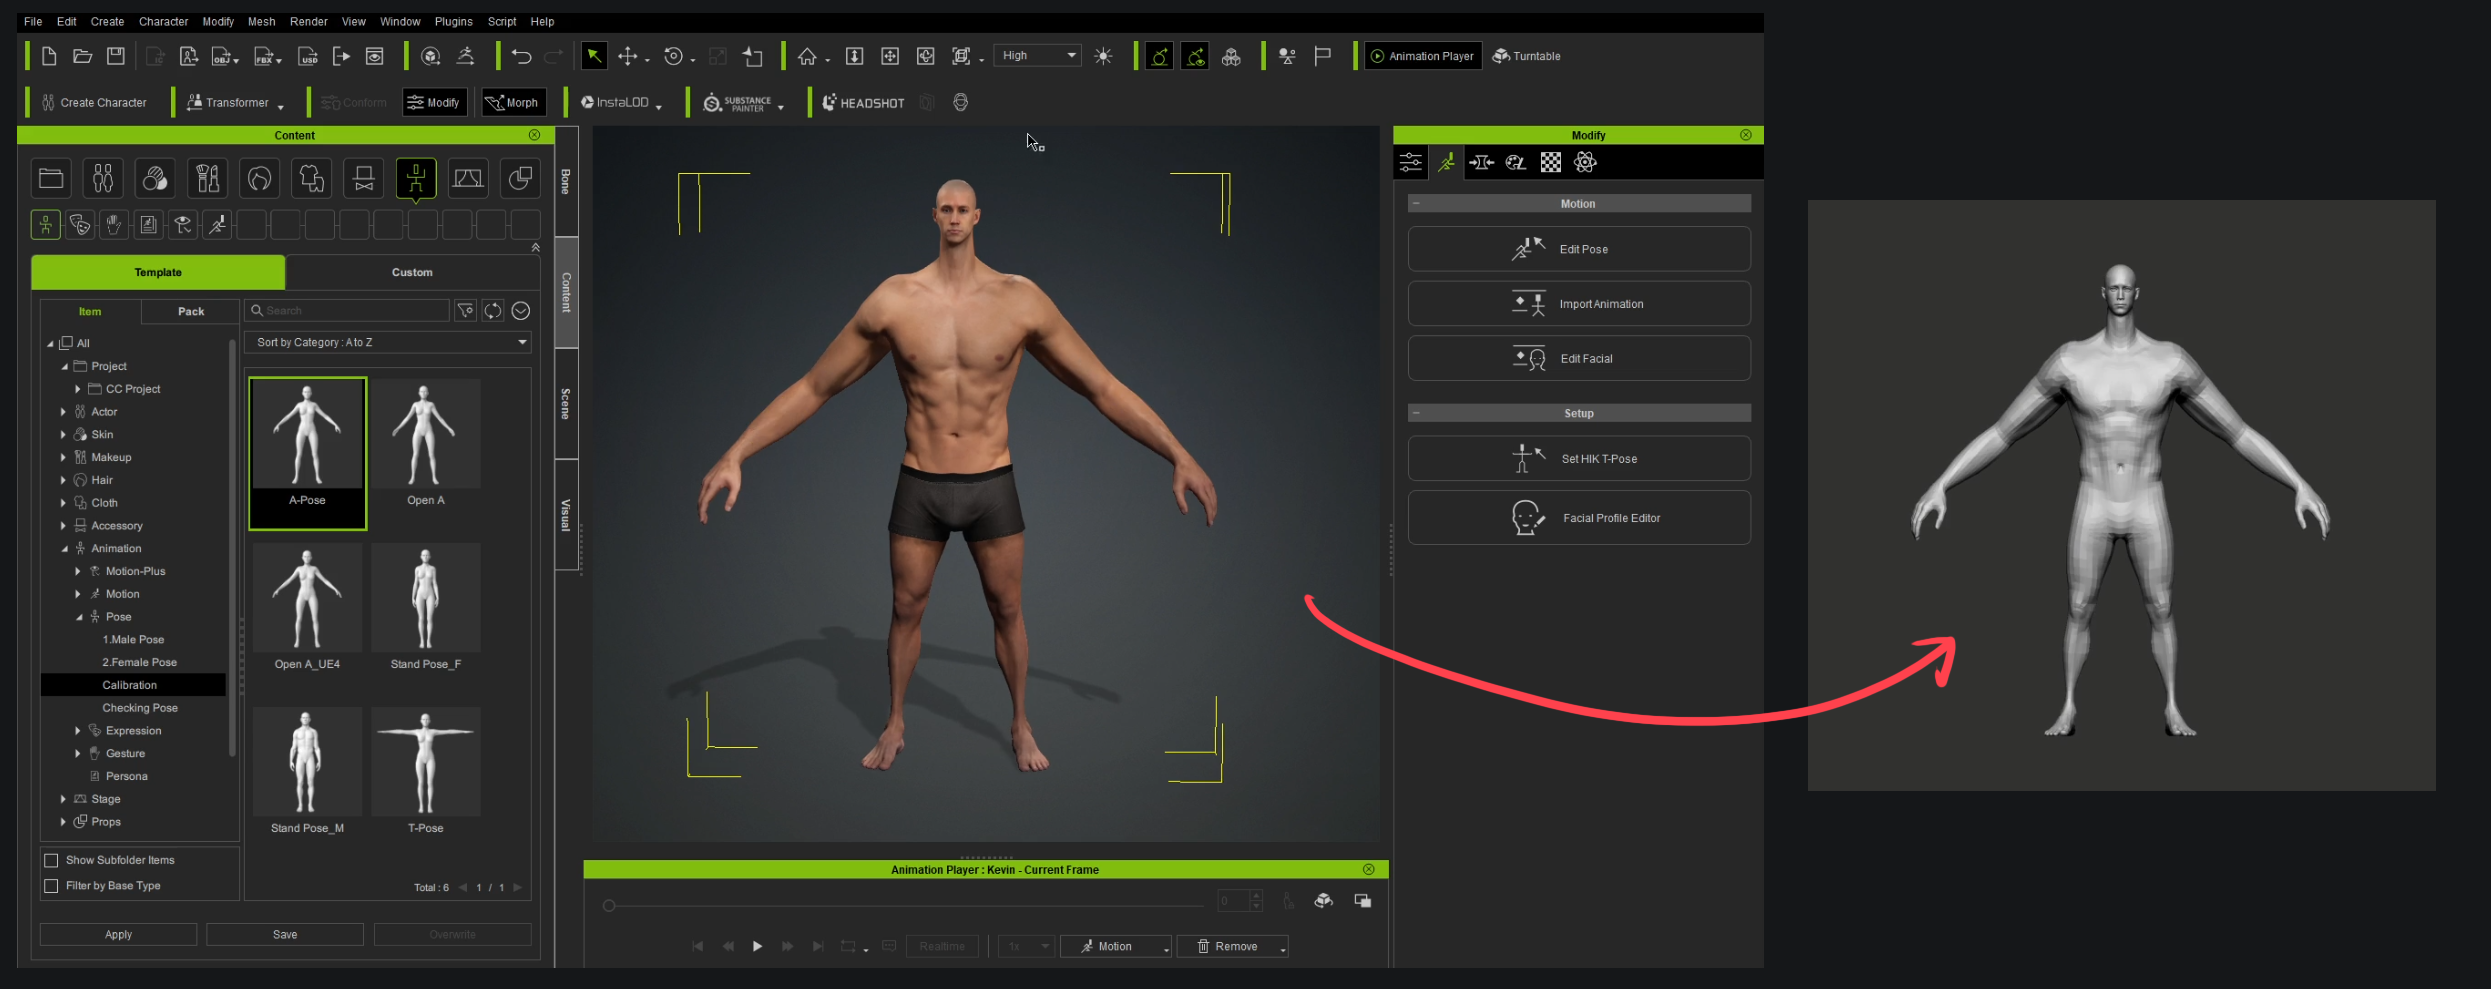
In CC4, you will notice a window and the default settings ought to be okay. It’s best to solely have one motion template which is Create Prop as a result of we created your complete character and base mesh in ZBrush. Observe that relying in your model of Character Creator, this window may look completely different, so ensure to replace to the most recent model.


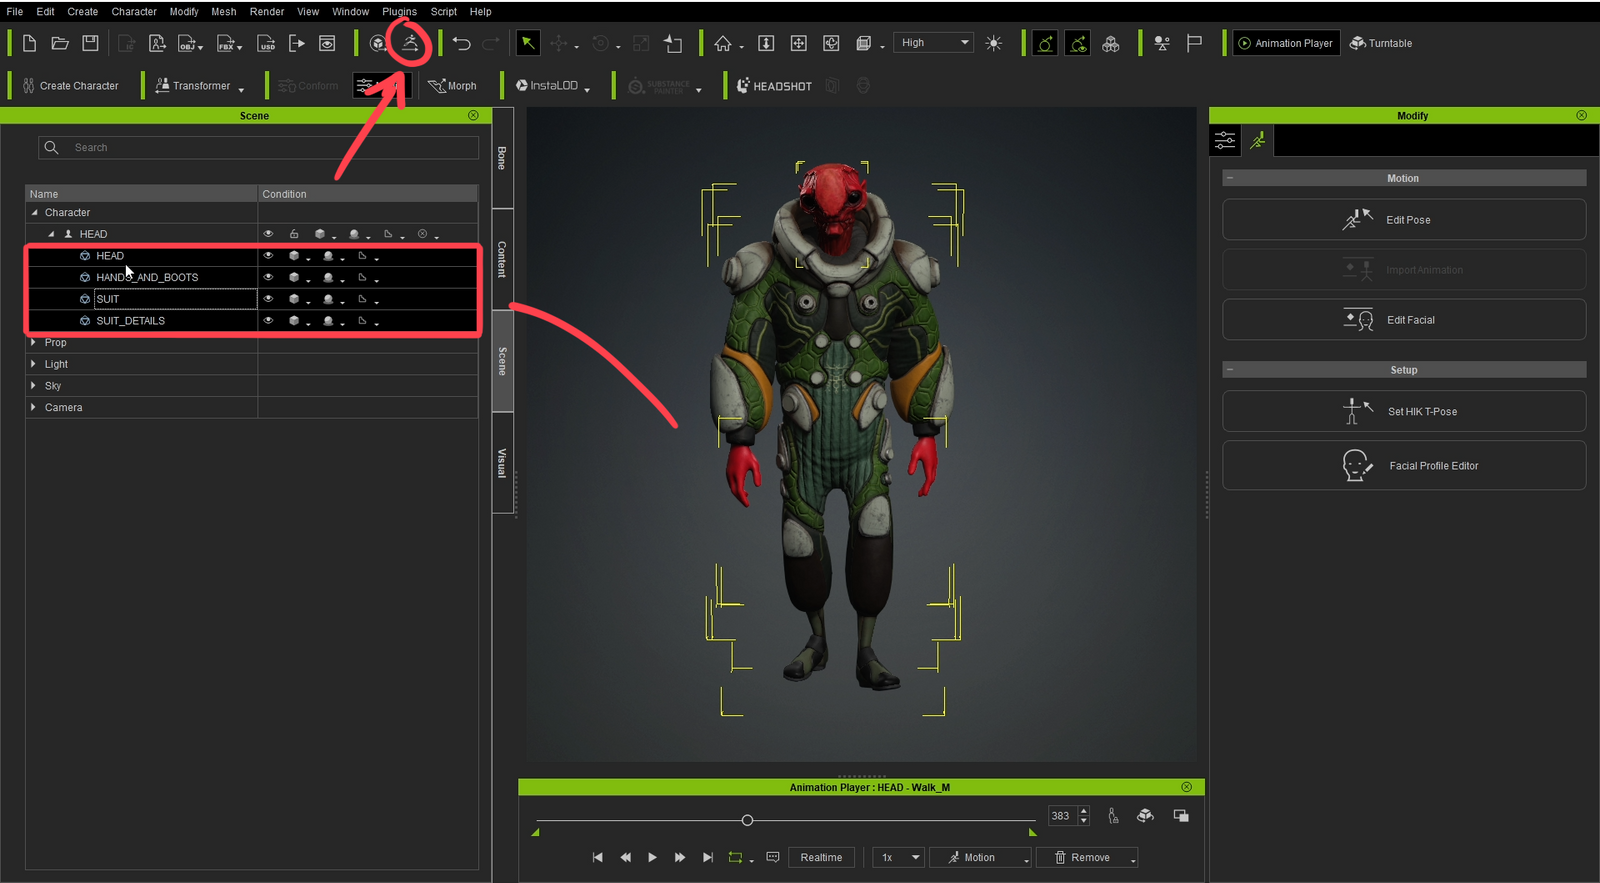
When you click on Replace, you’ll see your character in CC4 with the identical subtools as separate meshes within the Scene tab on the left-hand aspect. The connection between ZBrush and CC4 via GoZ will mechanically search for the bottom subdivision stage accessible in your subtools and ship these into CC4. If you wish to visualize extra particulars, you’ll have to create regular maps and ship these over. When you have textures in ZBrush, CC4 will mechanically acknowledge them and plug them in. However in case you have maps outdoors of ZBrush, it is advisable tweak a few issues.


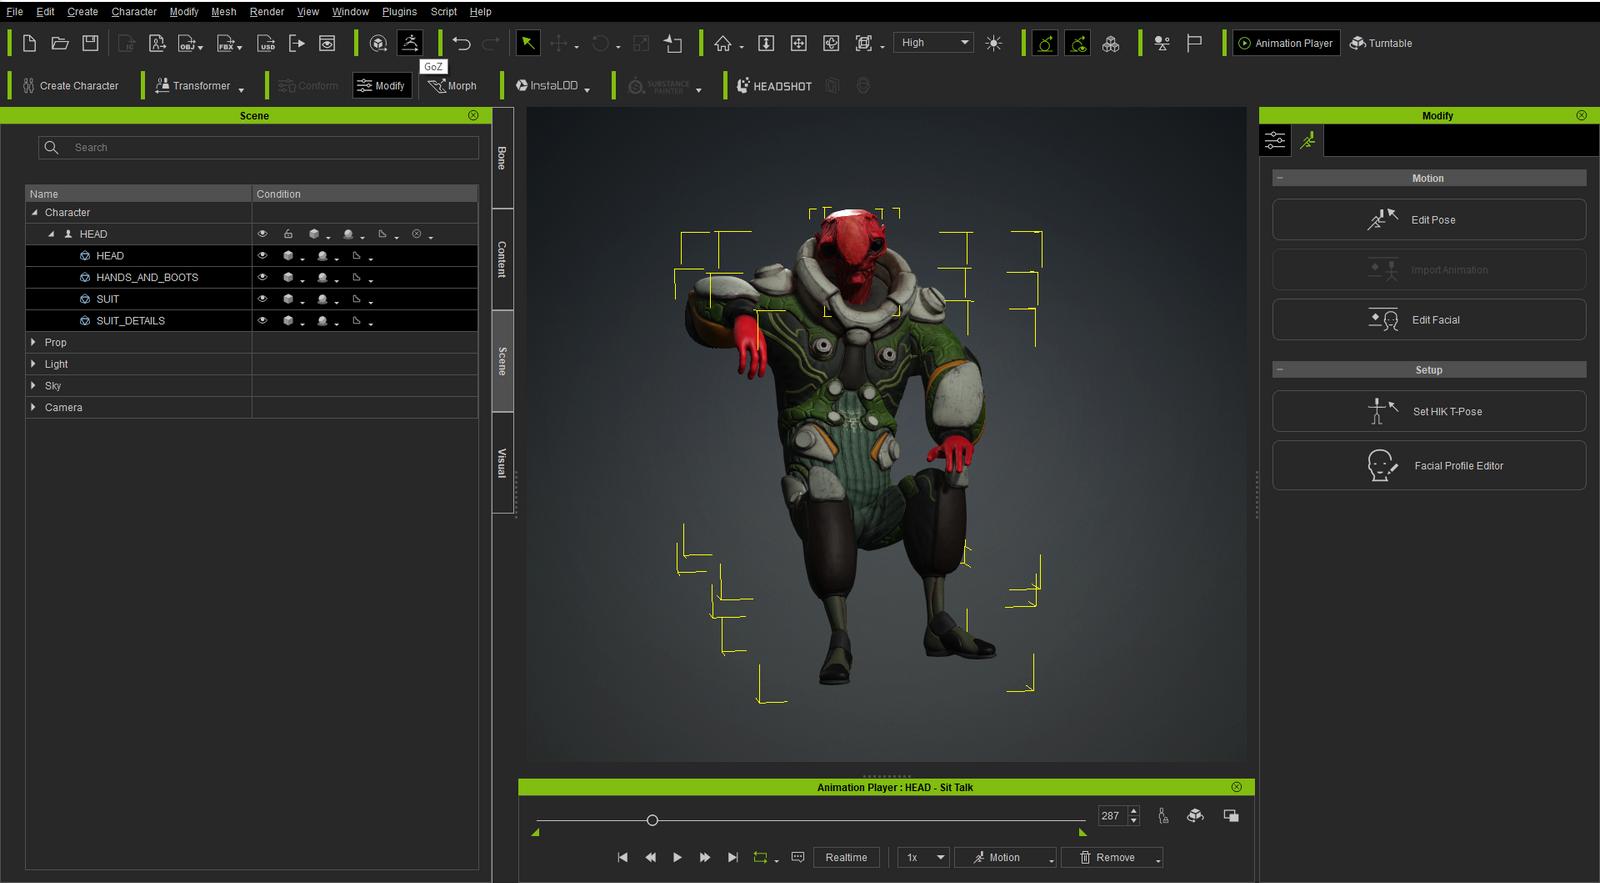
Now, for the enjoyable half! Choose all of your meshes from the Scene tab and within the Modify window, you’ll see the AccuRIG button. Click on on it and let’s begin the method!


When you enter the AccuRIG, you possibly can select to rig all of the meshes or only a number of them. In my case, I’ll use the All Meshes possibility and click on the Create Guides button.


Step one of the AccuRIG course of is to position the reference of the joints (the inexperienced, orange, and blue dots) on the character. As you place the dots, you possibly can toggle symmetry on or off and mirror the position of particular person joints in order for you. If you happen to’re struggling to position the dots, you possibly can flip off the Midpoint Placement possibility.


Most likely one of the vital essential placements is the joint for the wrist. The proper placement of this level will make your life so much simpler when organising the fingers.
If you happen to transfer to the following step and the factors for the fingers don’t look fairly proper, be sure to return and tweak the wrist:


The subsequent step is to decide on the quantity of fingers you may have in your character. I deliberately designed my creature with three fingers and a thumb simply to point out you the flexibility of this course of.
From the Variety of Fingers drop down I chosen “4”


After you make your choice, you possibly can hit the Generate Skeleton button to create factors for the palms, permitting you to regulate the position of the fingers if wanted.


The ultimate step is to bind the mesh to the skeleton you’ve created, which is completed by clicking the Bind Pores and skin button. Now you may have a rigged character prepared for posing. You should utilize the Verify Animation button to preview the deformation, and should you’re glad with the outcome, you possibly can exit AccuRIG.


You can too regulate the pores and skin weights if you wish to change the affect of sure joints on the mesh, however that’s a subject for an additional time. For now, let’s transfer on to the ultimate step which is sending the pose to ZBrush. Merely discover a pose you want from the animations, or edit a pose your self utilizing the Edit Pose button. Then, choose all your meshes and hit the GoZ button on the prime of the UI.

A brand new window will pop up, and it’s essential to decide on Present Pose from the underside and choose Relink from the drop-down menu in order that CC4 can discover and relink the pose to the character in ZBrush, together with all subdivision ranges and particulars. If you happen to don’t choose Relink, the pose will nonetheless be despatched to ZBrush, however as a brand new mesh, and also you’ll lose all subdivision ranges and particulars.


As soon as in ZBrush, we’ve the pose from CC4, and all subdivision ranges and particulars are preserved. And if it is advisable make adjustments, you possibly can simply return to AccuRIG and reset the pose or create a brand new one.


Rig Tweaks and Managing Poses
To wrap up this mission and be sure to have all the data you want, I need to share some further precious methods to reinforce your workflow and the standard of your poses.
First, let’s check out certainly one of my last poses in ZBrush. And right here’s a fast render in Marmoset Toolbag 4, which was exported from ZBrush:


Now, let’s dive into the ZBrush CC Pose Supervisor, a improbable little plugin from the oldsters at Reallusion. It’s the excellent companion for the ZBrush-to-CC4 workflow. The plugin is extremely helpful in automating the method of recording layers on every subtool to save lots of new poses.


The perfect factor about this plugin is that you just solely have to click on one button to modify between poses, even in case you have a number of subtools with a number of subdivision ranges. Right here’s the way it works:
- Selects the primary subtool from the subtool listing.
- Go to the best subdivision stage of the subtool (if relevant).
- Create and report a brand new sculpting layer from the Layers subpalette.
- Return to the bottom subdivision stage (if relevant).
- Transfer all the way down to the following subtool and repeat the method.
Right here’s one other pose recorded in a separate layer inside the identical mission:
So after you have your character rigged in CC4 and also you need to begin enjoying with some poses, you possibly can ship all of them to ZBrush and hold them in layers utilizing the ZBrush CC Pose Supervisor.
To get began, it is advisable have ZBrush and CC4 open and the character rigged. Basically, the whole lot we’ve executed on this mission as much as the final replace publish.
The subsequent step is to create a pose in Character Creator utilizing the posing instruments or a pre-made pose from the Content material Supervisor in CC4. You possibly can create any pose you need in CC4. Then, just be sure you have your default A-pose in ZBrush and the ZBrush CC Pose Supervisor plugin put in. I’ve the ZPlugin palette docked to the left for simple entry.


The plugin may be very easy and easy. As I discussed earlier, it simply follows a collection of steps that may be executed manually. As a way to deliver the pose from CC4, it is advisable click on on the Relink to Add Pose swap on the prime of the plugin.


As soon as this swap is turned on, return to CC4 and ship your character in a pose to ZBrush utilizing the GoZ button. Ensure that to pick the Relink possibility from the pop-up window.


Then, click on on the swap from the plugin to show it off and produce the character pose. Let the plugin do its work, and also you’ll have a brand new pose added in your ZBrush CC Pose Supervisor that you could activate or off. This lets you hold your unique symmetrical pose and all of your subdivision ranges!


You now undergo the method of adjusting your pose by sculpting in any of your subdivision ranges in a brand new layer so your complete course of is non-destructive.
As an example listed below are some Earlier than And After comparisons of one of many poses I despatched from CC4 to ZBrush and the way I tweaked to replace the compression of material and a few little nudges to the geometry across the palms and the pinnacle:


The tweaking of the rig is a little more tedious and in some way extra technical, however nothing too loopy. When you get your head across the thought of how you can edit the weights you possibly can spend a few hours refining the rig after which it would make an enormous distinction while you get to pose your character.
As an example, the creature for this mission has some exhausting floor particulars that ought to not deform with the rig. As an alternative, they need to be props or equipment to the rig.
Take the neck piece for example since it’s the obvious one.
The default rig offers you one thing like this:


So we will merely edit the weights of the rig to have an effect on much less — or extra — of a selected space. All it is advisable do is choose the item you need to edit, in my case the “SUIT_DETAILS” object, after which click on the Pores and skin Weights menu on the suitable:


Within the picture under, I’ve entered the edit mode for pores and skin weights and chosen the bone that I need to use to regulate or transfer the neck piece: “CC_Base_Spine02”.


You’ll see that it seems like a portion of the neck piece is white and the opposite half in direction of the again is black or darkish grey. This merely signifies that pure white might be 100% influenced by the chosen joint or bone, and something that’s pure black might be 100% left alone (zero affect over the neckpiece by the chosen joint).
So, you need to use the icons subsequent to “paint operation” so as to add or take away white or black to tweak the affect of the joint over the piece or object you need.
In different phrases, I need the neck piece to be 100% white once I choose the “CC_Base_Spine02” bone in order that when the character strikes the higher torso, the neck piece strikes with it and when the character strikes the pinnacle (a unique joint) then nothing strikes on the neck piece.
I painted all of it white:


That’s all there’s to it. The exhausting floor bits ought to be simpler since most often they’re both 100% white or 100% black in weight mapping.
With all of the tweaks to the rig, it was so much simpler to pose the character and simplified the method of adjusting the sculpt as soon as the pose was again in ZBrush. Listed below are a few last renders from my favourite poses of this character:


Thanks for taking the time to learn this tutorial, I hope this has been useful and informative!
Cheers,
Pablo M.
Free Obtain :
• ZBrush CC Pose Supervisor plugin (Early Entry of CC to ZBrush Posing Pipeline) https://www.zbrushguides.com/tutorials/posing-characters-in-zbrush-with-accurig#resource-related
• Character Creator https://www.reallusion.com/character-creator/obtain.html
Study extra :
• Pablo Munoz Gomez https://www.artstation.com/pablander
• ZBrushGuides https://www.zbrushguides.com/tutorials/posing-characters-in-zbrush-with-accurig
• Auto Rig Know-how https://www.reallusion.com/auto-rig/accurig/