Snapping modes assist you simply align objects whether or not they’re on the Canvas or within the Timeline. ActivePresenter 9 presents customers 4 snapping modes together with Canvas Snapping, Timeline Snapping, Cursor Snapping, and Container Snapping. Let’s find out about them in right now’s tutorial.
You possibly can simply discover out these 4 capabilities within the View tab of the app.

We’ll discover all of them via the desk of contents:
Earlier than going forward, click on the button beneath to obtain the newest model of ActivePresenter:


Canvas Snapping
From model 9, ActivePresenter enhances customers’ expertise with the Canvas Snapping perform. It comprises three instruments, specifically Gridlines, Guides, and Good Guides. For detailed info, confer with the article Align Objects Utilizing Canvas Snapping.
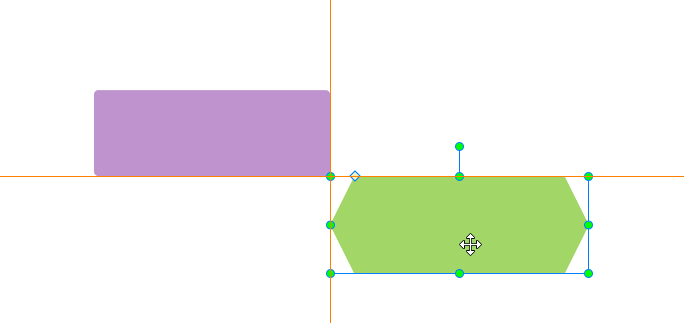
When the Good Guides checkbox is chosen, as quickly as an object comes within the neighborhood of one other object or the Canvas, it’ll make a tiny soar to match the sting of one another. Vertical and/or horizontal orange strains will seem to visualise the alignment. This selection is chosen by default.
You can even choose the Gridlines and Guides checkboxes to position the item extra exactly on the Canvas. If you wish to disable the Canvas snapping, deselect all of the checkboxes within the Canvas Snapping perform. Or, briefly holding down ALT whenever you drag or resize objects on the Canvas.
Timeline Snapping
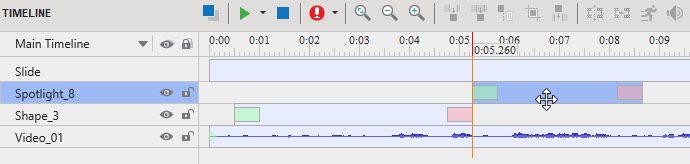
ActivePresenter 9’s Timeline Snapping mode lets you align numerous objects with higher ease and precision on the timeline. On the whole, it really works the identical manner because the Canvas Snapping mode. When this mode is on, as quickly as a shifting “snappable” object comes into the neighborhood of one other “snappable” object, it’ll make a tiny soar to match the timestamp of the opposite object.
Timeline snapping applies to the next timeline gadgets:
- Within the vary space: Playhead, begin marker, and finish marker of the vary.
- Within the objects’ time bars: Beginning and ending edge, all markers inside the item time bar (For instance, animation begin time, the tip fringe of animation length, or the beginning and ending level of insert time).
- Others: The beginning and ending level of the slide.
Timeline snapping is enabled by default. To disable it, entry the View tab > click on on Timeline Snapping. Or briefly disable this perform by holding down ALT whenever you drag an object’s time bar.
Notes:
- The “different object” could also be any object time bar within the Timeline pane whether or not it’s positioned in any row or any place.
- The vertical orange line signifies the snapping of the item time bars within the Timeline pane. Any object’s time bar can snap to others whenever you drag it alongside the timeline.
Cursor Snapping
Cursor snapping mode is designed for the cursor path, particularly whenever you document software program simulations. It helps transfer the corresponding level within the earlier/subsequent slide to make sure a clean mouse motion.
If you happen to don’t need the cursor path to maneuver repeatedly between slides, click on the View tab and switch off Cursor Snapping.
In uncommon circumstances, the cursor path may be out of sync. For instance, whenever you delete a slide that’s within the center or delete the cursor path in that slide. This leads to an abrupt motion of the mouse cursor within the rendered presentation when the slide adjustments. To keep away from this, you may once more sew the ends of cursor paths of adjoining slides collectively. Do the next:
- Proper-click the beginning level > Snap to Earlier.
- Proper-click the tip level > Snap to Subsequent.
Container Snapping
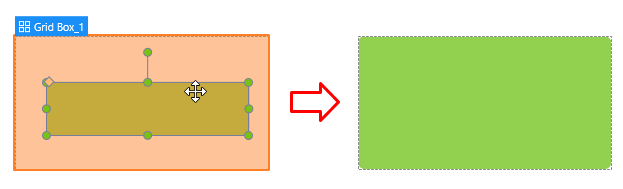
When you choose a container (Flex or Grid), the Container Snapping mode shall be enabled by default. That’s to say, whenever you transfer objects right into a container format, objects shall be mechanically snapped to that format (the container turns orange).
Any object may be included in or excluded from the container format. If an object is excluded from the format, which suggests it is not going to be dragged into that format, you might be free to position them wherever on the slide. To make a number of objects excluded from a container format, you may choose them first after which do both of the next:
- Proper-click the objects > Exclude from Container Format.
- Navigate to the Properties pane > Interactivity tab > Basic > choose the Exclude from the Container Format checkbox.
- Disable the snap habits briefly by holding down ALT whereas shifting objects. Or flip off this mode by clicking the View tab > Container Snapping.
In case your object is snapped within the Container, you may transfer it out of the Container as a separate object. Simply choose the item and right-click it > Group > Take away from Group.
You’ve realized about learn how to use 4 snapping modes in ActivePresenter 9. Work smarter with these little useful options! And don’t neglect to go to our YouTube channel for extra fascinating info.