Z-depth render go in Maya is de facto an effective way to create depth-based results within the post-production course of, reminiscent of DOF or fog. We will use these results for a extra sensible or creative look in our remaining picture.
On this article, we’re going to deal with the DOF (depth of subject) impact. We’re going to discover find out how to create a z-depth render go in Maya with the V-Ray renderer, and find out how to use that render go in Photoshop to create the precise DOF impact.
In abstract of what we’re going to cowl:
- Add a Z-depth render go in Maya-Vray
- Calculate the gap between the digital camera and objects for a greater Z-depth map
- Render and save the Z-depth render go
- Create the precise DOF impact in Photoshop
Right here is the remaining end result we are going to accomplish from this tutorial:
What’s a Z-depth render go:
Earlier than we dive into the method of rendering a Z-depth go, inside Maya with the V-ray renderer, let’s check out what it’s and why it’s vital.
Z-depth, or depth data, usually talking, is the gap between the digital camera and the objects in a 3D scene, which is measured in models reminiscent of meters, or toes. All these data is saved in a grayscale picture. In that picture, white areas signify the objects closest to the digital camera, and the black areas signify the objects distant from the digital camera accordingly.
The Z-depth render go is used more often than not within the post-production course of as a masks, to establish the areas (black and white) of the scene, to create depth-based results, reminiscent of DOF (Depth of subject) or fog.
Why the Z-depth render go is vital:
Usually talking, after we cope with depth-based results inside 3D software program, and never as a render go, just like the Z-depth go, however as an precise render of the actual depth-based impact, is a particularly time consumed render course of. Regardless that the results of the render go (Z-depth) is much less spectacular in comparison with the precise render of the depth-based impact, I’ll personally select it 9/10 instances, each time. And that’s why I consider it’s vital to seize the strategy of the Z-depth render go.
Add a Z-depth render go in Maya:
Right here is the Maya scene we will likely be engaged on. It’s nothing fancy, just a few bunch of random euros forex. Though it has some depth within the background, it may gain advantage from o DOF impact.

However earlier than we add the precise z-depth render go, we must always click on the checkbox on the Render View – Use Vray VFB first. By doing that, we enable the VRay body buffer to render our scene and never the build-in renderer, which permits us to take benefit of render passes (render components)

That has been checked, it’s time so as to add the precise Z-depth render go. For doing so, go to Render Settings – Render Parts – Zdepth (down the checklist – left column). Now we will choose the vrayRE_Z_depth node within the Added render components (proper column) and open up the Attribute Editor, so we will check out its paraments.
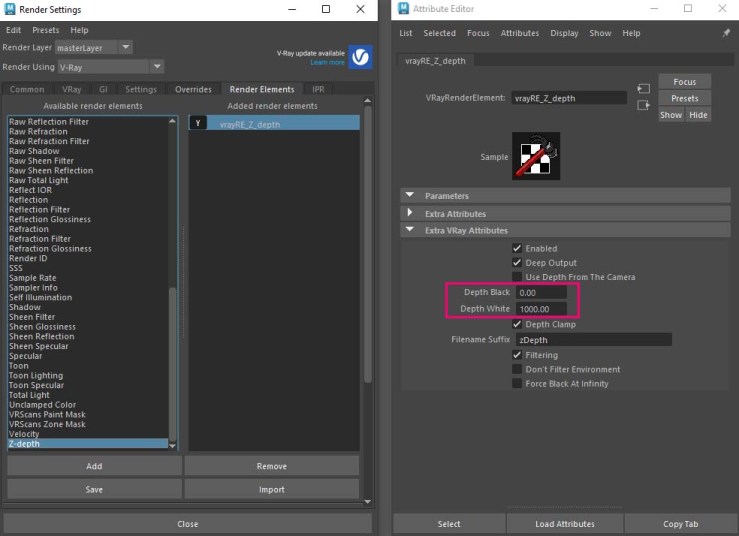
If we render our scene proper now, the Z-depth render go received’t present something, at greatest it is going to be incorrect, since we haven’t calculated the gap between the digital camera and objects but. In different phrases, we haven’t say Maya by way of Z-depth (Depth Black and Depth White) what distance to contemplate as nearer or distant from the digital camera.
We’re going to repair that within the subsequent step.

For extra dive into all of the paraments of the Z-depth render go be happy to try their official website.
Calculate the gap between the digital camera and objects:
Now we’ve got our Z-depth render go in place, it’s time to calculate the gap between the digital camera and objects in our scene. And the way in which to try this is thru the distance instrument in Maya.
We’re going to try this for each Depth White and Depth Black paraments.
Calculate the Depth White distance:
Go to Create – Measure Instruments – Distance Software.
Go to the highest view, and first click on nearer to the digital camera after which click on once more distant from the digital camera. The Distance instrument will present a numeric worth of that distance, as you may see from the picture beneath:
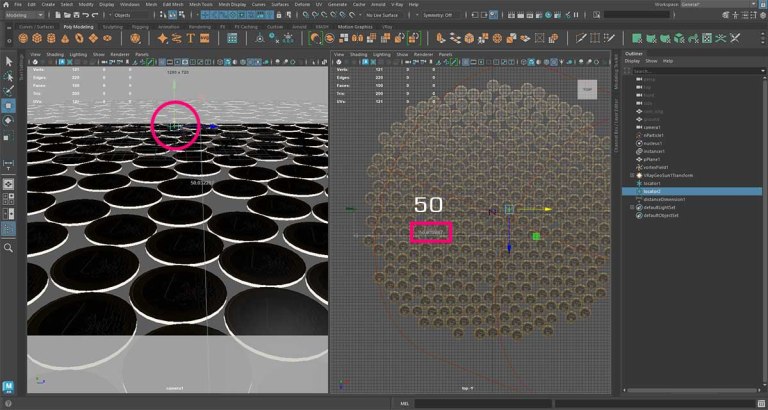
The space we’ve got in our scene is roughly 50 models.
Set that worth to your Depth White parament below the Additional VRay Attributes, just like the picture beneath:

If we now re-render our scene, the Z-depth render go will present one thing much like the picture beneath:

However as you may think about, the above picture is just not proper, a minimum of but. As a result of we would like a minimum of some portion of the down half to be fairly black and never a lite grey. In that method, the black space will likely be 100% not blurry and the white space will likely be 100% blurry. In any other case, our entire picture will likely be some sort of blurry, which isn’t the case of a DOF impact.
So as to decide the place 100% of black stops, we’re going to as soon as once more use the Distance instrument.
Calculate the Depth Black distance:
Since we have already got the Distance instrument in our Outliner, choose the locator 2, and place it fairly near the digital camera, like within the picture beneath:

Now put that quantity (17) within the Depth Black parament below the Additional VRay Attributes, just like the picture beneath:

Now if we re-render our scene as soon as once more, the end result we’re getting is what we wished for the Z-Depth render go. These colours imply, that the down a part of our picture will likely be 100% not blurry, and as we go up the picture will get blurry. Precisely what we would like for our DOF impact.

Observe: We will simply invert the colours from our Z-Depth render go inside Photoshop if we wish to.
Render and save the Z-depth render go:
So as to create the ultimate composition in Photoshop, we’ve got to render and save all the required render passes, which in our case is simply the RGB shade (grasp) and the Z-depth render go.
So after we render our scene with the V-Ray buffer, go to the save icon and press maintain, and selected the Save all photos channels to separate information. Choose the vacation spot of the folder, wherein the information will likely be saved, give it a reputation, and we’re completed. After that, Maya will mechanically save all render passes in that folder, for later use in Photoshop, in our case.

Within the following and final part of this tutorial, we’re going to really create the DOF impact in Photoshop.
Create the precise DOF impact in Photoshop:
We may create the ultimate DOF impact within the post-production course of both inside Photoshop or in After Results. If you’re not accustomed to utilizing After Results for that individual objective of picture enhancing, you may have a look right here, so you may see what After Results brings to the desk.
That being stated, let’s create the DOF impact in Photoshop.
Open up Photoshop and drag and drop the render picture (grasp). Additionally, drag and drop the Z-Depth render go, beneath the grasp layer, like within the picture beneath:

Creating the DOF masks:
Observe the steps beneath to create the DOF masks:
- Go within the second layer (Z-Depth) and within the thumbnail proper click on and choose “Choose pixels“
- After that, press ctrl+C (for copy)
- Then choose the primary layer (grasp) and go to the Channel tab
- Press the little plus icon (create a brand new channel)
- Now for the reason that new channel is chosen, press ctrl+v (for paste).
- For organizational functions, rename that channel to DOF
- Choose the RGB channel
- We will now, disable the second layer (Z-Depth) from the layer stack in Photoshop
We will see the above steps with visuals within the gif file beneath:

Making use of a Lens Blur filter:
So as to use the masks we created within the above step, we’re going to want the Lens Blur filter.
Since we’ve got chosen the grasp layer go to Filter – Blur – Lens Blur.
A brand new window popup. In that new window, simply guarantee that the Depth Map is within the new channel (DOF) we created within the earlier step. After that, simply play with the settings so as to get the very best end result.

We will make the impact of DOF as robust or lite as we would like. After some shade correction, right here is the ultimate end result:
