Render an ambient occlusion move in Maya and V-ray with just a few easy steps. The ambient occlusion when utilizing V-ray is known as Grime move.
Ambient occlusion is a method used to simulate delicate shadows that happen between close by objects. Principally, is a grayscale picture that we will use as a render move in Enhancing Software program to boost our last picture or video.
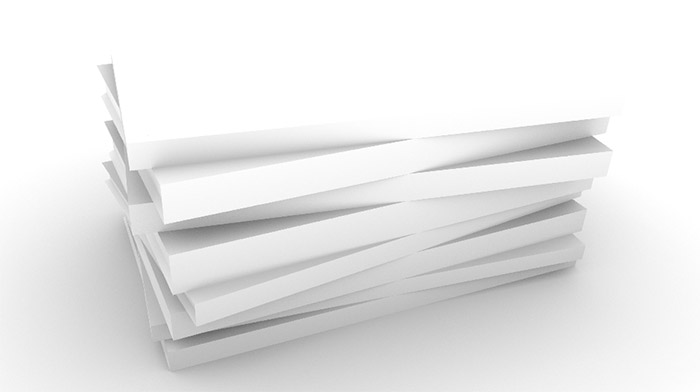
The picture under is an ambient occlusion render move from Maya-Vray. Really is from the challenge we might be engaged on, to show the ambient occlusion approach.
It may undoubtedly give some further realism to our 3D scenes. By rendering an ambient occlusion move, we have now extra management over the ultimate output in Enhancing Software program comparable to Photoshop. For instance, we will decrease or improve the opacity of our Ambient occlusion layer, we will change the mixing mode, shade, and so on.
Be aware: If we cope with 3D animation as a substitute of a single picture, we will nonetheless render an ambient occlusion render move. However as a substitute of utilizing Photoshop for the ultimate composition, we have to use Video Enhancing software program, comparable to After Results.
On this article, we are going to discover out, how we will render an ambient occlusion render move in Maya with V-ray renderer. Moreover, we are going to make the ultimate composition (with ambient occlusion move) in Photoshop.
We will see the ultimate outcome (with ambient occlusion move) within the picture under:
All steps:
- Put together the scene for the V-ray renderer
- Add an ambient occlusion move
- The setting of the VRay Grime node
- Render an ambient occlusion in Maya
- Closing composition in Photoshop
Related articles:
Put together the scene for the V-ray renderer:
Earlier than we add the ambient occlusion render move in V-ray, we must always in all probability change the Renderer in Maya to a V-ray renderer, from the Render Setting window.

I’m not going into particulars, about what the suitable V-ray settings are, since each scene is completely different, and one thing that may work for me, couldn’t work to your scene. To provide you and thought, the setting I used is under:

In case you are not accustomed to the V-ray renderer inside Maya, be happy to try their official documentation for that matter.
We might be engaged on the next scene:

Add an ambient occlusion move:
Including an ambient occlusion render move is a two-step course of. First, we add the render aspect itself (Additional Tex) after which join it with the suitable node (VRay Grime).
- So as to add an ambient occlusion render move go to the Render Parts part within the Render Settings window. Within the Availabe render parts (left column) find the Additional Tex node and click on on it. After that, it is going to seem in the suitable column.
- Choose that new vrayRE_Extra_Tex node and open up the Attribute Editor. Go to Additional VRay Attributes part and increase it. Within the Texture possibility, click on on the little checkerboard on the suitable. The Create Render Node window seems. Find and choose the VRay Grime node.

The setting of the VRay Grime node:
Now we have now chosen the VRay Grime node, and because the Attribute Editor is open, change some settings, comparable to Radius and Subdivs.

Crucial settings are Radius and Subdivision. However since this node has a variety of options to play with, be happy to have a look right here, for extra data, about that node basically.
Be aware: We will have entry to the VRay Grime node, from two locations. From Shadergraph – Textures tab, and from Render Parts window.
Render an ambient occlusion in Maya:
Now we have now set our ambient occlusion, let’s get a fast render by way of the Vray body buffer, as a way to confirm if every part is okay.
Be aware: So as to see the ambient occlusion render move, we have now to modify from the higher left nook (dropdown) to the right render move, on this case, to the “extraTex_VRayDirt1”

If we’re not pleased, with the outcomes of ambient occlusion we’re getting, we will play with the VRay Grime settings. In my case, I’m fairly proud of this outcomes, so I name it a day.
Closing Render:
So after we render our scene with the V-Ray body buffer, go to the save icon and press maintain, and selected the Save all pictures channels to separate recordsdata. Choose the vacation spot of the folder, through which the recordsdata might be saved, give it a reputation, and we’re accomplished. After that, Maya will mechanically save all render passes in that folder, for later use in Photoshop, in our case.


Closing composition in Photoshop:
Open up Photoshop and drag and drop the render picture (grasp). Additionally, drag and drop the ambient occlusion render move, above the grasp layer. Lastly set the ambient occlusion (the above layer) to multiply mixing mode.

If for any motive your ambient occlusion is powerful, be happy to decrease the opacity of that layer, as a way to reduce the impact. Then again, in case your impact just isn’t robust sufficient, you possibly can duplicate your ambient occlusion layer, as many instances as you want, as a way to get the outcome you anticipate.
Here’s a comparability of ambient occlusion and with out: