
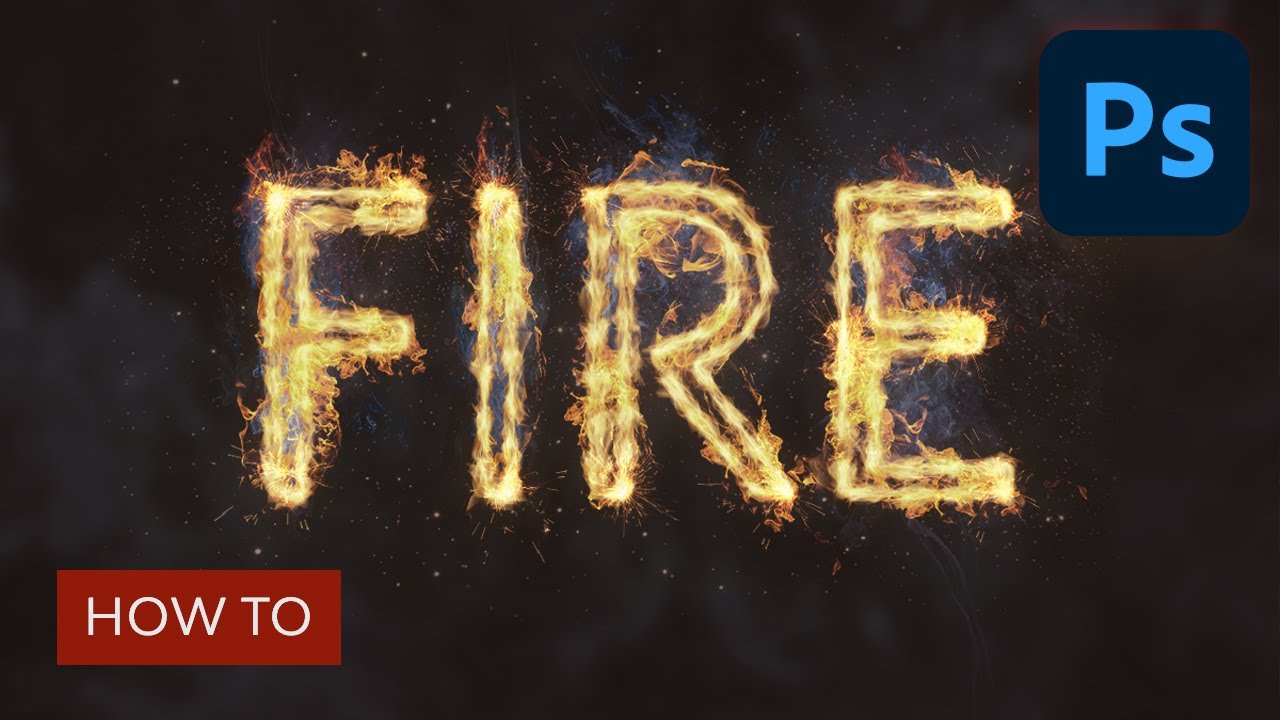
Pyrophobia is an inordinate concern or hatred of fireplace. This tutorial will present you easy methods to use Photoshop’s Flame filter, together with some flame, smoke, and spark picture textures in addition to mixing choices, filters, and adjustment settings, to create a blazing, fiery textual content impact. Let’s get began!
This flaming textual content Photoshop impact was impressed by the various flame impact Photoshop add-ons out there on Envato Components. For instance, there’s this superior flame textual content impact motion for Photoshop, which you’ll be able to apply to create a hearth photograph impact or flame textual content impact in seconds:


Moreover, should you choose to look at video tutorials to study these expertise, you are in luck! You’ll be able to watch this new video from the Envato Tuts+ YouTube channel to discover ways to make fireplace in Photoshop:
What You will Be taught in This Photoshop Flame Impact Tutorial
- Tips on how to create the background and textual content layers
- Tips on how to create a stroke path and layer
- Tips on how to use the flame filter
- Tips on how to create a texture overlay layer
- Tips on how to create a texture utilizing filters
- Tips on how to modify a layer’s mixing choices
- Tips on how to add flame pictures
- Tips on how to add smoke pictures
- Tips on how to add sparks
- Tips on how to create an outer glow
- Tips on how to add smoke to a background
- Tips on how to add a background texture
- Tips on how to apply ultimate changes
What You will Want
The next property had been used throughout the manufacturing of this Photoshop flaming textual content tutorial:
1. Tips on how to Create the Background and Textual content Layers
Step 1
Create a brand new 1200 x 850 px doc, click on the Create new fill or adjustment layer icon on the backside of the Layers panel, select Stable Colour, and use the Colour #1e100c.


Step 2
Create the textual content in All Caps utilizing the font Aller Gentle. Set the Dimension to 350 pt and the Monitoring to 100.


2. Tips on how to Create a Stroke Path and Layer
Step 1
Proper-click the textual content layer and select Create Work Path.


Step 2
Conceal the textual content layer by clicking the attention icon subsequent to it, and create a brand new layer with the title Stroke Flames.


3. Tips on how to Use the Flame Filter
Step 1
Go to Filter > Render > Flame, and click on OK should you get a message telling you that the trail is lengthy.
Subsequent, you will be taking part in round with the completely different choices and settings’ values to stroke the trail with flames, till you get an end result you want.
The values used listed below are:
Fundamental
- Flame Sort: 2. A number of Flames Alongside Path
- Size: 115
- Verify the Randomize Size field.
- Width: 35
- Interval: 50
- Verify the Alter Interval for Loops field.
- High quality: Excessive (Sluggish)


Superior
- Turbulent: 35
- Jag: 20
- Opacity: 50
- Flame Strains (Complexity): 29
- Flame Backside Alignment: 20
- Flame Model: 2. Violent
- Flame Form: 5. Pointing
- Verify the Randomize Shapes field.
Click on OK to use the filter. It’d take a while, so simply wait a bit of bit for it to be rendered.


Step 2
If you like the result, choose the Direct Choice Instrument (A) and hit the Return key to do away with the work path.


4. Tips on how to Create a Texture Overlay Layer
Step 1
Create a brand new layer on high of the Stroke Flames layer, title it Flame Texture, and fill it with White.
Be certain to set the Foreground and Background Colours to Black and White.


Step 2
Proper-click the Flame Texture layer and select Convert to Sensible Object.


Step 3
Proper-click the Flame Texture layer once more and select Create Clipping Masks.


Step 4
Go to Filter > Render > Clouds.


5. Tips on how to Create a Texture Utilizing Filters
Step 1
Go to Filter > Filter Gallery to use the next Filters:
Sketch > Bas Reduction
- Element: 13
- Smoothness: 3
- Gentle: Backside


Step 2
Click on the New impact layer icon within the backside proper nook so as to add one other filter, and apply Bas Reduction with the identical values once more.


Step 3
Add one other new impact layer.
Brush Strokes > Spatter
- Spray Radius: 10
- Smoothness: 5
Click on OK when achieved.


6. Tips on how to Alter a Layer’s Mixing Choices
Step 1
Change the Flame Texture layer’s Mix Mode to Comfortable Gentle.


Step 2
Double-click the Flame Texture layer to regulate its Mixing Choices. We’re going to modify the This Layer sliders below the Mix If part.
Press-hold the Possibility key, and click-drag the precise slider to separate it. As you progress the slider’s ends, you will discover how the feel begins to mix higher with the flames.
What this slider does is stop the lighter areas of the feel from interacting with the content material beneath it.


Step 3
Attempt completely different values till you want the result.
We are going to get again to the feel on the finish of the tutorial to blur it, so you can too modify the values some extra then.


7. Tips on how to Add Flame Photographs
Step 1
Use any of the flame pictures from the Flames0032, Flames0036, and Flames0043 units so as to add to the textual content.
It’s higher so as to add the photographs as Sensible Objects with the intention to apply modifications to them non-destructively.
To take action, go to File > Place Linked, and open the picture you need to add.


Step 2
Change the picture layer’s Mix Mode to Display.


Step 3
Press Command-T to enter the Free Remodel Mode, and transfer, resize, and rotate the picture to position it over part of the textual content.
Hit the Return key to commit the modifications.


Step 4
Go to Picture > Changes > Hue/Saturation, and alter the Hue to 3 and the Saturation to -35, or use every other values to match the colour of the picture’s flame with the stroke’s flame coloration.


8. Tips on how to Add Extra Flames
Step 1
Place one other flame picture over one other a part of the textual content, change its layer’s Mix Mode to Display, and rework it as wanted.
To duplicate the changes, broaden the primary flame picture layer’s filter checklist, press-hold the Possibility key, and click-drag the Sensible Filters tab to the newly added picture layer.


Step 2
Repeat the steps so as to add as many flame pictures as wanted to the textual content.


Step 3
Place all of the flame picture layers in a bunch and title it Flames.


9. Tips on how to Add Gentle Smoke Photographs
Step 1
Add any of the smoke pictures you want as a Sensible Object, and alter its layer’s Mix Mode to Display.
Place the smoke picture over part of the textual content, and rework it as wanted.


Step 2
Press Command-U to regulate the Hue/Saturation. Verify the Colorize field, and alter the Hue to 215, the Saturation to 25, and the Lightness to -60.


Step 3
Double-click the smoke picture layer to regulate its Mixing Choices. This time, we’re going to modify the Underlying Layer sliders below the Mix If part.
Press-hold the Possibility key, and click-drag the precise slider to separate it. As you progress the slider’s ends, you will discover how the smoke picture begins to mix higher with the textual content and the background.
What this slider does is shield the lighter areas of the textual content from being affected by the smoke texture.


Step 4
Proper-click the smoke picture layer and select Copy Layer Model.


Step 5
Add extra smoke pictures to the textual content, and for every new picture you add, right-click its layer and select Paste Layer Model.
It’s also possible to duplicate the Hue/Saturation changes the identical manner you duplicated them for the flame pictures.
Double-click the Hue/Saturation tab below the Sensible Filters checklist to make use of completely different values relying on the picture you add and the impact you need.
Repeat the identical steps till you want the result.


Step 6
Place all of the smoke picture layers in a bunch and title it Smoke, and alter the group’s Opacity to 85%, or any worth you want.


10. Tips on how to Add Heavy Smoke Photographs
Step 1
We’re going to add extra smoke pictures to create extra depth.
So add a brand new smoke picture, change its layer’s Mix Mode to Lighter Colour, place it over any a part of the textual content, and rework it as wanted.


Step 2
Add a couple of extra smoke pictures utilizing the identical Mix Mode, and hold them a bit of bit smaller than the lighter ones.


Step 3
Place all the brand new smoke picture layers in a bunch and title it Smoke 02, and alter the group’s Opacity to 50%, or any worth you want relying on the impact you need.


11. Tips on how to Add Sparks
Step 1
Place one of many Fireworks0023 pictures over any a part of the textual content, change its layer’s Mix Mode to Linear Dodge (Add), and rework it as wanted.


Step 2
Repeat the identical steps so as to add extra sparks all around the textual content.


Step 3
Place all of the spark picture layers in a bunch and title it Sparks.


12. Tips on how to Create an Outer Glow
Step 1
Press-hold the Possibility key, and click-drag the Stroke Flames layer downwards to create a replica beneath the unique.


Step 2
Rename the copy layer to Glow, right-click it, and select Convert to Sensible Object.


Step 3
Go to Filter > Blur > Gaussian Blur, and set the Radius to 25.


Step 4
Change the Glow layer’s Mix Mode to Laborious Gentle and its Opacity to 25%.


13. Tips on how to Add Smoke to a Background
Step 1
Place a brand new smoke picture on high of all layers and alter its layer’s Mix Mode to Display.
Resize the picture to fill one aspect of the doc.


Step 2
Press Command-U to regulate the Hue/Saturation. Verify the Colorize field, and alter the Hue to 215, the Saturation to 25, and the Lightness to -83.
Remember the fact that these values are those used within the tutorial, however you’ll be able to all the time tweak them to fit your work and pictures.


Step 3
Go to Filter > Blur > Gaussian Blur, and set the Radius to 6. The goal right here is to create a delicate foggy impact throughout the textual content.


Step 4
Repeat the identical steps so as to add a pair extra smoke pictures.


Step 5
It’s also possible to add some extra behind the textual content.


14. Tips on how to Add a Background Texture
Step 1
Place the Fireworks0017 – Picture 2 texture on high of the Stable Colour layer, and alter its layer’s Mix Mode to Linear Dodge (Add) and its Opacity to 50%.
Remodel the feel as wanted to fill the background.


Step 2
If you wish to do away with any elements of the feel, click on the Add layer masks icon on the backside of the Layers panel, and ensure to pick the masks’s thumbnail.


Step 3
Set the Foreground Colour to Black, choose the Brush Instrument, and select a smooth spherical tip. Paint over any areas you need to erase.


15. Tips on how to Apply Remaining Changes
Step 1
Click on the Create new fill or adjustment layer icon on the backside of the Layers panel and select Colour Lookup.
Select FoggyNight.3DL from the 3DLUT File menu, and alter the layer’s Opacity to 10%.


Step 2
Choose the Flame Texture layer, and go to Filter > Blur > Gaussian Blur and set the Radius to 3 in order that the feel will not be as harsh.


Congratulations! Your Fireplace Textual content Impact Is Performed
On this tutorial, we created a textual content work path and stroked it with flames utilizing the Flame filter. Then, we began including flame, smoke, and spark picture textures to construct up the impact. We additionally used mixing choices, filters, and changes to higher mix every thing collectively. Lastly, we added the background and a few ending touches to complete off the impact.


5 Prime Photoshop Flaming Textual content Results and Actions From Envato Components
Now you know the way to make fireplace in Photoshop and easy methods to create the good flame textual content. Now, if you wish to save a while subsequent time you need to make a flame impact Photoshop design, you want high add-ons.
In case you’re an avid Photoshop consumer, you will love Envato Components. The subscription-based market gives you limitless Photoshop add-ons, Photoshop flame results, premium fonts, inventory pictures, and extra!
This is our choice of the greatest flame impact Photoshop actions, brushes and add-ons. Attempt them to your subsequent undertaking!
1. Artistic Fireplace Textual content Impact (PSD)
Need to create cool Photoshop flaming texts in minutes? Take a look at this add-on. The obtain features a PSD file with a holographic good object in HD (4000×2500 pixels).
This Photoshop textual content fireplace impact is simple to make use of, non-destructive, and well-organized in layers.
2. Artistic Flame Textual content Impact (PSD)


In case you prefer to have extra selection in your Photoshop flame textual content design, this obtain contains three kinds. Identical to the earlier one, this can be a Photoshop textual content fireplace impact price having. The result’s absolutely editable, and it is simple to make use of.
3. Poisonous Flame Textual content Impact (PSD)


What should you’re on the lookout for various kinds of Photoshop flame results? Then this one is for you.
This cool Photoshop flame textual content impact replicates fireplace with acid chemical compounds for a unique look. You’ll be able to modify the colours as you want: multicolor, monotone, gradients, or extra!
4. Fireplace Impact Photoshop Brushes (ABR)


Generally you simply want a practical set of fireplace impact Photoshop brushes. This pack is ideal for creating digital artwork, photograph results, overlays, and extra. Attempt these brushes for a practical fireplace textual content impact!
5. Fireplace Impact Photoshop Motion (ABR, ATN)


This Photoshop flame impact motion is one other welcome boost to your assortment. It is very easy to make use of. You simply have to brush over your design the place you need the flame impact and play it. You can create superior flaming textual content Photoshop designs with this pack of non-destructive actions and brushes!
Discover Extra Photoshop Tutorials and Assets
Seeking to study extra? Take a look at these superior fireplace impact and Photoshop tutorials:
Editorial Be aware: This publish has been up to date with contributions from Maria Villanueva. Maria is the Affiliate Editor of the Tuts+ Design channel.