You might get accustomed to working with the Object Settings to create default objects and reuse them later. Now, ActivePresenter 9 brings you enhancements to make you optimize your work. Study extra in right this moment’s article.
As you could know, the Object Settings function comes with ActivePresenter 8 launch model. It helps customers save tons of time to create the identical objects’ properties for programs, initiatives, and quizzes. That’s as a result of it retains all the data, coloration, and elegance even should you change its form. After customizing objects within the Object Settings view, newly inserted objects of the identical sort will inherit all of the properties that you’ve adjusted. Apart from, this function lets you resolve the place of your object flexibly. That is the distinction between Object Settings and Slide Masters.
The article covers 4 important components as follows:
Obtain the app right here to unlock your creativity!


Overview of Object Settings
To open the Object Settings view, simply entry the View tab > Object Settings.
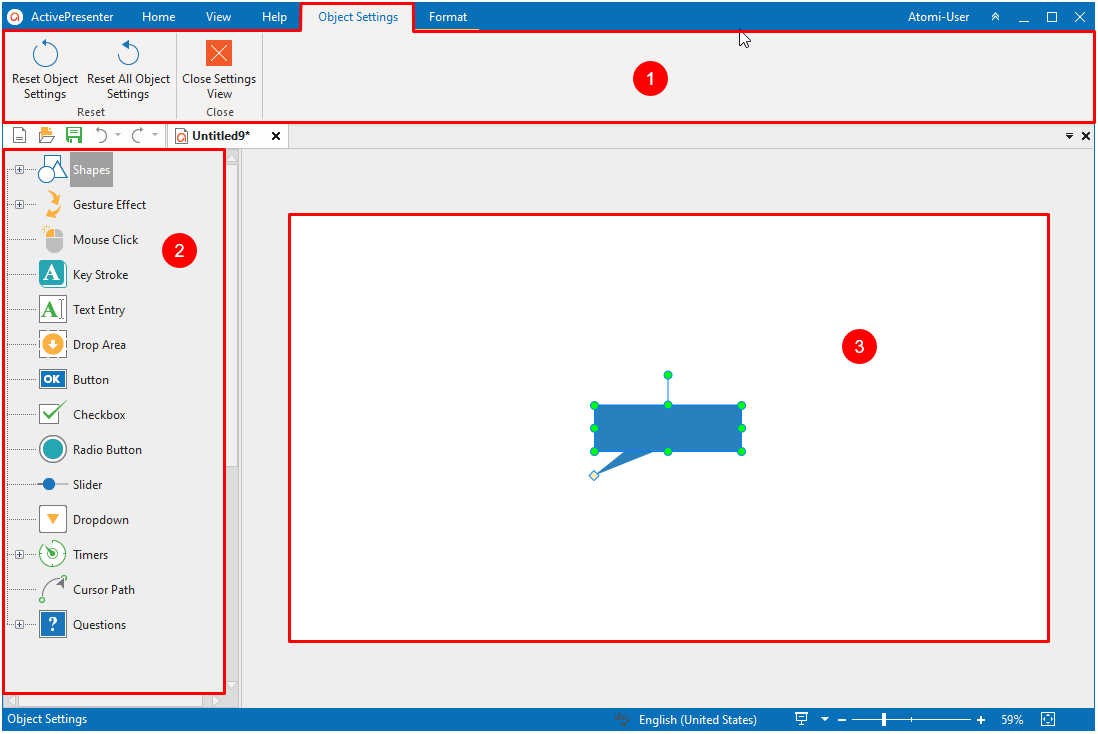
As could be seen, the Object Settings View consists of three important components:
- The Objects Settings tab’s toolbar comprises instructions for enhancing default objects.
- The left pane consists of 14 object varieties, particularly Shapes, Gesture Impact, Mouse Click on, Key Stroke, Textual content Entry, Drop Space, Button, Checkbox, Radio Button, Slider, Dropdown, Timers, Cursor Path, and Questions. Every object sort has its personal default object.
- The Canvas previews the modifications while you customise default objects.
Be aware: Shapes, Gesture Impact, Timers, and Questions have their very own object varieties.
Customise Default Objects in Object Settings
On the subject of setting default objects, you’ll be able to right-click the item on the Canvas and choose Set as Default. Nonetheless, in case you haven’t created any object on the Canvas, working with Object Settings is your resolution.
Now, to customise any default object, take the next steps:
Step 1: Click on on object sort on the left pane. The default object will seem on the Canvas.
Step 2: Choose the item and alter its coloration and look, add textual content, add occasions – actions, and extra (Go to the item’s Properties pane or the Format tab). The Canvas will present all of the modifications you made to the item.
Step 3: Click on Shut Settings View to save lots of all the pieces and shut the view. All newly added objects of the identical sort within the present undertaking will inherit the alterations.
Save Objects Throughout Tasks
In case you need to reuse the custom-made objects for different initiatives, including them to Object Templates or saving them as Customized Themes are good selections. Right here’s how:
Step 1: Click on ActivePresenter > Save or Save as….
Step 2: Choose ActivePresenter Object Template (*.apobject) within the Save as sort record. Alternatively, you’ll be able to choose ActivePresenter Theme (*.aptheme).
Step 3: Click on Save.
Usually, your file saves in (C:Customers<user_name>DocumentsActivePresenter Templates (for Home windows) or /Customers/<user_name>/Paperwork/ActivePresenter Templates (for macOS)).
Reset Default Object Settings
In case you aren’t happy with the modifications after customizing, ActivePresenter 9 lets you reset. The app affords you two choices:
- Reset a person object: click on Reset Object Settings within the Objects Settings tab’s toolbar > choose Sure on the pop-up dialog. Alternatively, right-click the item > Reset Default Settings.
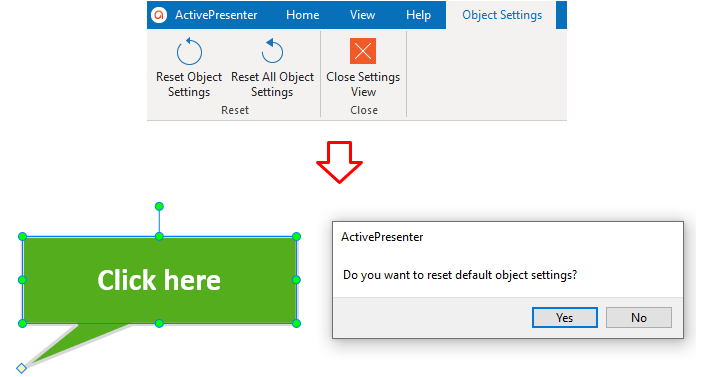
- Reset all default object settings: click on Reset All Object Settings within the Objects Settings tab’s toolbar > choose Sure within the pop-up dialog.
It’s straightforward to work with Object Settings, isn’t it? Give ActivePresenter 9 a attempt to pace up your workflow. Go to our YouTube channel to get extra tutorial movies. Have any issues? Be happy to contact us.
Extra Articles: