
A Dev Information to Creating Reusable Asset Library for the Reallusion Market

Introduction
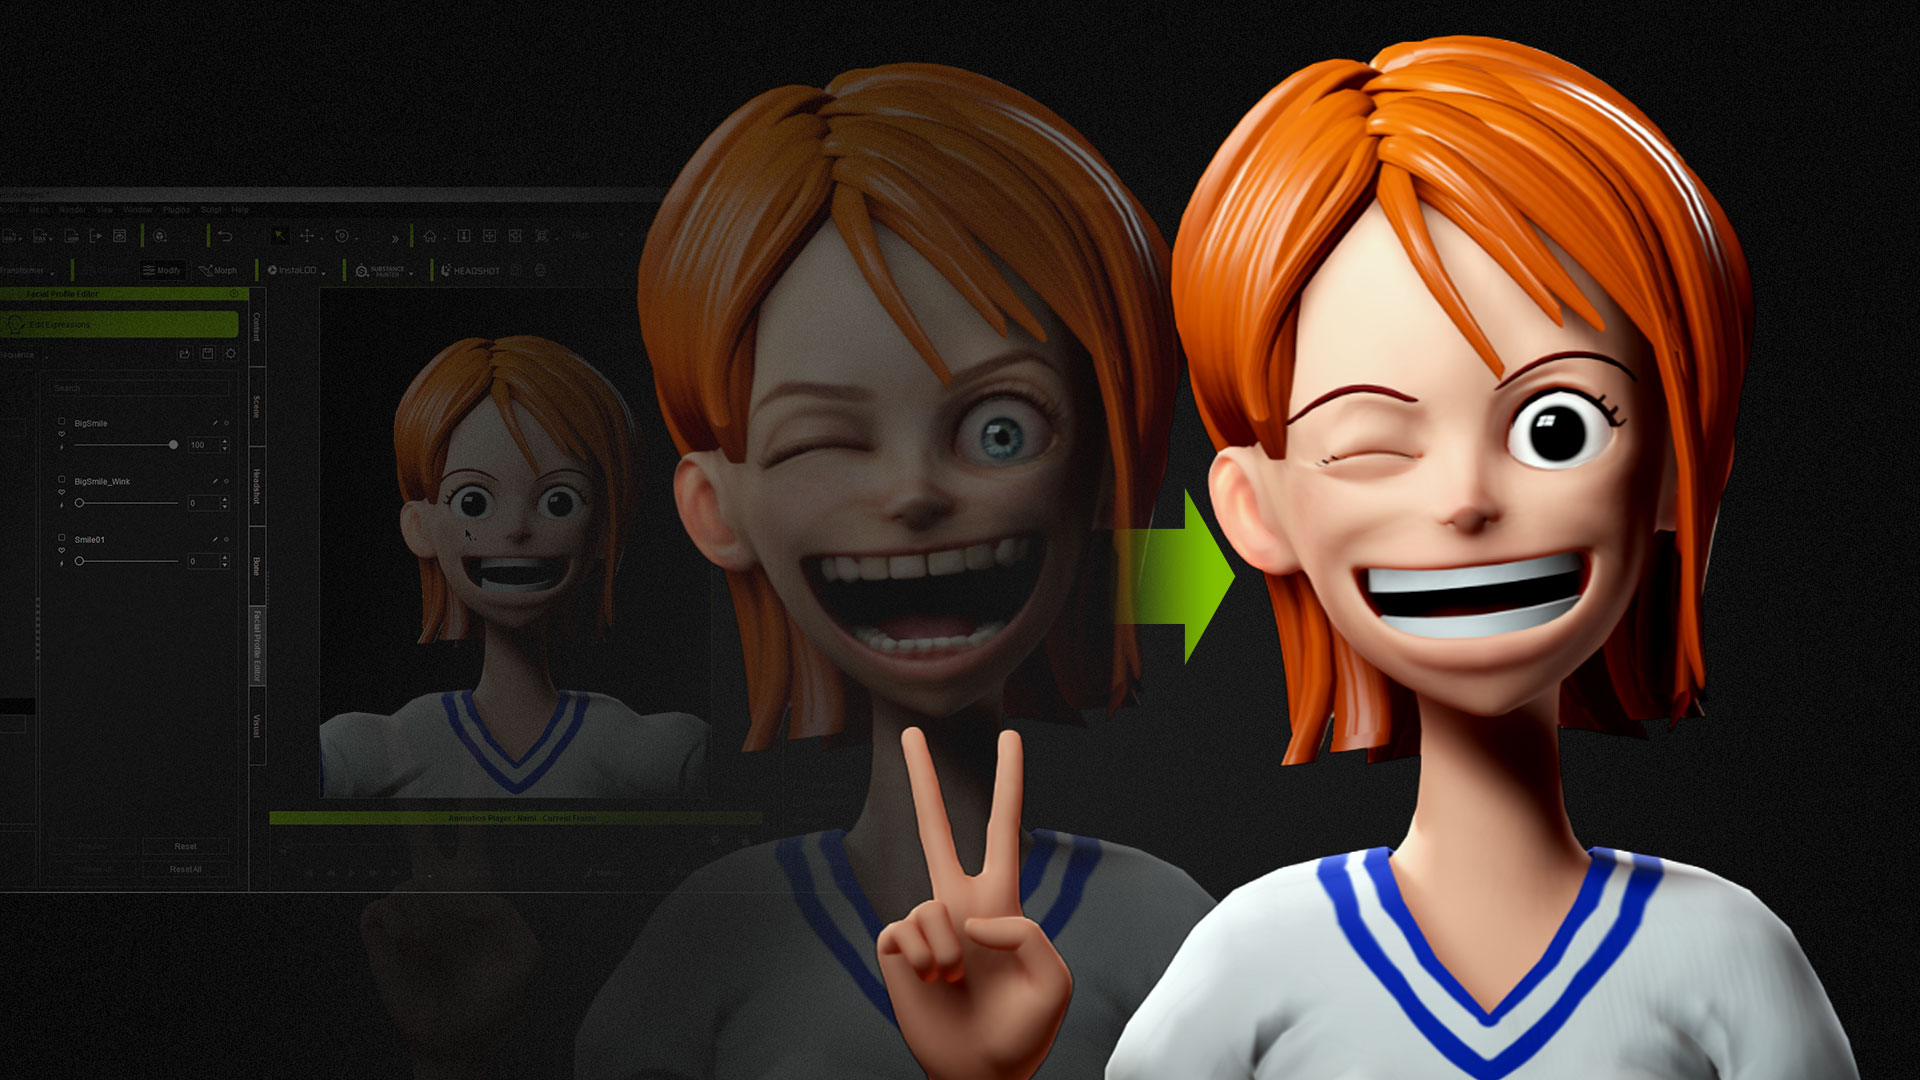
Greetings, I’m Peter Alex and on this article I’ll display some superior methods in creating anime-style toons in Character Creator 4 (CC4). The issue I used to be going through is that CC’s design is targeted round reasonable characters; But, I used to be aiming for the imaginative fashion of One Piece. The areas I’ll be specializing in are the tooth, eyes, eyelashes, and pores and skin. I’ll even be adjusting the facial profile, making a Head Preset, and making use of parts of the newly created elements to a different stylized character. So I encourage you to learn on to equip a few of the core ideas that may be expanded upon to your personal tasks.


To begin off this tutorial, you’ll must obtain and set up the “CC4 Blender Pipeline Software Plugin” for CC4. >> Obtain right here.
Then you definitely’ll must obtain and set up the “CC/iC Blender Instruments” plugin for Blender. >> Obtain right here.
Creating New Enamel


Whereas some cartoon types do comprise reasonable tooth, I’m particularly going for a really simplified, anime fashion.
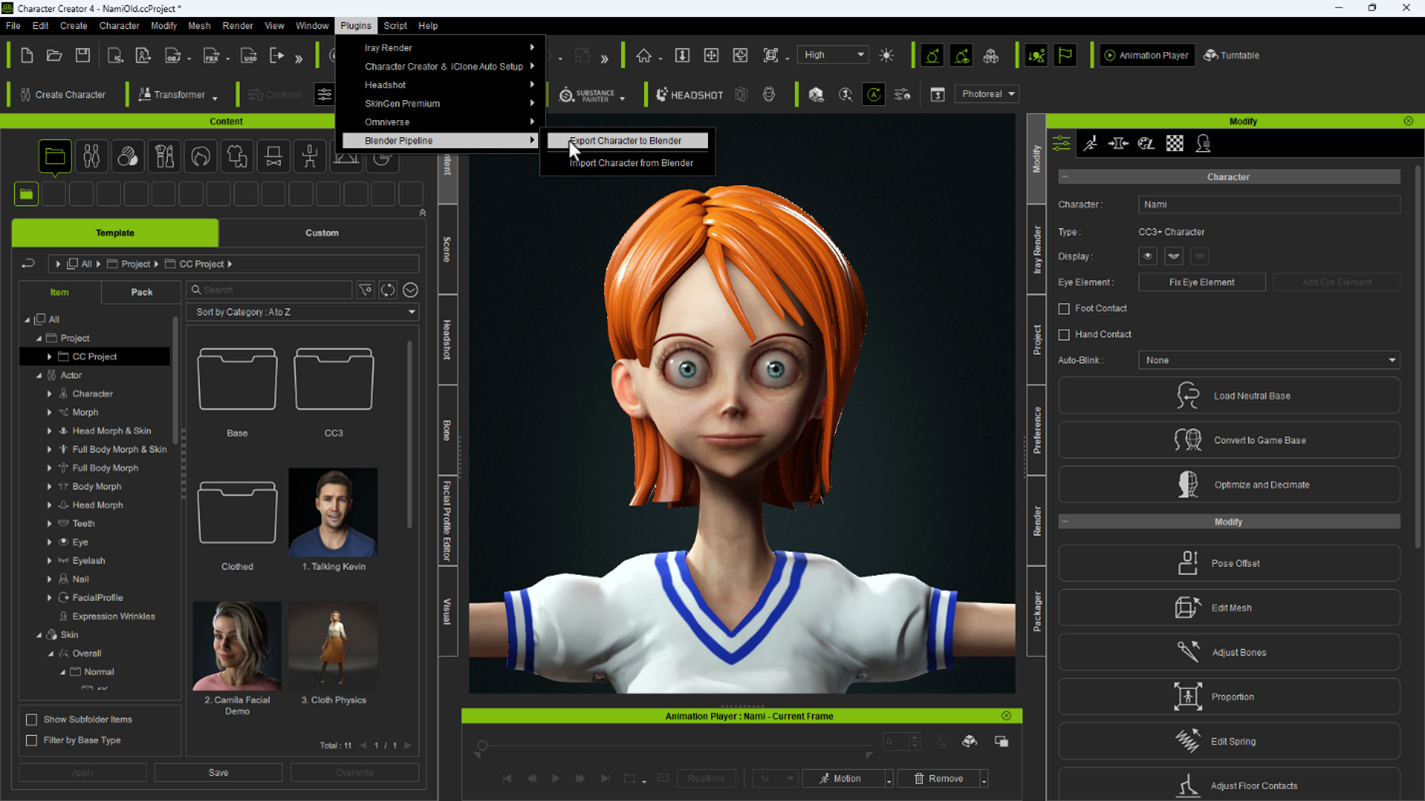
1. I’ll begin by exporting the character utilizing the Blender Pipeline Add-on in Character Creator.

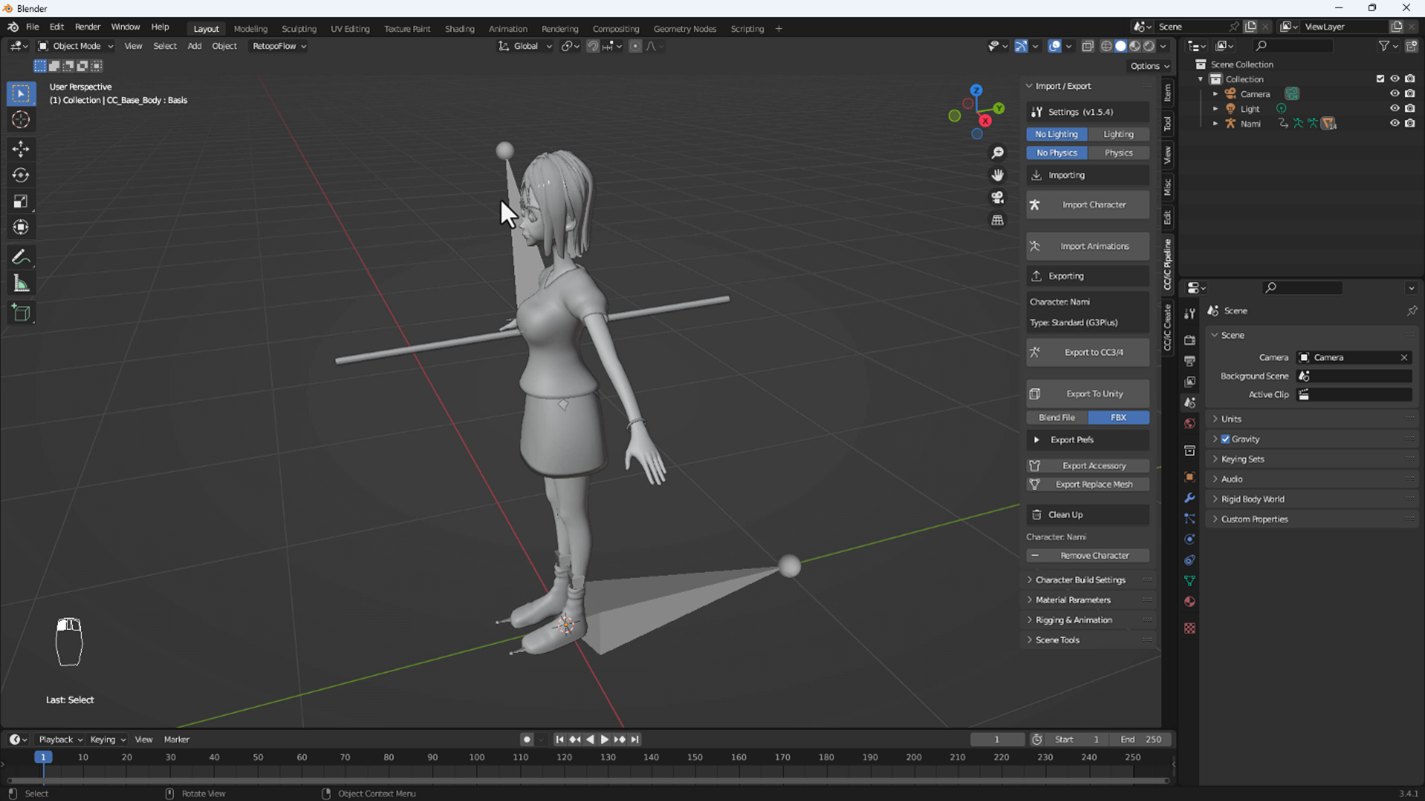
2. Then, I’ll import the FBX file utilizing the CC/iC Add-on in Blender.

3. With the avatar imported, I’m going to make use of the geometry of the unique tooth to construct the anime tooth. I’ll seize an edge loop from the highest of the gums and extrude a easy form for the highest tooth. Then I’ll extrude and add some depth. I’ll then delete the highest row of polygons, which can enable for straightforward UV unwrapping.


4. I’ll repeat this for the underside tooth, then mix the tooth into one object.


Word:
Because the geometry has been extruded from the unique tooth, I don’t want so as to add vertex teams or weight maps. These tooth are additionally certain to the armature by default, utilizing this methodology. In case you create extra advanced tooth utilizing one other methodology, you will want to assign the suitable teams and weight maps and bind it to the armature.
- For the High Enamel, the vertex group have to be “CC_Base_Teeth01”.
- For the Backside Enamel, the vertex group have to be “CC_Base_Teeth02”.
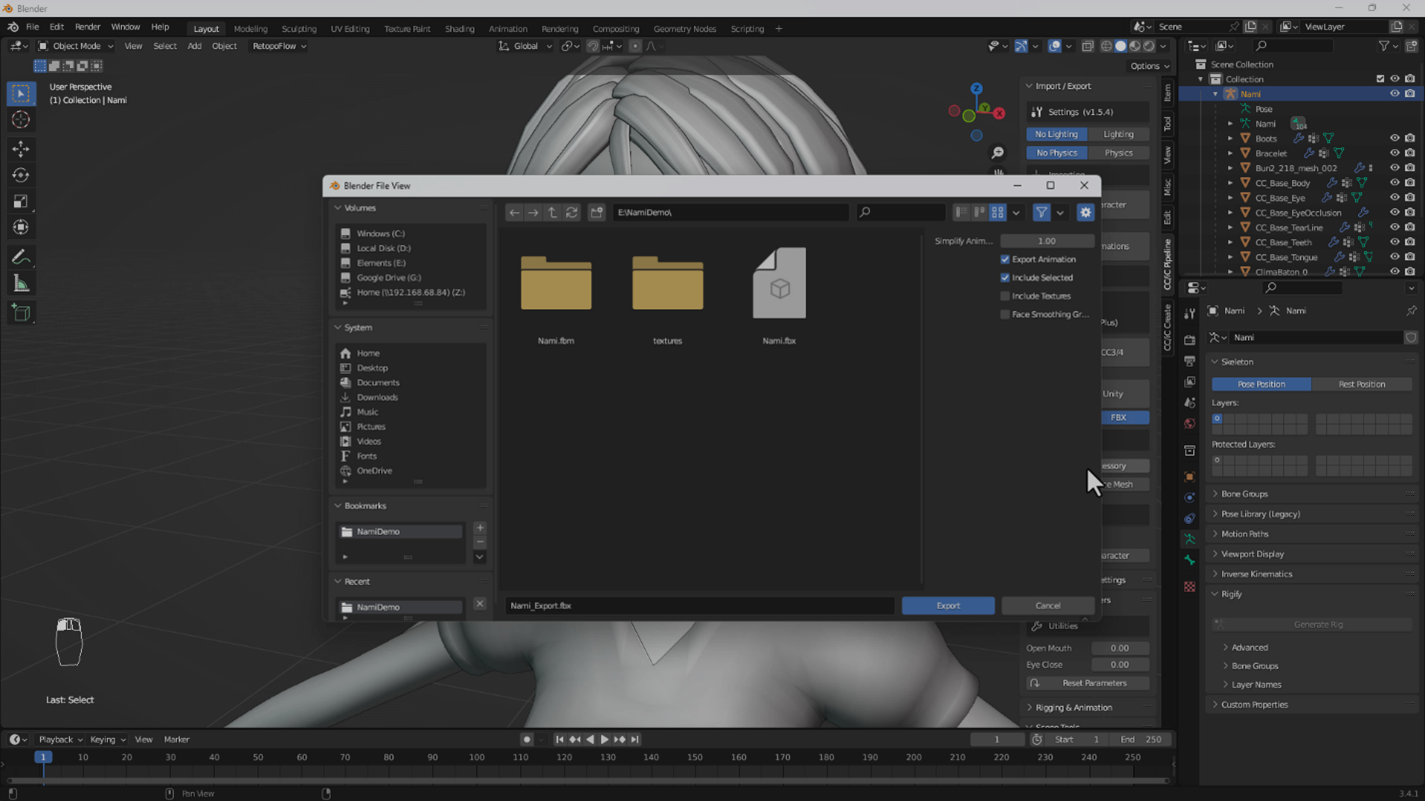
5. With the tooth created, export the character utilizing the CC/iC add-on and import the FBX utilizing the Blender Pipeline Plugin in Character Creator.

Word:
You could expertise a warning through the import course of, however the import ought to in any other case achieve success.


Adjusting the Eyes
With the tooth created, I’ll work on the eyes. It is a easier course of than the tooth, as I’ll principally be altering the textures. You’ll need a picture editor for this course of; In case you don’t have Photoshop, you need to use an alternate similar to Krita.


Clicking on the fabric channel and initiating the feel launcher will ship the feel to your picture editor. I will likely be enhancing the diffuse texture.


In Krita, I will likely be making a quite simple texture to switch the reasonable model. Only a white to pink radial gradient for the sclera and a black circle for the pupil and iris. I’ll save the feel, which is linked to a short lived file. Except the hyperlink is damaged, saving the file in Krita will replace the feel in Character Creator.


I’ll then manually copy this eye texture over to the opposite supplies for the attention, as they don’t seem to be linked to the saved file.


I see that that is nonetheless inadequate, because of the properties of this materials, so I’ll modify the Sclera brightness.


I’ll use this identical course of to create stylized eye lashes. On this case I’ll edit the opacity map, and use it as a reference when making the changes. Opacity operates on a black to white spectrum. Black is invisible, white is seen.


Creating New Pores and skin
Subsequent, I’ll simplify the pores and skin texture. There are a couple of methods to do that — I’ll use the only methodology. Choose the diffuse texture slot for the top. Within the Alter Shade dialog, dial the Distinction to -100.


Copy the feel then reserve it in the identical slot. This would be the identical as importing a grey texture. Alter the Saturation, Hue and Brightness till you obtain the specified pores and skin tone.


Copy this texture and place it within the slots for the Physique, Arms, and Legs. This can create a easy basis to your pores and skin. If the traditional maps are offering an excessive amount of element, dial down the traditional depth.
You can also make additional changes to the pores and skin by activating the Pores and skin Shade choices. I needed to subtract some element, so I didn’t use it initially.


I’ll make a couple of different changes earlier than I begin altering her facial profile. I’ll enhance the dimensions of her Pupil and Iris. This may be accomplished by way of the Morph Editor if in case you have the Headshot plugin, and may be accomplished to a restricted diploma by manipulating the supplies for the Cornea.


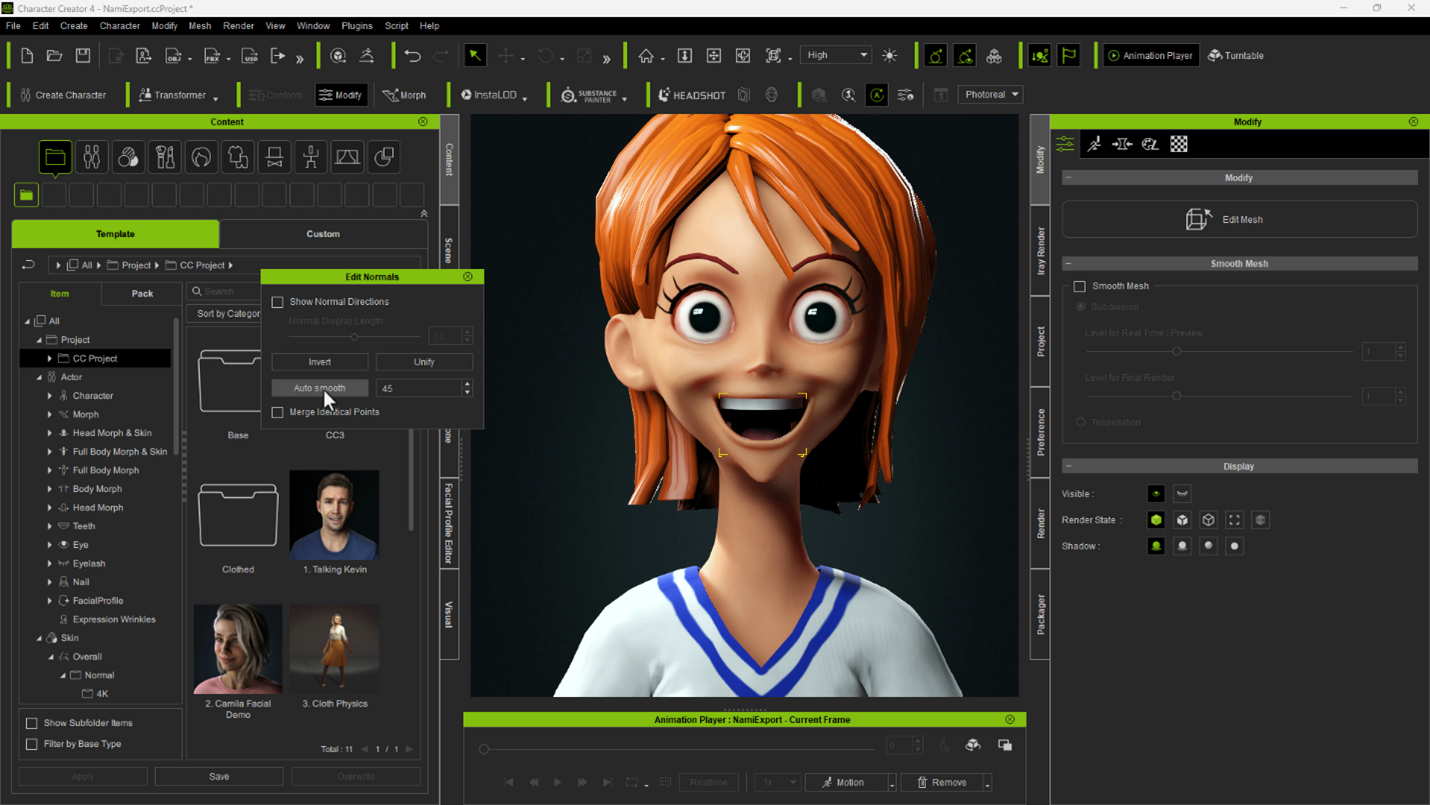
Adjusting Stylized Enamel
Subsequent I’ll modify the position of her tooth. Though first I discover that the stylized tooth have odd regular results. You may repair this by choosing the tooth and smoothing the normals within the Edit Normals choices.

Now I’ll modify the tooth by referencing the thumbnails of every main expression.


I’ll make extra corrections similar to the position of the eyelashes and eyeballs. Make these changes previous to utilizing the facial profile editor so that you don’t need to redo them.


Utilizing the Facial Profile Editor
The following step is to switch the facial profile. However first, I’ll modify the attention parts by choosing Appropriate Eyeblink within the Character menu. Typically the eyelash will have to be manually corrected, particularly for stylized characters. As well as, eyes this massive current an issue since they bulge past the elasticity of the eyelids, inflicting them to clip by way of the geometry when the character blinks.
There are two methods to appropriate this downside: deform the eyeballs for the blinks or modify their positions. For this character, I selected the latter methodology as a result of the attention positions may be mirrored versus deformations.


To reposition the eyes, I used the Proportion Editor and switched to Face and made positive that symmetry was disabled. When wanted, I checked Present Expression to reference the present expression.


I then chosen the attention bones and translated them barely backwards and baked the expression. The eyeballs will now retreat to mitigate the clipping through the blinks. In all however excessive circumstances, this could resolve the problem.


Accommodating Customized Expressions
I beforehand created customized expressions for this character, however the tooth weren’t appropriate with the unique knowledge. To repair this, I’ll dial within the expression and modify the tooth to suit, then rebake it in order that the brand new tooth will purchase the brand new knowledge. Adjusting the tooth is surprisingly straightforward with the remodel instruments whereas within the Edit Mesh window.


Saving the Edits to the Eyes and Enamel
Saving an asset typically requires two steps. Choose the asset you need to save and go to the designated class within the Content material window and click on Save. A thumbnail will likely be mechanically generated for you based mostly on the present digicam. You may substitute it with one other picture at any time.


Making a Head Preset
The top consists of a number of elements: The morph, facial profile, eyes, tooth, eyelashes, pores and skin and materials settings — and now the wrinkle settings with the most recent replace (I’m positive sooner or later it’s going to include much more elements). Every of those elements may be saved as a preset, and the Head preset unifies them.


Making a Head preset is comparatively straightforward. First, you could separate the physique and head utilizing the Create > Head & Physique Morph Sliders command. Subsequent, go to the content material window, choose your character, and click on save whereas within the Head Morph & Pores and skin class.


A physique preset can likewise be saved, though it incorporates much less elements.
I’ll display the presets I’ve created on a brand new character. I’m going to load a demo character and use it as a base to use the presets I simply created. I’ve cleared the prevailing morphs, leaving the character in its default impartial state.


Any preset or accent may be utilized by double clicking or dragging the merchandise onto the character from the Content material window. The preset hundreds fantastic, though there may be an apparent conflict between realism and cartoon types. Loading the physique preset and stylized hair minimizes this.


All of her presets are actually loaded to this demo avatar, together with the facial profile, which is a part of the top preset. The flexibility to load a whole head setup helps with mixing character designs.


Lastly, I’ll apply the tooth and eyes to a different stylized character, so I can clarify the problems you could have to resolve along with your undertaking. First, be aware that your character will need to have the identical tier of facial profile for the customized tooth or eyes to load. For instance, these tooth have been created with the Prolonged Facial profile, so the character will need to have an Prolonged Facial profile utilized for the tooth to load.


You may see that the preliminary alignment with this character is off, however it may be simply corrected utilizing the remodel instruments in Edit Mesh. After which you’ll align the tooth higher by evaluating the place with the icons within the Facial Editor.


Utilizing the Facial Editor to look at expressions is a vital a part of adjusting the facial profile. This menu permits you to undergo widespread expression mixtures and see if there are any points, similar to geometry clipping or misalignment with different property, such because the tooth or tongue. Ideally you need the expression to match the thumbnail, and adjusting the tooth to match key expressions is a vital step.


I’ve scaled down the iris dimension a bit, as I discover them to be too dilated. Beforehand I had used each the sclera UV radius and the morphing choices to realize a big iris, however I can use simply the Sclera UV choice to lower the Iris scale. The distinction is that adjusting the UV radius impacts the feel, whereas the morphing choices affect the geometry.


These tooth have been aligned with the earlier stylized character, so the offset was based mostly on her tooth’s preliminary place. For the perfect outcomes, design your tooth across the avatar’s impartial form.
The largest points are with the customized expressions for this character. The remainder of the expressions work nicely.


You may see the side-by-side comparisons right here. As I discussed, you might not want toon property to convey a cartoon fashion, though I feel for the anime character it will be troublesome to do with out.


Conclusion
The presets in Character Creator are extraordinarily highly effective and may be leveraged for a lot of completely different types, together with cartoons. Whereas the base avatar is designed with realism in thoughts, the flexibility to avoid wasting facial profiles and import customized anatomy can push the software program into different classes. Character Creator turns into highly effective with each replace, and I encourage content material creators and artists so as to add this superb software program to their pipeline.


Free Obtain :
• CC/iC Blender Instruments (addon put in in Blender)
• CC4 Blender Pipeline Software Plugin (addon put in in Character Creator 4)
Be taught extra :
• Peter Alexander (Mythcons): ArtStation. Fb