ActivePresenter 9 offers you with as much as 5 methods to insert audio tracks into the app. Maintain studying the article to discover what they’re!
As chances are you’ll know, audio and photographs are thought of an ideal pair in designing eLearning programs due to their skill to make classes much more partaking, emotional, and memorable for learners. With ActivePresenter 9, you may add an audio monitor to a single slide or set it as background music that performs throughout the complete mission. Additionally, the software program means that you can insert an audio monitor into a selected object reminiscent of a form, textual content caption, and button.
General, there are 5 predominant methods to insert audio tracks into the app:
It’s doable to insert nearly any sound into your tasks in lots of codecs, together with MP3, OGG, WMA, and WAV. Then, you’re free to edit the inserted audio monitor or take away it in the event you not want it in your mission. However first, obtain the most recent model of ActivePresenter right here:

Drag Audio Tracks and Drop into the App
As chances are you’ll know, dragging and dropping the audio tracks out of your laptop into ActivePresenter is the quickest solution to insert them. So, you may carry out this step to insert audio tracks into ActivePresenter 9 with ease. Or, think about different various manipulation under.
Insert Audio from Current Information
Listed here are the steps to insert audio from present recordsdata to ActivePresenter 9:
Step 1: Choose a slide > Entry the Insert tab > Audio > From File… (1).

Step 2: Choose an audio monitor out of your laptop > click on Open.
Then, you see an audio icon ![]() seems on the Canvas and the audio waveform seems on the Timeline pane. See the picture under for element:
seems on the Canvas and the audio waveform seems on the Timeline pane. See the picture under for element:

File a New Audio Monitor
As a substitute of including an present audio file, ActivePresenter 9 allows you to file a brand new audio monitor proper contained in the app. In case you might have a microphone plugged into your laptop, you may file your personal voice in real-time. Listed here are the 2 choices which you can select:
- The Audio part within the Properties pane.
- The File Narration button within the Timeline pane. It turns out to be useful to match the voice with the mission’s content material.
And let’s carry out the next process:
Step 1: Choose a slide > Entry the Insert tab > Audio > Create New (2).
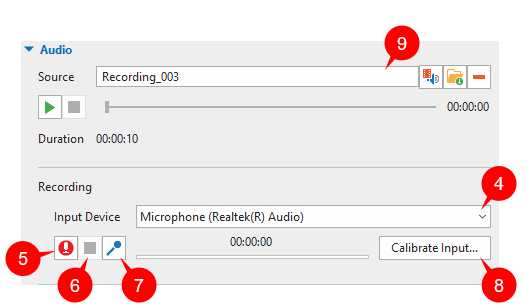
Step 2: Navigate to the Properties pane > Media tab > Audio part. With a view to file new audio, it is advisable to work with all of the options within the Recording half.
Keep in mind that:
- Enter Machine (4): Choose a tool from the drop-down checklist.
- File (5): Begin recording.
- Cease recording (6): Choose this whenever you’re executed with the recording.
- Change enter quantity (7): Modify the recording quantity.
- Calibrate Enter… (8): Set the audio recording units to the suitable stage earlier than recording.
After ending recording, your recorded file will seem within the Supply field (9).
When a slide comprises each narration and system audio (or audio monitor), the Timeline shows two completely different waveform bars like this:

Be aware:
- If you wish to seize audio from the start when creating a brand new mission, please take a look at the File Audio from Microphone and System Audio tutorial to get detailed data.
- ActivePresenter doesn’t assist you to connect audio to the next objects: cursor path, zoom-n-pan, closed caption, verify field, and radio button. Apart from, you may’t connect an audio monitor to an object group.
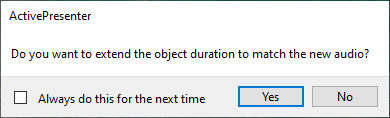
- If the article period is shorter than the recorded audio period, the app shows a dialog to ask whether or not you wish to lengthen the article period to suit the period of the generated audio or not. In case you don’t wish to get this notification sooner or later, choose At all times do that for the subsequent time verify field.
- The Audio part additionally offers Playback Choices to regulate how the audio is performed. That is helpful whenever you insert audio as background music.
Insert Constructed-in Audio
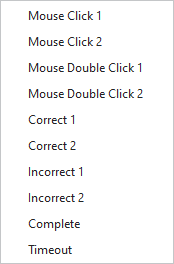
Relating to built-in audio, ActivePresenter 9 offers you with some helpful interactive objects like mouse clicks and suggestions messages. To insert built-in audio, do as follows:
Step 1: Choose the article that you simply wish to insert audio.
Step 2: Open the Insert tab > Audio > Constructed-in (3) and select one within the audio drop-down checklist.
After that, you will notice an audio icon ![]() on the Canvas and the audio waveform within the Timeline pane.
on the Canvas and the audio waveform within the Timeline pane.
Insert Audio Utilizing Textual content-to-Speech Function
Apart from the three above strategies, ActivePresenter 9 additionally helps you to generate audio from textual content. This characteristic is sensible in some circumstances, particularly when the article has textual content and also you need it to be “learn out loud”. Try the tutorial Convert Textual content to Speech to know extra.
Customise an Audio Monitor
Change or Take away an Audio Monitor
After inserting audio tracks into ActivePresenter, to interchange an audio monitor in your mission, first, choose the audio icon on the Canvas or the audio object on the Timeline pane. Then, navigate to the Properties pane > Media tab > Audio part. Right here, you are able to do both of the next:
- Click on
 to pick one other audio monitor from the present mission.
 - Click on to import one other audio file out of your laptop.
As soon as executed, the newly added audio monitor replaces the previous one.
Subsequent, to take away an audio monitor, take one of many following:
Choose the audio icon on the Canvas > press DELETE. Alternatively, right-click the audio icon > choose Delete.
Choose the audio object on the Timeline pane > press DELETE. Or, right-click it > choose Delete.
Choose the audio object > Properties pane > Media tab > Audio part > choose ![]() . This efficiency may also be used to take away audio from an object.
. This efficiency may also be used to take away audio from an object.
Edit an Audio
After inserting an audio monitor right into a slide, you may preview and edit it within the Timeline with the next strategies:

- Click on Play (10) to hearken to the audio.
- Choose (11) to enlarge, shrink or match the waveform into the Timeline.
- Choose Minimize, Copy, Delete, and Crop (12) to use fundamental enhancing for the audio. See Fundamental Video Modifying: Minimize, Copy, Delete, and Crop for extra particulars.
- Click on Insert Time (13) so as to add an interval of silence. The silence is inserted on the Playhead place.
- Choose Break up/Be a part of (14) to separate/be part of the audio objects.
- Click on Modify Quantity (15) to extend or lower the sound stage of the audio file.
- Choose (16) if you wish to fade in or fade out your audio file.
- Click on Audio Noise Discount (17) to take away noise from an audio monitor.
- Click on Audio Normalization (18) in case you wish to make all of your audio tracks have the identical quantity stage.
Apart from, keep in mind that all of those choices can be found for each system audio and narration audio.
Now, all of the methods to insert an audio monitor into ActivePresenter 9. Hope that this tutorial evokes you. Don’t hesitate to comply with us on YouTube, Fb, Twitter, and our Tutorial web page to get extra helpful tutorials about designing eLearning programs and screencasts.
See Extra: