A Fill in Blanks quiz is broadly used to check learners’ data whereas lowering their guessing fee. So, in at the moment’s article, let’s discover ways to create a Fill in Clean quiz utilizing the Fill in Clean questions in ActivePresenter 9.
At first look, many individuals might even see this query kind just like the Fill in Textual content Entry or Fill in Textual content Entries questions. Nonetheless, they’re totally different. The Fill in Blanks query permits learners to fill in a number of blanks in a paragraph. This query kind additionally turns out to be useful when you have got a paragraph and also you need to convert a phrase or phrase in that paragraph right into a clean. See the picture beneath as a Fill in Blanks query:
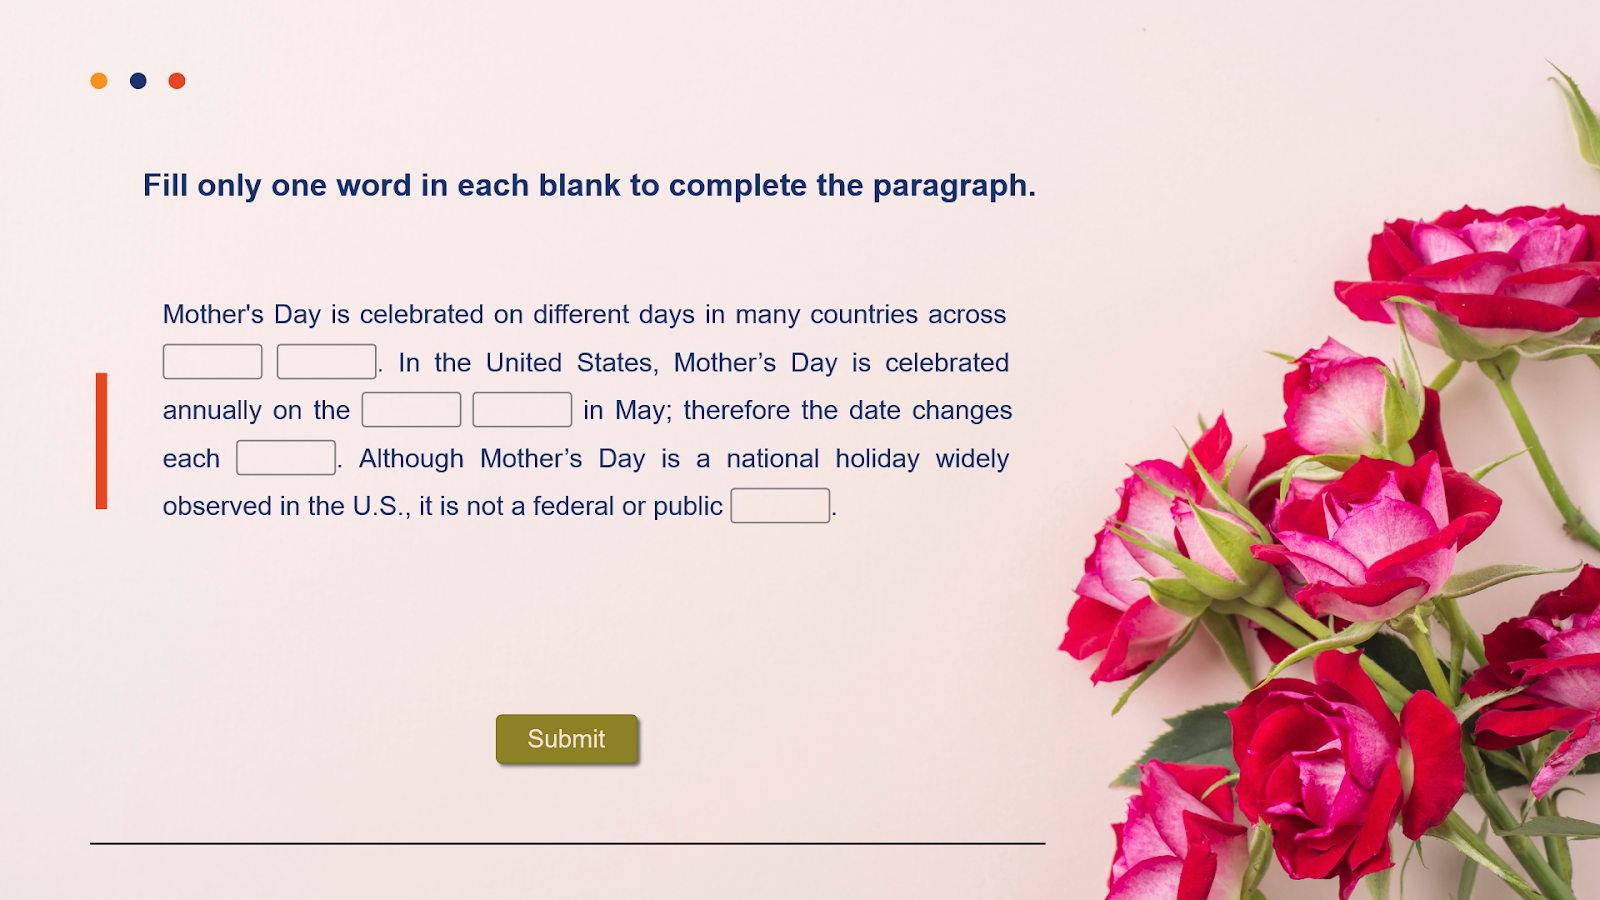
As proven within the above pattern, learners are requested to fill in every clean with just one phrase to finish a paragraph about Mom’s Day.
To create a Fill in Blanks quiz, there are some main steps it’s worthwhile to take:
So, let’s obtain the app and begin proper now!


1. Insert a Fill in Blanks Query
The very first step to create a Fill in Blanks quiz is inserting a Fill in Blanks query. So, do both of the next:
- Within the Questions tab > Fill in Blanks.
- Within the House tab > Interactions > Fill in Blanks.

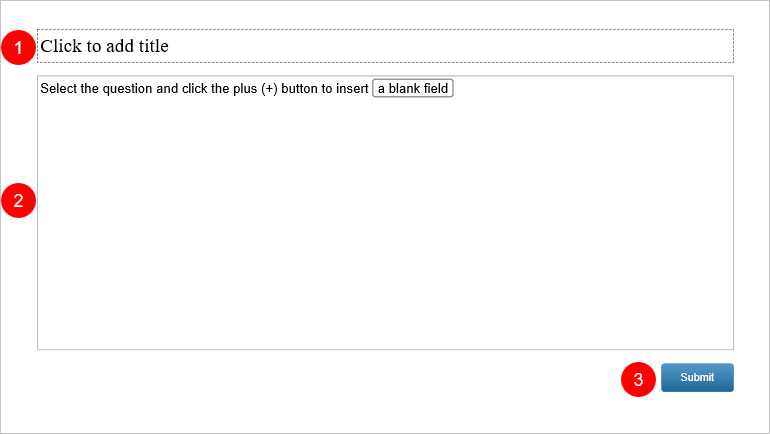
Then, you will note a brand new query slide inserted into your undertaking as within the picture beneath. As you may see, it contains three components: (1) the highest textual content field, (2) the reply space, and (3) the Submit button.
2. Customise a Fill in Blanks Quiz
Listed here are some choices that you need to use to customise a Fill in Blanks query in your quiz:
Change the Look
- Add query title: Enter the query title on the highest textual content field. After that, use the inline textual content editor that seems or the Font part of the House tab to fashion the textual content.
- Add slide background: Navigate to the Properties pane > Slide Properties tab > Background Picture > Choose a picture out of your present undertaking or your laptop.
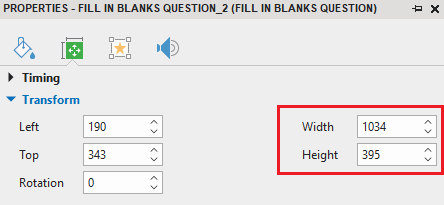
- Resize the query title (1) and the reply space (2): You may resize these sections by choosing them and dragging the resizing handles. Alternatively, choose them, then go to the Properties pane > Dimension & Properties tab > Rework to regulate or kind the worth within the Width and Peak combo field:
Work with the Blanks
- Insert a clean: After including textual content to the reply space, click on anyplace within the textual content the place you need to add a clean, then click on the inexperienced plus button and choose New Clean.

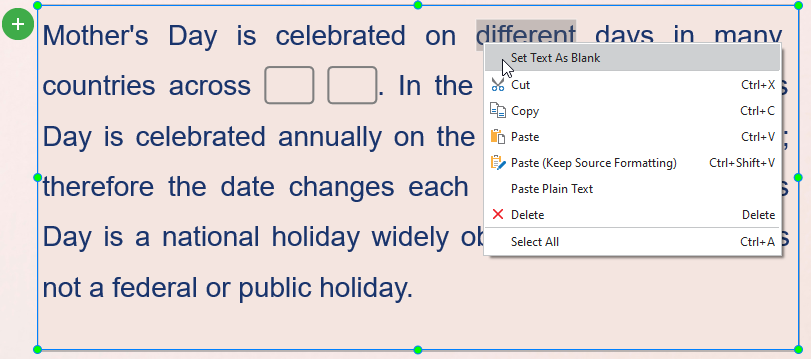
- Set textual content as clean: ActivePresenter 9 additionally permits customers to transform phrases or phrases within the textual content into blanks. To do this, choose a phrase or a phrase, then, click on the plus button and select Set Textual content As Clean. Alternatively, you may right-click it and select Set Textual content As Clean.
- Delete blanks: Choose a clean and press DELETE in your keyboard. Alternatively, you may right-click the clean and choose Delete.
- Format blanks: To alter the blanks’ fashion, choose the reply space or a clean > Properties pane > Type & Results tab > Reply Type. Right here, you may change the blanks’ properties resembling Border Colour, Border Width, Field Width, and Nook Radius.
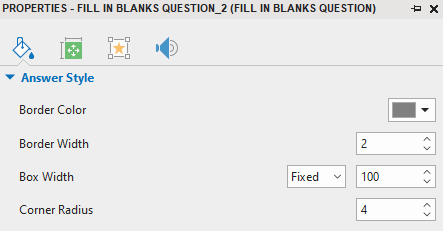
+ Border Colour: Click on the drop-down arrow to pick one other coloration.
+ Border Width: Enter a particular worth (from 1 – 5) to vary the border width of all blanks in pixels.
+ Field Width: Click on the drop-down arrow to change between the Auto and Fastened mode. With the Auto mode, the clean width will likely be routinely adjusted to the textual content size. In the meantime, the Fastened mode permits customers to vary the field width of all blanks in pixels.
+ Nook Radius: Enter a particular worth (from 1 – 10) to vary the nook radius of all blanks in pixels.
Tip: To create a constant search for your blanks, you may customise the Fill in Blanks quiz within the Object Settings earlier than including questions from the Questions tab. See Easy methods to Work with Object Settings for extra data. Or, after customizing the query, right-click the reply space and choose Set as Default Fill in Blanks Query if you wish to reuse it later.
Set Right Solutions
To set an accurate reply for a clean, merely kind the proper reply into it.
Apart from, take word that every clean can settle for multiple appropriate reply. Observe these steps to set many appropriate values for every clean:
Step 1: Click on on a clean. After that, open the Properties pane > Interactivity tab > Rating & Reporting > Right Values.
Step 2: Click on the Add Worth button (4) to show a clean field, then kind the proper reply into the field.
Carry out Step 2 once more to set as many appropriate values as you need for every clean.
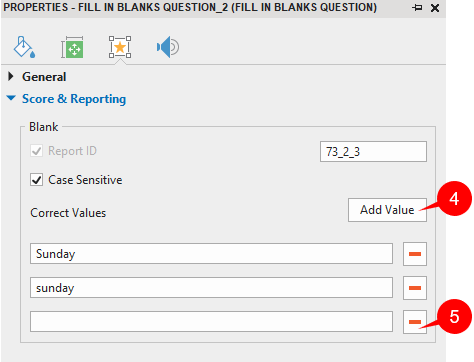
In the event you set textual content as clean, the chosen phrase or phrase is routinely set as an accurate reply. Then, you may add extra appropriate values to that clean following the above steps.
To take away any worth, simply click on the Take away button (5).
Word: ActivePresenter 9 means that you can set Case Delicate for every clean. If you choose this selection, the uppercase and lowercase characters will likely be handled otherwise.
Set Rating and Reporting
To set the rating and reporting for the query, choose the reply space, then, go to the Properties pane > Interactivity tab > Rating & Reporting.
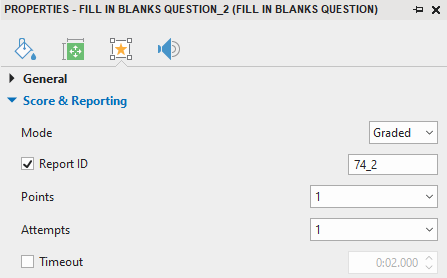
This part gives quite a lot of helpful choices, together with:
Mode: Choose the Graded mode if you wish to measure learners’ efficiency, or choose the Survey mode if you wish to acquire learners’ suggestions or data;
Report ID: Observe learners’ actions;
Factors: Set factors for proper solutions;
Makes an attempt: Set the utmost makes an attempt that learners can work together with the query;
Timeout: Set a time restrict that solely permits learners to answer the query within the given time frame.
For extra particulars, see Easy methods to Create Interactive Quizzes.
Add Occasions and Actions
ActivePresenter 9 gives default occasions and actions for Fill in Blanks questions within the quiz. Usually, this query kind has 4 default occasions for the Graded mode (On Right, On Incorrect, On Incomplete, and On Timeout) and three for the Survey mode (On Full, On Incomplete, and On Timeout).
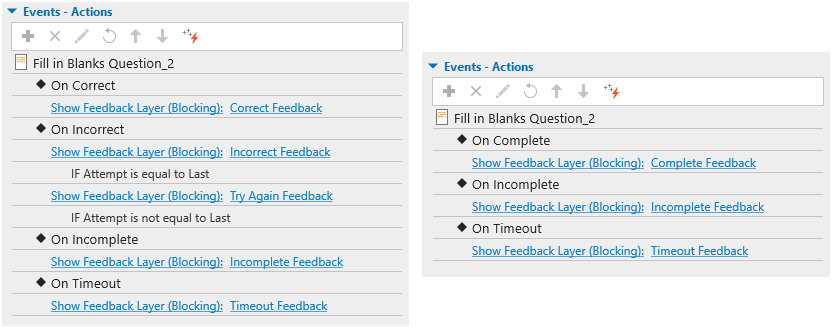
You may take away, change, or make occasions and actions for this query extra superior as you would like. To do this, firstly, choose the reply space. Then, entry the Properties pane > Interactivity > Occasions – Actions.
See Work with Occasions – Actions to be taught extra.
Customise Suggestions Layers
ActivePresenter additionally routinely provides default suggestions layers for Fill in Blanks questions. These default suggestions layers embody Right Suggestions, Incorrect Suggestions, Strive Once more Suggestions, Incomplete Suggestions, and Timeout Suggestions (for the Graded mode) or Full Suggestions, Incomplete Suggestions, and Timeout Suggestions (for the Survey mode). See the above picture for particulars. Word you could delete, change, or add extra suggestions layers if needed. To open suggestions layers in ActivePresenter 9, within the View tab, click on Suggestions Grasp.
See Work with Suggestions Layers to be taught extra.
Conclusion
Now, you’ve realized tips on how to create a Fill in Blanks quiz with ActivePresenter 9. Obtain the app proper now and contact us you probably have any questions.