
On the lookout for advertising and marketing methods to advertise your small business? This fast tutorial exhibits you the essential parts you might want to know to edit flyer and brochure templates in InDesign.
Brochures and flyers are nonetheless a few the best methods to get info to a audience. Envato Components and GraphicRiver supply a myriad of high-quality brochure and flyer templates. They’re visually beautiful and fast and simple to edit.
On this tutorial, we’ll have a look at the fundamentals of opening and modifying a brochure template. I’ll speak you thru opening the information, including pictures and logos, and modifying colours and fonts to match your model. Lastly, we’ll check out how you can export information for skilled printing and e mail sharing.
For the aim of this tutorial, I’ll present you how you can open a flyer template and how you can edit a brochure template in InDesign. Opening and modifying each is barely totally different as brochures have extra pages than flyers.
Comply with together with this tutorial over on our Envato Tuts+ YouTube Channel:
What You may Want
Along with the property listed beneath, you will want Adobe InDesign. If you do not have the software program, you may obtain a trial from the Adobe web site.
Save all of those information in a folder that is straightforward to find. Let’s get began!
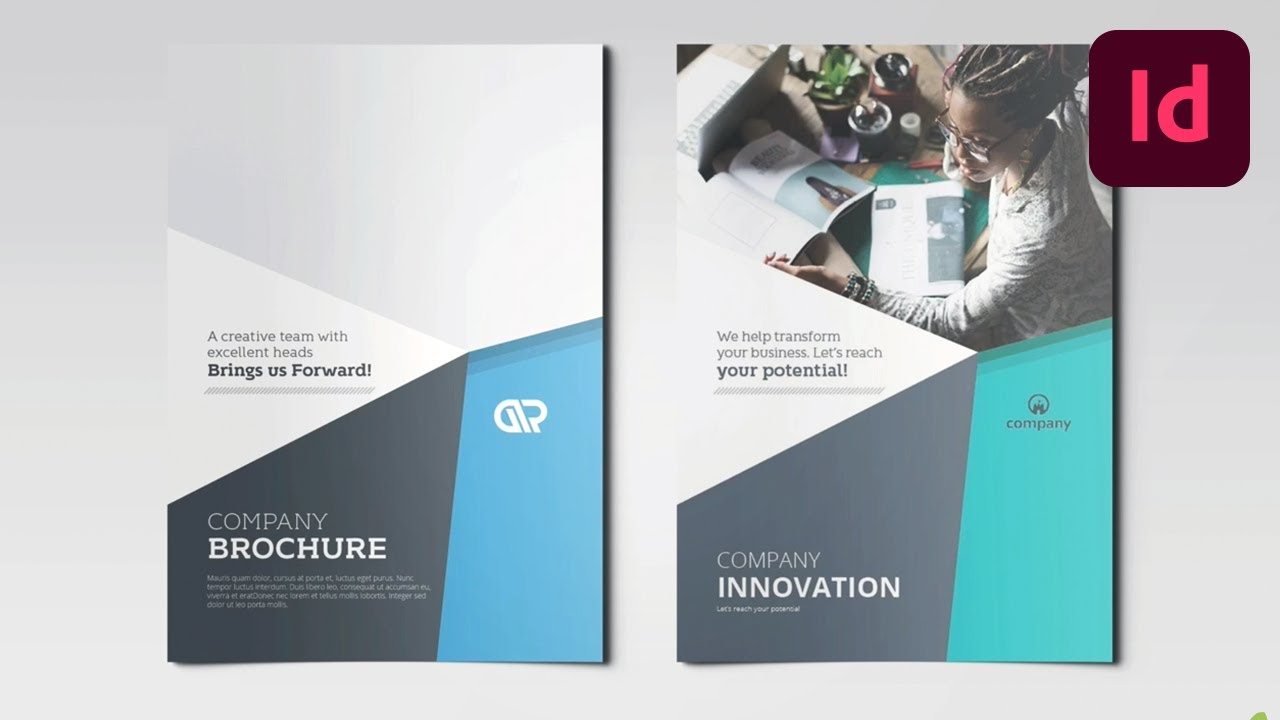
On the lookout for superb InDesign brochure templates? Head on over to Envato Components or GraphicRiver.
1. The right way to Open an InDesign Flyer Template
Step 1
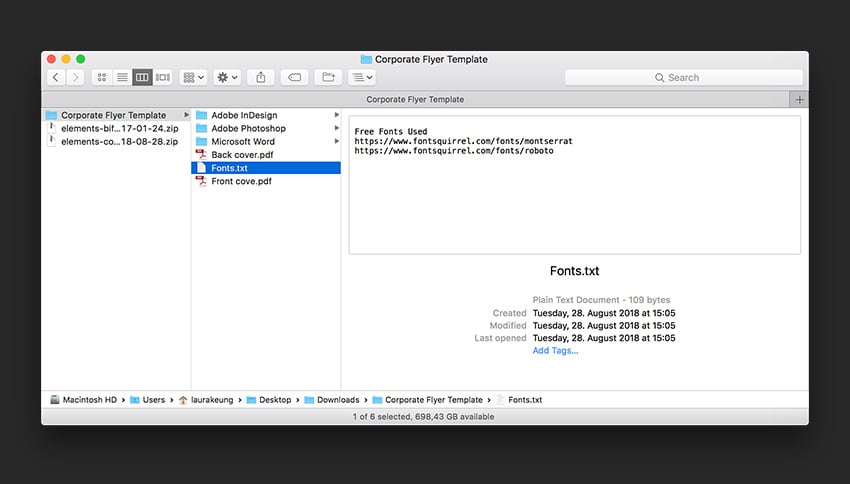
Find the .zip file downloaded from Envato Components. Double-click on the file to decompress it.
Within the decompressed file, there a number of folders and information, one in every of them named Font.txt. This file comprises hyperlinks to obtain the fonts used within the template. Right here, you will have the choice to go forward and obtain the fonts. Alternatively, you may reinforce your model by utilizing your model’s fonts.


Step 2
On this particular template, we’ll discover information for Adobe InDesign, Photoshop, and Microsoft Phrase. We’ll work with Adobe InDesign.
You’ll discover there are .idml and .indd information. The distinction between these two is that INDD is model particular and IDML is an (nearly) common file that may be opened by InDesign CS4 (or later). I’m working with InDesign CC, so I will likely be opening the INDD file for the entrance cowl.
Bounce to step 3 to learn to place pictures and edit textual content.


2. The right way to Edit a Brochure Template
Step 1
For this step, I’ll swap to working with a brochure because it comprises extra parts. Comply with the identical steps as above. Decompress the file, and open the InDesign file that corresponds to your setup.
On this particular template, the font info is throughout the assist.txt file. Comply with the hyperlinks within the file to obtain the fonts and set up them in your FontBook.
In case you are utilizing InDesign CC, there’s an opportunity a few of these fonts are a part of the Adobe Fonts bundle. On this case, you may activate them within the pop-up warning window upon opening the file.


Step 2
With the file open, we will verify what we will likely be working with.
Open the Pages panel to see the format. If you happen to don’t have it open, head over to Home windows > Pages. We will see that the file consists of a canopy, again cowl, and inside pages.
Open the Layers panel by going to Window > Layers. Examine the layers—on this case, we’re working with one layer solely.
Let’s verify the Paragraph Type panel by going to Window > Types > Paragraph Types. You may see we now have quite a lot of kinds.
Paragraph kinds are a group of formatting attributes given to particular paragraphs or strains of textual content. Types comprise formatting corresponding to fonts, household, measurement, alignment, indents, and so forth. The benefit of utilizing them is that they will save time and provide help to design constantly, avoiding errors.
On this case, these kinds will likely be useful should you determine to make common kind modifications to the brochure.


Step 3
Let’s begin by including a picture to the quilt. Choose the gray object on the prime of the web page. Press Command-D to Place a picture. Within the Place window, discover the picture you’d like to put. Click on Open.
To resize the picture, use the Direct Choice Instrument (A) from the toolbar. Choose the picture, which is able to activate a bounding field on the picture however throughout the object. You’ll know it’s the proper bounding field as a result of the colour must be totally different from blue.


Step 4
To vary the copy, use the Textual content Instrument (T) from the toolbar. Click on on the textual content and change it with your personal.


If you happen to don’t have a lot textual content so as to add, you may choose a textual content field and delete it by urgent the Backspace key. In my case, I don’t have a lot textual content so as to add to the subtitle, so I will likely be making this textual content field smaller. Double-click on the center deal with to mechanically collapse the field.


Step 5
So as to add a emblem, be sure to have an .eps or .ai file. Choose the emblem positioned on the template and delete it. Press Command-D to Place a brand new emblem. This time, click on outdoors of the web page to resize it to create its personal field.


To resize the emblem, press Shift-Command and drag one of many corners. Shift will scale the emblem evenly, whereas Command will match the content material to the field. Delete the template emblem and change it with the brand new one.


Step 6
Let’s work on the inside pages. Choose the rectangle on the prime of the web page and press Command-D so as to add a picture. To resize the picture, use the Direct Choice Instrument (A) from the toolbar.


Step 7
Utilizing the Textual content Instrument (T), add the specified textual content. On this case, the subtitle and replica are in two separate textual content packing containers.
For the aim of this tutorial, let’s say you’ve added a shorter quantity of copy. To shine issues off, we’ll shorten the textual content packing containers. Double-click on the deal with level of the bounding field, and it ought to mechanically shorten.


Step 8
If you happen to’d like so as to add a 3rd paragraph, choose the Choice Instrument (V) from the toolbar. Choose the final headline and textual content field. Maintain down Shift and drag each packing containers upwards. Shift will keep the vertical positioning of the field.


Step 9
Choose a headline and a duplicate textual content field from above. Maintain down Shift-Possibility and drag downwards. This shortcut will duplicate and keep the vertical positioning of the field.


You may edit the remainder of the textual content by utilizing the Textual content Instrument (T) and deleting parts you won’t have copy for.


Step 10
To vary the font you’re utilizing or different codecs, you are able to do so within the Paragraph Type. For example, let’s edit the physique textual content model on web page 3. Whereas on the Paragraph panel, choose any textual content field, and the model will likely be highlighted. Double-click on it to open the window possibility.


Within the Paragraph Type window possibility, verify the Preview field on the backside so you may see the modifications stay.
Choose the Fundamental Character Codecs on the left aspect. Below Font Household, you may choose every other font you’d like. I’m altering from Lato to Open Sans. This can change all of the textual content all through the brochure that’s utilizing this model. If you wish to use a unique font all through the doc, you may change the font for every model. It is a fast method that may guarantee all of the fonts have been changed. Right here, you may as well change different formatting choices like colour, measurement, indents, and so forth.


Step 11
Lastly, you may as well edit the colours on the template if you wish to have one thing extra aligned along with your branding tips.
Open the Swatches panel by going to Window > Colour > Swatches. Prolong the Swatches panel and also you’ll discover swatches for all the colours getting used within the template.


To edit these, choose an object on the web page to see what swatch is getting used. I chosen one of many blue objects. Double-click on the highlighted swatch.
Within the Swatch window possibility, be happy to regulate the CMYK values to one thing that applies to your model. I’ll be altering all of my swatches to a turquoise colour. Click on OK.
You may alter any colour within the template. Simply needless to say once you edit this swatch, all of the objects utilizing the colour you edited can even change.


Step 12
You too can change the colours on every of the textual content packing containers individually. Choose a textual content field, head over to the Swatches panel, and choose a colour. Under, I’ve modified the colour for among the bullet factors and the info background.


For the info background, you may see that the colour is lighter than the actual colour. It’s because the Tint is decrease. On the Swatches panel, you may alter the Tint proportion by transferring the slider.


Let’s preserve modifying the remainder of the brochure. I’ve added a photograph on the again cowl and altered the colour of the citation marks to match the info background.


Step 13
When you’re achieved modifying the file, you may export the file for printing. Make it possible for all of the images are assembly the bleed marks. The marks are represented with a pink line across the web page.


To export the file, press Command-E. Within the Export window possibility, identify your file. Set the Format to Adobe PDF (Print). Click on Save.


Within the Export Adobe PDF window possibility, set the Adobe PDF Preset to Press High quality. Choose the Marks and Bleeds possibility from the menu on the left. Examine All Printer’s Marks and Use Doc Bleed Settings. Click on Export. You’ll have a PDF prepared for skilled printing.


Step 14
To export the file to connect to an e mail for on-line advertising and marketing, press Command-E to Export. Save the file with a unique identify or add ‘-online’ to distinguish it from the print file. Set the Format to Adobe PDF (Interactive). This can assist make the file measurement smaller in comparison with the printing file.


Within the Export to Interactive PDF window possibility, choose the Common possibility from the menu on the left aspect. Ensure All is chosen underneath Pages. Within the Export As part, you will have the choice to export the PDF file as single pages or as spreads. Right here you may select what you like.


Choose the Compression menu, and set the JPEG High quality to Excessive. This can make sure the PDF file is of excellent high quality. Click on Export. Click on OK within the colour house warning window. You’ll have a PDF able to be shared in advertising and marketing emails.


Nice Job! You’ve Completed This Tutorial!
On this tutorial, you discovered how you can open and edit flyers and brochures. In case you are new to InDesign, seize one of many many nice flyers and brochures Envato Components affords. Together with this tutorial, you’re positive to efficiently edit it to market your small business. At this time, we’ve discovered to:
- Open an Adobe InDesign file.
- Place and format pictures and logos.
- Edit and format typography.
- Use the Paragraph Types panel.
- Use the colour Swatches panel.
If you want to discover extra template concepts, you’ll find many customizable brochures and flyers over at Envato Components and Graphic River. Test it out!


If you happen to favored this tutorial, you would possibly like these: