
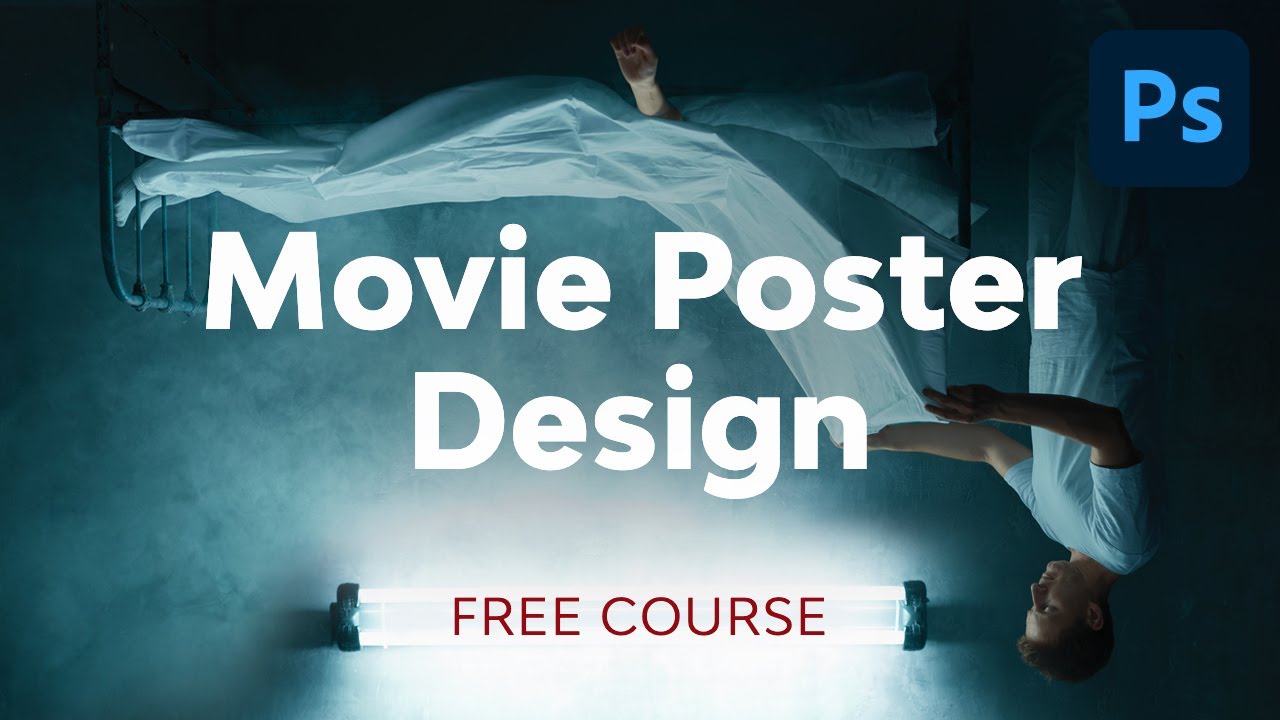
1. How one can Make an Motion Film Poster in Photoshop
Step 1
Let’s begin our motion film poster on Photoshop by creating a brand new 27 x 40 inch canvas.
In case you have no intention of printing this as a full film poster, then be at liberty to go smaller, however maintain the identical ratio.
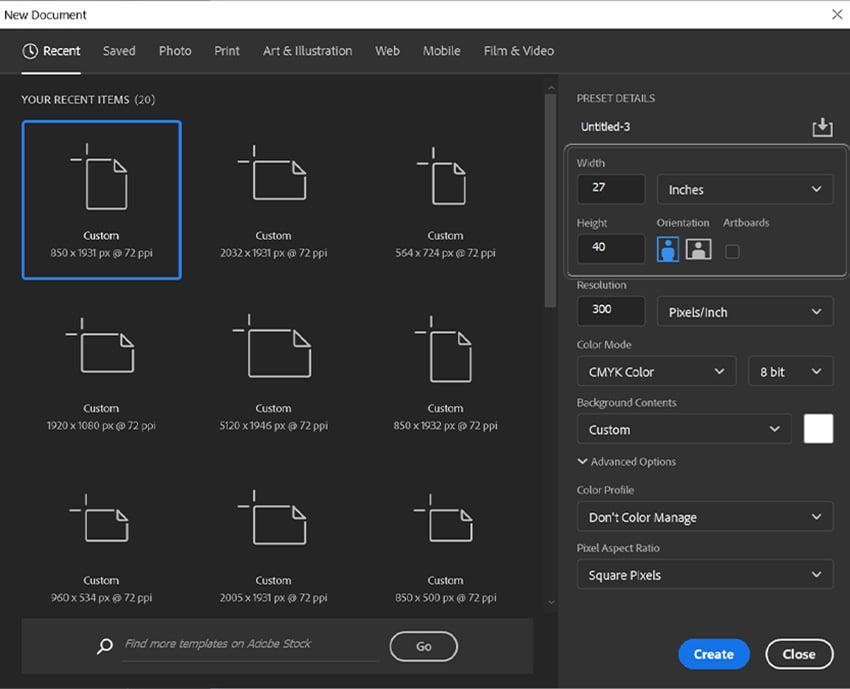


Step 2
Subsequent, in case your design will make it to paper, design within the CMYK Coloration Mode.
If will probably be web-only, then RGB is best for internet and different digital makes use of. I can be utilizing CMYK for my design at the moment.


Step 3
Lastly, if printing, set your DPI or Decision to 300. This can ensure that your picture prints good and sharp. If will probably be web-only, then the default 72 is ok.


2. How one can Create an Motion Film Poster Design Composition
Step 1
Create a Coloration Fill layer and fill it with a mustard yellow #d3a033.


Step 2
Take a concrete wall with rust spots texture and place it over the Coloration Fill layer. If it is just like the inventory picture above, ensure you enlarge it in order that solely the wall texture is exhibiting.
Flip the feel black and white. I like to make use of Hue/Saturation for this, however it does not matter.


Step 3
Set the feel’s layer mode to Overlay.
Duplicate the feel in order that it’s much more harsh and vivid. This yellow texture will give us an identical look to a Mad Max film poster.
Group the 2 textures and the Coloration Fill layer, naming the group “Background.”


Step 4
Subsequent, take your three major topics and extract them from their backgrounds utilizing your most well-liked methodology.
Since I’m going for a tough, imperfect look, I used the Choose Topic instrument. When you want one thing extra exact, you need to use the Pen Software and Refine Edge.
When you solely want to put one or two topics, that is effective! However attempt to place no extra than three, as it might probably come off too busy in any other case.
Proper-Click on > Convert to Good Object all your topics in an effort to resize them as you go and never have to fret about high quality loss or blurriness.


Step 5
This is a helpful tip when designing a film poster, particularly an motion film poster: Place the themes so as and measurement of significance. Here’s a common information:
- If featured on the poster, then the villain ought to be the biggest topic. They need to be positioned overhead, looming over everybody else to indicate they’re a menace.
- If you’ll solely be that includes the primary topic, be it an individual or merchandise, then they/it ought to be the biggest.
- All aspect characters ought to be sized in response to their significance to the story.
So in my case, the masked man is the villain, the lady is the hero, and the kid is a aspect character who’s essential to the story however shouldn’t be the hero.
tip
Attempt to place your topics in order that they kind a triangle form.


Step 6
Subsequent, darken and regulate the distinction of all three of the themes utilizing a clipped Brightness/Distinction adjustment layer.
You need to use Layer Masks to masks out any areas that appear too darkish or contrasting.
Masked Man’s Settings
- Brightness: -91
- Distinction: -37
- Layer Masks: Masks out the perimeters of the masks, leaving the within of the masks white.
Girl’s Settings
- Brightness: 18
- Distinction: 34
- Layer Masks: none
Kid’s Settings
- Brightness: 0
- Distinction: 28
- Layer Masks: none


Step 7
Create and clip a New Layer into the lady, setting the layer to Multiply.
Create a shadow on the decrease half of her physique utilizing a darkish brown shade #201512.
You are able to do this on any topic that wants extra separation to face out amongst the opposite topics. On this case, it would assist the lady and little one not mix into one another.


Step 8
For the topic’s hair, create and clip a New Layer into each the lady and kid’s layer.
Paint utilizing a tough spherical Brush blue #0099c3 onto the perimeters of the kid’s hair and yellow #f7b62c onto the perimeters of the lady’s hair. This can give it a harsh illustrative impact.


Step 9
Now, create and clip a brand new layer into each the lady’s and kid’s layer, setting it to Lighten.
Fill within the goggles utilizing a tough spherical Brush set to a light-weight yellow shade #ffdb51, giving it a stylized reflection impact.


Step 10
End up the themes by giving the dangerous man some blue goggle reflections utilizing a Curves layer. Once more, that is within the CMYK shade profile. If you’re working in RGB, will probably be completely different.


Principally, you simply need to make it clear that the kid and girl are on the identical “group”, whereas the person shouldn’t be. That is represented by the completely different coloured goggles. Any related impact will work simply as effectively.
Be sure every topic is in its personal group, naming every in response to the topic inside. Mine are “Girl”, “Baby”, and “Man”


Step 11
In case your topics are lopsided, just like the villain right here, attempt to make them symmetrical. Right here I copy and pasted the person’s shoulder pad from the left aspect onto the correct aspect. Because it’s armor, it did not want any exact mixing.
This step is non-compulsory.


3. How one can Use Clipping Masks in Photoshop
Step 1
Create a New Layer between the “Girl” and “Baby” group.
Utilizing a big smooth spherical Brush, paint teal blue shade #003943 throughout the canvas, as you may see beneath.
I’ll identify and consult with the layer as “Fade.”


Step 2
Clip a picture of sand dunes into the teal gradient by dragging and dropping a picture of sand dunes onto the canvas, putting it above the gradient, holding Alt, after which hovering the mouse between the 2 layers.
Whenever you see a logo of a field and an arrow seem, then click on. The dunes layer ought to clip into the gradient layer.
Set the sand dunes layer to 50% Opacity.


Step 3
Regulate the dunes utilizing a Hue/Saturation and Brightness/Distinction adjustment layer.
Hue/Saturation Settings
Brightness/Distinction Settings
- Brightness: -90
- Distinction: 100


Step 4
End up by making a New Layer above the “Baby” group.
Repeat the above two steps on the brand new layer to cover the underside fringe of the kid picture. This can be known as the second “Fade” layer.


4. How one can Create Motion Film Poster Design Typography
Step 1
Now onto the typography, beginning with the title of the movie!
My title is 2 phrases, so I can be splitting the title into two, putting every phrase by itself layer utilizing the Furiosa Font.
The primary phrase, “Mud”, can be positioned above the “Girl” group and the primary “Fade” layer.
The phrase “City” can be positioned above the second “fade” layer.
I used the identical mustard shade #c29c2e because the background fill layer.


Step 2
Copy and paste the identical rusty background texture from the background group, holding them set to Overlay and clipping them into each title phrases.


Step 3
Create and clip a New Layer into each title phrases, setting it to Overlay.
Use a smooth spherical Brush to color white in the midst of every phrase, and black across the edges, making a radial gradient impact.
Group every phrase into its personal group, named accordingly. In my case, it is “Mud” and “City.”


5. How one can Make an Motion Film Poster Coloration Grade
Step 1
Lastly, in our motion poster we’ve got a shade grade consisting of 4 adjustment layers. These will improve and regulate the present orange and blue shade scheme. Orange and blue is a go-to for motion film posters because it’s high-contrast and attention-grabbing.
First, create a Curves adjustment layer, with the Cyan curve pulled up into the shadows. The Magentas ought to be simply barely pulled into the shadows and barely faraway from the highlights. After which create an S curve within the Yellows.


Step 2
Subsequent, use a Ranges adjustment layer to barely enhance the distinction by adjusting the toggles, pulling the highlights inward.


Step 3
Add a Hue/Saturation layer to barely shift the colours’ hue right into a warming orange and extra teal blue.


Step 4
And eventually, we want a Selective Coloration Layer specializing in the Blacks. Add in some Cyan and Magenta and take away only a contact of Yellow. This can make the shadows a pleasant chilly blue and never as inexperienced.
If the colour grade finally ends up trying too harsh, group the entire adjustment layers collectively and convey down the opacity of the group. I set mine to 70% Opacity.


Strive an Motion Film Poster Mockup
Lastly, even for those who will not be printing your poster, you can provide folks a style of the true factor utilizing a mockup template like this one on Placeit.


That is It! Now you Know How one can Design a Film Poster!
And that’s make a film poster in Photoshop. Whereas this film poster design in Photoshop tutorial is concentrated on creating an motion poster, you may simply apply the identical rules to different genres as effectively.


If you wish to make a fast however efficient motion poster design that also appears Hollywood-approved, then take a look at these presets and add-ons from Envato Components.
Design a Film Poster on Photoshop: Tutorials and Ideas
Head on over to our Envato Tuts+ YouTube channel, the place you may be taught extra about poster design in Photoshop with my free video course Film Poster Design in Adobe Photoshop.
4 Photoshop Actions to Design a Film Poster From Envato Components
If you wish to proceed creating designs much like the one on this tutorial and even obtain an identical look to the Mad Max film poster, proceed scrolling as a result of we have 4 superb Photoshop actions from Envato Components to obtain on your subsequent film poster designs.
1. Triple Publicity Photoshop Motion (ATN)


The Triple Publicity Photoshop Motion will immediately mix three images to create the ultra-trendy double publicity impact, however plus one! Mix three action-packed pictures to create a dynamic but elegant motion film poster design.
2. Fervent 2 Photoshop Motion (ABR, ATN)


Fervent Motion 2 is an motion preset that creates an intense occasion photograph manipulation impact. With deep orange colours and explosive particulars, it is simple to see how this may be labored into an motion film poster design. Simply run the motion, add your title, and you’re achieved!
3. Glitch Poster Maker Photoshop Motion (ABR, ATN, PAT, PDF, TXT)


This glitch poster maker creates a classy glitch impact that focuses on a cyberpunk look. Embody the glitch impact in your film’s title to tie every little thing collectively.
4. Blast Photoshop Motion (PSD, ATN)


The Blast Photoshop motion tells you every little thing you want to find out about it in its identify! It’s going to add orange sparks and flames round your major topics. Nonetheless, not like different spark actions, this preset actually lets your mannequin shine, holding issues minimalist and smooth.
Discover Extra Sources and Tutorials
Searching for extra film poster design in Photoshop tutorials? Take a look at some extra tutorials beneath: