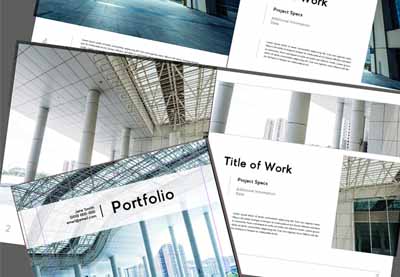
On this tutorial, we’ll create a clear, trendy InDesign portfolio template, appropriate for architectural work, with a number of emphasis on imagery and geometry. These ideas may also apply to a wide range of brochure design eventualities. So seize your favourite portfolio items, and let’s dig proper in.
What You Will Want
You will have the next belongings in an effort to full this venture:
Now, let’s get began!
1. How one can Begin Our Undertaking
Step 1
First, let’s begin up a New Doc. We’ll have to determine the orientation and dimensions of our portfolio template.
Portfolios are notably enjoyable to design, since you usually have quite a lot of freedom to determine on one of the best ways to characteristic your work. You may select to go together with one thing conventional, or perhaps you will go together with a sq. form or perhaps a lengthy format. Take into account your choices and what is perhaps one of the best ways to current your work.
On this instance, we will work in a sq. format, 10″ Broad by 10″ Excessive.


Step 2
Earlier than we finalize our doc setup, let’s deal with a couple of extra attributes.
I set my Margins to 0.5″ on the High, Backside, and Exterior. On the Inside, I set my Margins to 0.75″, just a bit further, to accommodate the house which may be misplaced between my pages.


Step 3
I additionally wished so as to add a 0.125″ Bleed to my doc.
If a picture is “Full Bleed”, it typically implies that the imagery/content material goes to the sting of the web page, with none border or “white house”. If we would like one thing to be full bleed, we frequently have to increase our work to the bleed space, to permit for trimming when our work is printed and ready.
When you’re blissful together with your settings, click on Create to simply accept and begin up your doc.
In case you’ve made a mistake otherwise you change your thoughts, don’t fret—you possibly can at all times return and alter these settings through File > Doc Setup.


2. How one can Create Our Inside
Step 1
Let’s begin creating our portfolio inside inside a Dad or mum Web page.
Dad or mum Pages are sometimes used as a template of kinds—we are able to apply components that we lay out in our Dad or mum Pages to the Lively Pages in our doc.
Dad or mum Pages are positioned throughout the prime portion of the Pages panel. In case you do not see the Pages panel, you possibly can open it up through Window > Pages.


Step 2
Go “inside” of A-Dad or mum, our first Dad or mum Web page, by double-clicking on it. That is the place we’ll begin laying out our composition.
Portfolio pages primarily want to point out off our work—there must be an emphasis on the portfolio piece itself. Nonetheless, we additionally need to achieve this in a visually partaking and attention-grabbing means.
Earlier than I began inserting imagery, I made a decision to “block out” my composition with grey rectangles, utilizing the Rectangle Device. The Fill is about to 25% grey. I discover this to be a easy strategy to experiment together with your composition or create a thumbnail.


Step 3
As soon as I had some rectangles positioned, I created Guides, primarily based on my format components. To take action, Click on and Drag from the Doc Rulers on the sides of your doc.
These Guides are impressed by the grey rectangles I positioned.


Step 4
Subsequent, I began inserting textual content primarily based on the Guides I had created. Use the Textual content Device to position textual content.
Take into account the textual content that you just’d need featured in your portfolio. It is typically a good suggestion to have the title of the piece, the date it was created, and an outline. You may additionally need an artist’s assertion of some form, to additional clarify your course of or intention.
Let’s begin with our title. By way of hierarchy, it ought to seemingly be the textual content with essentially the most visible significance—so I would prefer it to be relatively massive on the web page.


Step 5
I made a decision so as to add supplemental textual content, underneath the title, utilizing the Textual content Device. This felt like a fantastic place to have key info that the viewer would want to know instantly—like a short description of what it’s and the date of creation.
Once more, take into consideration hierarchy. That is extra supplemental sort, so I made it smaller.


Step 6
Now, let’s add two areas for some extra supplemental sort—this might be a fantastic place for extra feedback, insights, or statements on the work. Once more, use the Textual content Device. I wished this kind to be the smallest, as a result of it’s meant to be essentially the most supplemental—it is our physique copy.


Step 7
To push the aesthetic additional, I made a decision so as to add some strains utilizing the Line Device. Be aware that they’re impressed by the prevailing format components.
The Guides, within the instance under, have been Hidden (through View > Grids and Guides > Disguise Guides) so it is simpler to see the strains.


Step 8
The footer space might embrace any supplemental info you want. Within the case of my composition, I made a decision I wished to stay with web page numbers.
To insert web page numbers, first create a Textual content Field utilizing the Textual content Device.
Then, go to Kind > Insert Particular Character > Markers > Present Web page Quantity.
You will discover that they learn “A”—that is OK! Keep in mind, we’re working in A-Dad or mum, a Dad or mum Web page, in order that technically is the web page quantity.
I made a decision to make my web page numbers massive, however a lightweight grey, so their low distinction helps maintain them supplemental within the hierarchy.


Step 9
Lastly, let’s insert some imagery. Choose the Rectangle Body that you just need to place your imagery into. Then, go to File > Place, and choose your picture.
Double-click on the Rectangle Body to toggle between deciding on the body itself and the contents inside it. You will know you’ve got chosen the contents when the border round it’s in crimson.
Resize and regulate your imagery till you are proud of the way it’s cropped.


Step 10
Repeat this course of to your different rectangle frames. You can use these areas for close-ups or different pictures of your work.


3. How one can Apply Our Dad or mum Pages
Step 1
Now that we have created a format inside a Dad or mum Web page, let’s apply our Dad or mum Pages to our Lively Pages.
First, Create New Pages. Let’s make sure that we now have three pages in our Pages panel. Click on on the New Web page icon within the Pages panel to create a brand new web page.


Step 2
Discover that your pages have an “A” Icon on them. This implies they’re derived from our A-Dad or mum Web page.
To additional illustrate this concept, choose the first web page in your doc. Then Choose [None] in your record of Dad or mum Pages and drag it to your energetic web page. You will discover that it goes clean—as a result of, now, it is not derived from any Dad or mum Web page.


Step 3
Let’s go to Web page 2 and three of our doc. You will discover that these two pages are derived from A-Dad or mum Web page.
Nonetheless, whenever you attempt to click on on components of your format, nothing will occur. It is all locked up.
To make edits domestically, inside particular person pages, maintain down Shift-Command (on Mac) or Shift-Management (on PC) whereas clicking on a component of your format. It will make it editable.


Step 4
Let’s take a look at this premise out by inserting new portfolio imagery into pages 4 and 5 of our portfolio.
First, create two New Pages.


Step 5
Then, choose the picture areas by holding down Shift-Command (on Mac) or Shift-Management (on PC) whereas clicking.
Double-Click on to pick out the contents of the Rectangle Body and Delete it.
Keep in mind, we’re deleting the contents right here—not the body itself!


Step 6
Now, let’s insert our imagery. Choose the oblong body. Go to File > Place, after which choose your picture file.
Now, it’s best to have a brand new picture on this rectangular body—the one from our template has been changed.


Step 7
Repeat this course of within the different picture areas in your format. You can use the identical picture, close-up pictures, or a distinct, relevant complement right here. Once more, it is as much as you and what’s finest to your portfolio presentation.


4. How one can Create a Cowl
Step 1
Now that we have created our inside pages and practiced enhancing them for various portfolio items, let’s make a canopy for our work.
Earlier than we start, only a word—make sure that to ask your printer about any questions or file necessities that may apply to your venture. For instance, your cowl will differ out of your inside, because it has a backbone. Adapt your composition as wanted.
Let’s begin by making a New Dad or mum Web page. It must be known as B-Dad or mum, and it’ll seemingly seem as a two-page unfold by default.


Step 2
Delete one of many pages in B-Dad or mum, so that you’re left with a one-page unfold. That is going to be our entrance cowl.
I wished the entrance cowl to characteristic some compelling imagery. A canopy usually has to compel the reader to open the ebook up—so it is time to shine!
Place the imagery by going File > Place. Alter the rectangle body and Crop your work as desired.


Step 3
Then, I added a rectangle body on prime of the imagery with a White Fill.
So as to add transparency, choose the rectangle body and Proper Click on (on PC) or Management Click on (on Mac). From the ensuing dropdown menu, choose Results > Transparency.
I set my Transparency to 90%.


Step 4
Subsequent, I added some sort utilizing the Textual content Device and a line utilizing the Line Device.
You can place any sort right here that you just discover most acceptable—however be at liberty to observe my instance on this! Keep in mind, there is not any unsuitable reply—you understand what’s finest to your work! That is your time to shine.


Step 5
I made a decision I wished the again cowl to be extra supplemental.
Create one other New Dad or mum Web page for the again cowl. This one will probably be known as C-Dad or mum.
Once more, delete one of many pages in C-Dad or mum, so we now have a one-page unfold.


Step 6
Since that is the again of the booklet, I positioned a picture however left it small, and reused the contact data from the entrance cowl, utilizing the Textual content Device.
My objective was to create one thing supplemental but uniform with the remainder of the ebook.


Step 7
Now, similar to with our different Dad or mum Pages, we are able to apply B-Dad or mum and C-Dad or mum by clicking and dragging them to an energetic web page.
Create a New Web page, so our doc ends with Web page 6.
Web page 1 and Web page 6 are single pages—apply the back and front cowl to those pages.


5. How one can Use Your Template
Step 1
Now that we’re wrapping up our template, how can we use it?
You can save your work as an InDesign File (or indd file), however you possibly can additionally reserve it as an InDesign Template file (or indt file).
If you go to avoid wasting your work (by going File > Save), you will discover these choices underneath Format.


Step 2
What is the distinction? In contrast to a “commonplace” InDesign file, an InDesign Template file can both be opened as an “unique” (the place you edit the template itself) or as a replica—the place a brand new, untitled doc is opened, primarily based in your template.
See how that would turn out to be useful?


And There You Have It!
Thanks a lot for becoming a member of me on this InDesign portfolio walkthrough! Hopefully, you may have some further perception into how you can create a portfolio or how you can make a brochure design. I hope you discovered these strategies useful—good luck together with your portfolio, and your artistic tasks!


In search of some further inspiration, and even some further assist? Take a look at these InDesign templates—they’re able to go, and so they might make a fantastic addition to anybody’s assortment. Brochure templates can show to be actually versatile, too!
Structure Portfolio Template InDesign
With 20 completely different pages, this InDesign template isn’t solely a fantastic match for architectural work—its clear design might work for a large number of various tasks, from illustration to graphic design. Test it out!


InDesign Structure Journal Template
This lovely, trendy journal format might be simply tailored to your portfolio or different print venture. In case you’re in search of format inspiration or a leap begin in your venture, this might match the invoice.


Portfolio Template InDesign
I really like the lengthy, horizontal orientation featured on this portfolio booklet. There’s a lot house right here to showcase your work in a clear and well-organized means. So far as InDesign brochure templates go, this one is a winner.


Structure InDesign Brochure Template
Heat colours, transparencies, and clear design—this template is able to use. Simply drop in your content material, and also you’re able to go—or use it as a springboard for a brand new tackle this composition.


InDesign Portfolio Template
I really like all of the unfavorable house on this portfolio design! It is a stylish, timeless look that may swimsuit virtually any type of work—architectural or not! It is massive format, at 8.5″ x 11″, and contains 16 completely different pages.


In case you loved this tutorial, listed here are some others to take a look at!