ActivePresenter 9 lets you create object animation results with 4 sorts: Entrance, Exit, Emphasis, and Movement Path. There are as much as 80 results of every kind that assist convey your content material to life effortlessly.
Creating animation for objects in your tasks will help have interaction your viewers higher. ActivePresenter 9 lets you simply add, edit and take away object animation. Let’s be taught intimately proper now.
This tutorial consists of 5 important components:
- Add Entrance and Exit Results
- Add Emphasis Results and Movement Paths
- Modify Object Animation Results
- Create Animation Results for Textual content
- Take away Object Animation Results
Add Entrance and Exit Results
Generally, an Entrance impact controls how an object enters a slide. It begins initially level of an object (the left fringe of the article time bar). In the meantime, an Exit impact determines how an object exits a slide. It ends on the finish level of an object (the correct fringe of the article time bar).
To create object animation utilizing the doorway and exit results, take the next steps:
Step 1: Choose an object you need to animate.
Step 2: Entry the Animations tab > click on Entrance Results (1) and/or Exit Results (2) to point out the gallery. Then select the specified impact.

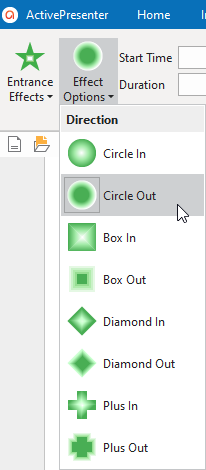
Step 3: A number of the results have choices that allow you to outline different animation properties, such because the animation course. On this case, the Impact Choices buttons will probably be activated. Simply click on these buttons and select one course you need.
Step 4: Click on the Play button within the Timeline pane or press the SPACE BAR in your keyboard to preview object animation results.
Add Emphasis Results and Movement Paths
You possibly can solely apply the Emphasis results and Movement paths to things that already existed in a slide. Emphasis results assist emphasize the article whereas movement paths create the article’s actions.
To use emphasis results and movement paths to create object animation, do the next:
Step 1: Choose the article you need to add animation results.
Step 2: Open the Animations tab > click on the drop-down arrow to open the Emphasis & Movement Path gallery. Subsequent, select one emphasis impact or one movement path you need. These results will probably be added on the Playhead place.
Word: With movement paths, ActivePresenter 9 lets you select a built-in path or draw your personal one.
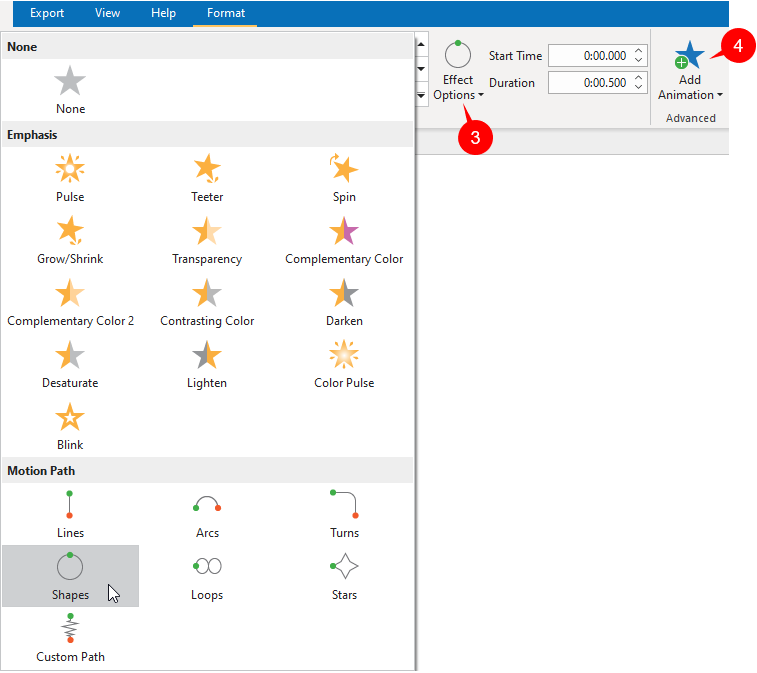
Step 3: Just like the doorway and exit results, some kinds of emphasis results and movement paths even have impact choices. Simply click on the Impact Choices button (3) and choose one from the gallery.
Word: In the principle timeline, you’ll be able to add just one entrance and one exit impact to an object. Nevertheless, a couple of emphasis and movement path impact will be added. So as to add a number of emphasis and movement path results, click on the Add Animation button (4) and select the specified one. For those who add extra results through the use of the Emphasis & Movement Path gallery, you’ll change the prevailing impact with the one you’re including.
Modify Object Animation Results
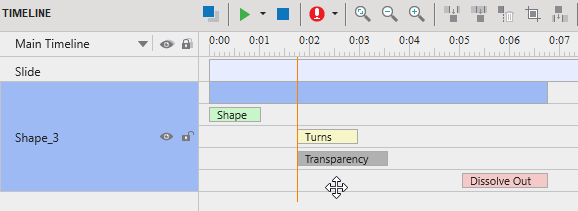
After including results to things, the article time bar will show inexperienced bars (for entrance results), purple bars (for exit results), and yellow bars (for emphasis results and movement paths).
A number of results can have the identical begin time or play concurrently, making it exhausting to pick out and manipulate them within the timeline. In that case, you’ll be able to right-click the article time bar > Develop Animations to broaden the animations.

To regulate object animation results, choose the article and take one of many following:
- Enter values within the Begin Time and Period spin field of the corresponding animation impact within the Animations tab.
- Drag the coloured impact time bars alongside the Timeline pane to vary their begin time and period.
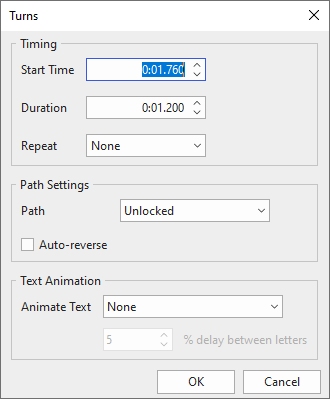
- Double-click or right-click an impact time bar and choose Impact Settings. This opens the settings dialog corresponding to every impact kind. Edit the impact’s properties and click on OK to avoid wasting adjustments.
For movement path results, together with all of the properties above, you can even do the next:
- Choose the trail on the Canvas and transfer the trail to a brand new place, rotate it, or resize it by dragging its resizing handles.
- Proper-click the trail or click on Impact Choices to decide on the specified modifying choice. Particularly, you’ll be able to edit the person level of the movement path, lock or unlock a path, or change its course.
Word: It’s potential to use an object animation impact to all objects of the identical kind within the present challenge. Simply set the impact to at least one object and right-click it on the Canvas, then choose Apply to All Objects > Animation.
Create Animation Results for Textual content
For text-based objects equivalent to Shapes, Textual content Captions, Buttons, and so forth., you’ll be able to create animation results for textual content within the Impact Settings dialog.
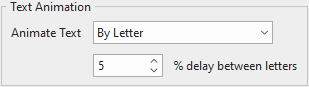
Textual content will be animated by its letters or phrases. Additionally, you’ll be able to set the delay worth between letters or phrases showing primarily based on the period of the article’s animation impact. For results that haven’t any period like Seem and Disappear results, the delay worth will probably be arrange by seconds.
Take away Object Animation Results
For those who now not want object animation results, do both of the next to take away them:
- Within the Timeline pane, choose an impact time bar. Drag the mouse downward till the impact time bar turns grey, after which launch the mouse button.
- Proper-click the impact time bar within the Timeline pane > Take away Impact.
- Choose the article, and navigate to the Animations tab > None.
- For movement paths, you can even choose a path on Canvas and press DELETE.
That’s find out how to create object animation in ActivePresenter 9. Strive it and make your tasks extra enticing.

Additionally, don’t overlook to go to our tutorial web page to get extra up-to-date ActivePresenter 9 tutorials.
See additionally: