The Audio Normalization characteristic in ActivePresenter 9 mechanically adjusts audio quantity ranges for constant playback. Let’s attempt enhancing the audio high quality and enhancing the listening expertise with just some clicks.
Suppose you will have a gaggle of audio objects at totally different amplitudes and also you need to make all of them play on the identical degree. ActivePresenter 9 lets you normalize audio to unravel this concern rapidly. For instance, you may normalize audio through the recording section while you can’t communicate on the identical quantity. Principally, the Audio Normalization characteristic applies a relentless quantity of achieve to an audio recording to carry the amplitude to a goal degree (the norm).
So, obtain the most recent model of ActivePresenter, then we’ll discover this characteristic.

What’s the Course of to Normalize Audio?
You probably have an audio file and need to normalize it, guarantee to insert it into ActivePresenter first. See How you can insert audio tracks for particulars. After that, do as follows:
Step 1: Choose your entire monitor, or a number of tracks, or outline an audio vary that you just need to normalize.
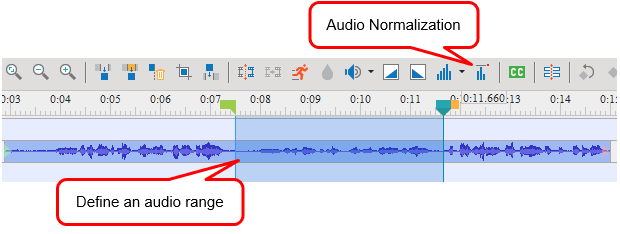
Step 2: Click on the Audio Normalization button ![]() within the Timeline pane. Then, the Audio Normalization dialog will seem because the picture beneath. Regulate the settings or preserve the default settings and click on OK to normalize the chosen monitor.
within the Timeline pane. Then, the Audio Normalization dialog will seem because the picture beneath. Regulate the settings or preserve the default settings and click on OK to normalize the chosen monitor.
Step 3 (Non-obligatory): Click on Restore Defaults to return to the unique settings in case you are not happy with the change. Alternatively, press CTRL+Z on the keyboard. Then, attempt Audio Normalization once more with totally different settings.
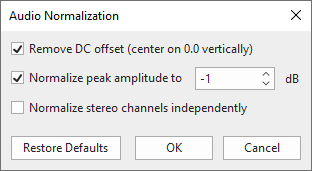
The Audio Normalization Dialog:
- Take away DC offset (heart on 0.0 vertically): DC offset is an offsetting of a sign from zero. The waveform can symbolize the difficulty because it seems above or beneath the 0.0 horizontal line. Typically, DC offset is usually a {hardware} downside that may trigger clicks, distortion, or lack of audio quantity, which might restrict the potential loudness. Therefore, eradicating the DC offset is required when normalizing audio because it facilities the waveform on the 0.0 amplitude degree. Moreover, in case you are positive your audio has no offset, It is best to deselect this examine field to hurry up the normalization
- Normalize most amplitude to (peak normalization): Peak normalization brings the very best peak to the norm. A degree of -1 dB (the preliminary default setting) is just under the utmost amplitude (0 dB) potential with out clipping however provides just a little headroom for results and distortion-free playback on all tools. For this selection, enter zero or a unfavorable worth for the utmost amplitude you prefer to the chosen monitor to have. A extra unfavorable worth means you normalize the chosen monitor to decrease amplitudes.
- Normalize stereo channels independently: Normalization can work on the left and proper channels of a stereo monitor independently or as a pair. So, when you choose this selection, normalization adjusts the amplitude of the channels individually to the identical peak degree. That is useful for correcting stereo imbalances. In distinction, normalization adjusts the extent of each channels by the identical quantity, which is sensible in case your audio is already balanced.
So, you’ve recognized the way to normalize audio in ActivePresenter 9. Don’t neglect to make use of this characteristic to reinforce your audio high quality. And be at liberty to contact us if you happen to want any help.
See extra: