Pastorross writes:
I’ve been additional experimenting with Morphing extra advanced objects than I’ve achieved in earlier posts.
As I stated in my final put up, I found the superb Mesh Information Switch addon by Maurizio Memoli. It was not meant for Morphing however works so properly in doing so. It’s unimaginable, as raved about in earlier put up.
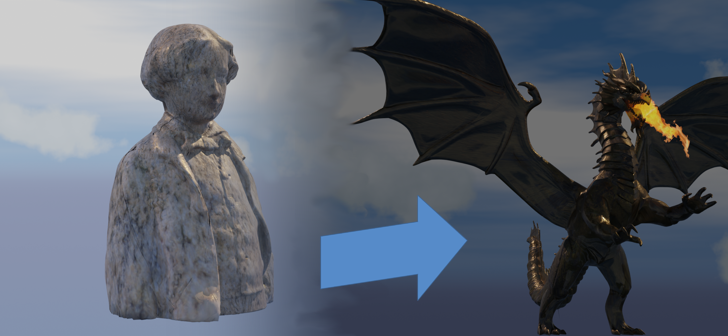
As you’ll be able to see it’s able to some very advanced morphs.
Right here I’ve morphed a statue right into a Dragon. The dragon is from a free 3D fashions web site,
https://creazilla.com/ writer Miguel Zavala. The statue is from Sketchfab, of Francois by Fablab.In case you have not seen my final put up, here’s a rundown on the method…
- The Supply Mesh is the mannequin of the statue of Francois. For this you have to have a really properly unwrapped mesh that covers a number of the sq. within the UV window, no overlaps.
- The Transferee Object, in my case the Dragon, should share the identical UV texture.
- Go to Shader Editor and make the supply texture the identical because the Dragon texture utilizing Picture Texture node.
- Unwrap the Dragon utilizing Spherical Unwrap. Flip your object to the place you need the Dragon to look from the supply mesh earlier than unwrapping. I used Orthographic mode to unwrap. I don’t suppose it issues.Utilizing Spherical Unwrap it is best to discover that it fills up the UV sq.. That is what you need.I used Scale (S + X or Y + 0 after which G to regulate these components of the mesh outdoors the sq.). Mesh must be proper on or barely overlap. The Dragon ought to look bizarre at this level with the incorrect texture.
- Shift click on on Supply Statue after which the Dragon.
- Go to Mesh Information Switch in Object Information Properties. Select Lively UV, Closest, select Supply with eye dropper. Press little sq. on proper to create form keys. Press Switch Form.
- It’s going to take a second to work however it is best to get a reasonably correct and complicated mesh with out an excessive amount of distortion. It will likely be of the Supply mesh (Statue in my case).
- Go to Form keys, flip Relative off, and use the Analysis Time to look at transformation.
- In Object Mode, add extra Form Keys through the use of bigger arrow on facet and press New Form from Combine.
- Create your animation. Use Shader Editor to combine textures.
I added the sky from Final Sky professional and performed with the important thing frames setting to vary the colors because the dragon appeared. I then made the video and edited it with free music.
The hearth is a picture airplane with a film of a flame thrower with some alpha settings. I’ve used it with emission for extra drama.