
Let’s come to a different chart kind that ActivePresenter 9 brings out: the Bubble chart. This chart kind is right if you wish to examine numerical values in three dimensions concurrently.
That’s to say, a Bubble chart in ActivePresenter 9 presents information factors in bubbles. The primary two dimensions correspond to horizontal (X) and vertical (Y) axes that outline the situation of bubbles. In the meantime, the third dimension is mirrored within the bubbles’ sizes.
For instance, you need to examine 4 gross sales territories by way of the variety of models offered, gross sales, and profitability of every area. And you’ve got the next pattern information set:
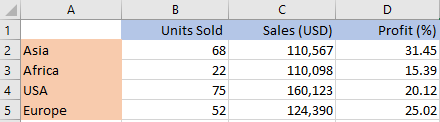
For visualizing these 3 units of values, utilizing a Bubble chart is a correct alternative.
Comply with this process to create a Bubble chart in ActivePresenter 9:
- Insert Bubble Charts
- Edit Knowledge for Bubble Charts
- Change Bubble Charts’ Types
- Modify Chart Structure
- Preview and Export the Charts
Insert Bubble Charts
To insert a Bubble chart, do the next:
- Click on the Insert tab > Chart.
- Choose the Bubble chart kind on the left pane within the Insert Chart dialog.

- Click on OK to insert.
Edit Knowledge for Bubble Charts
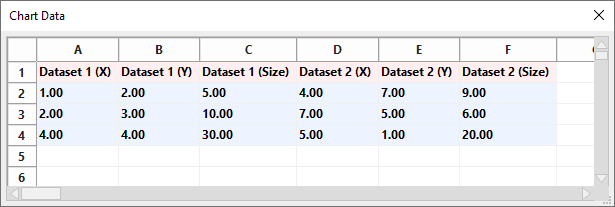
After inserting a chart, the Chart Knowledge window seems with default values.
Be aware: When you choose the chart, this window must be proven up. If not, you may right-click the chart > choose Edit Chart Knowledge.
Then, merely edit the defaults together with your information:
- Choose a Dataset cell (eg. Dataset 1 (X)) and alter its textual content to Asia, Africa, USA, or Europe. Whenever you’ve performed, the (Y) and (Dimension) cells’ texts of that dataset will likely be up to date accordingly.
- Add additional datasets by deciding on a clean cell within the first row, then kind your Dataset identify.
- Choose the worth cells and take away or enter your information values.
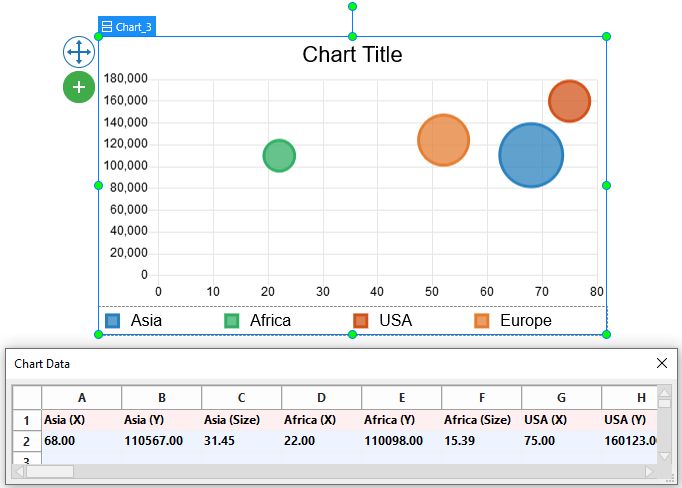
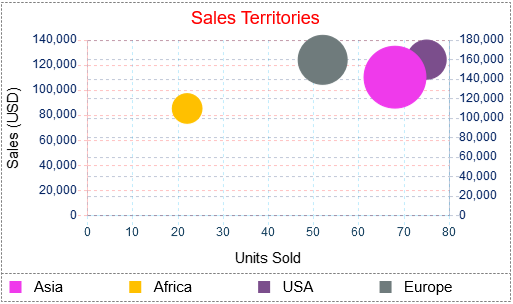
All of the modifications you made will likely be instantly proven within the chart like this:
Change Bubble Charts’ Types
To start with, let’s outline a number of the Bubble chart’s parts. By doing so, you may know extra about parts to be personalized.
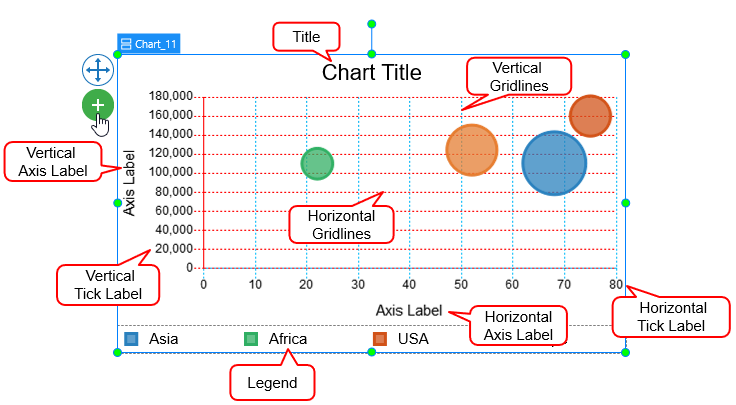
Be aware: Some parts are usually not proven by default. You may choose the chart > click on on the plus button ![]() > select to point out or disguise any parts.
> select to point out or disguise any parts.
After that, navigate to the chart Properties pane > Chart > Type. This part permits you to customise the background fill and line of the datasets, in addition to gridlines, tick labels, and axis labels.
Customise Datasets
The Dataset means information values introduced in a coloured bubble. You may select to customise any dataset by clicking the drop-down Dataset listing.
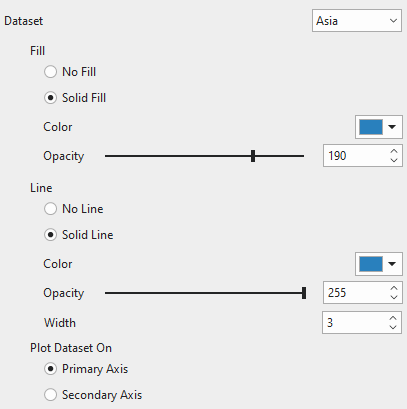
- Fill and Line: Fill the dataset and its line border with a single colour, respectively.
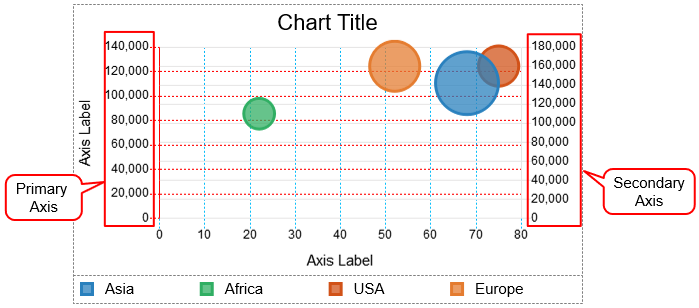
- Plot Dataset On: Select between Major Axis and Secondary Axis to plot a dataset on. Within the Bubble chart, the first axis runs alongside the left facet of the chart and the secondary axis runs alongside the fitting facet of the chart. You need to use a secondary axis when information values range drastically between each other with out the necessity for extra charts. Be aware that you simply can not plot all of the datasets within the secondary axis.
For instance, the Africa (green-colored) and USA (brown-colored) datasets are plotted on the Secondary axis. In the meantime, the Asia (blue-colored) and Europe (orange-colored) datasets are plotted on the Major axis.
Customise Scale Choices
On this part, you’re free to regulate the gridlines, tick labels, and axis labels equivalent to the axis that the dataset is plotted on.
To start with, you may click on the drop-down listing on the Axis choice. Then, select one of many chart axes. There are 4 sorts of axes: Major Horizontal, Major Vertical, Secondary Horizontal, and Secondary Vertical.
Be aware: The properties for the Secondary Horizontal and Secondary Vertical choices are solely out there when there may be at the least one dataset plotted on the Secondary axis
Gridlines
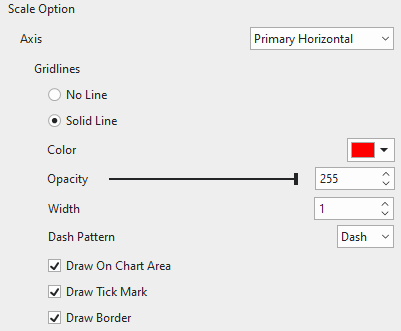
Gridlines are traces that cross the chart space to point the divisions on the axes. You may select to attract gridlines of the at present chosen axis with a single colour or not. Modify the transparency and the width of the gridlines the way in which you need.
- Sprint Sample: Change the sample of gridlines.
- Draw On Chart Space: Tick the checkbox to attract horizontal/vertical gridlines on the chart space. Drawing gridlines helps viewers perceive what values are represented by unlabeled information factors.
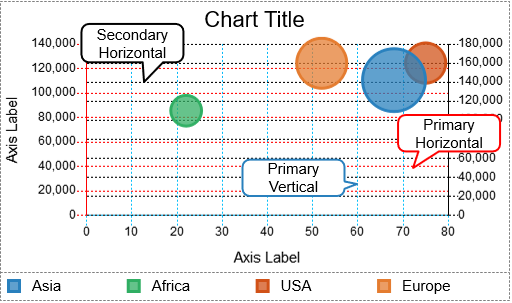
Be aware: Because the Bubble chart is a vertically oriented chart, there are not any Secondary Vertical gridlines.
- Draw Tick Mark: Tick the checkbox to attract traces that are the extension of the gridlines from the axis border to the tick labels.
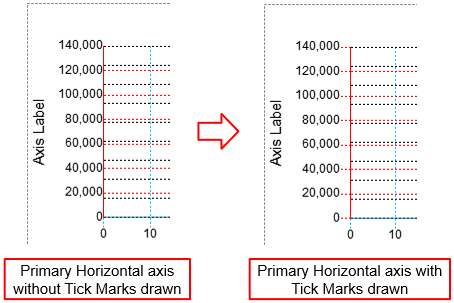
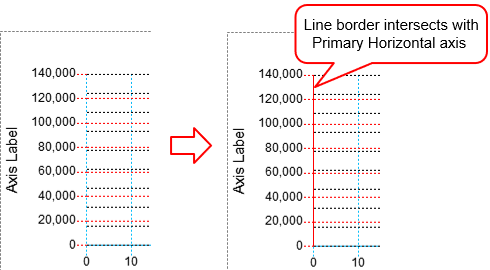
- Draw Border: Tick the checkbox to attract a line border on the edge intersecting with the corresponding axis.
Tick Labels
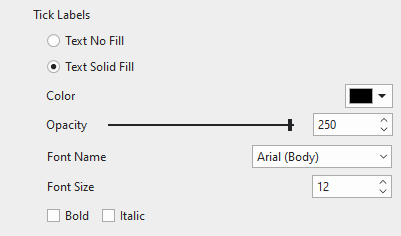
Fill the tick labels of the corresponding axis with a single colour. You may as well change the font identify, font measurement, and make the tick labels daring and/or italic the way in which you need. In any other case, in order for you the axis to haven’t any tick labels, simply choose Textual content No Fill.
Axis Label
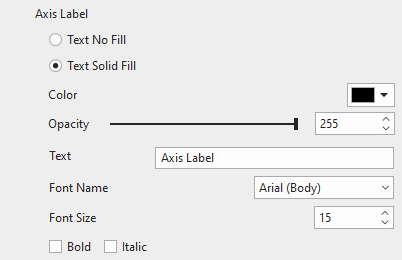
Fill the axis label of the corresponding axis with a single colour. Enter a brand new identify of the axis label within the Textual content subject. Furthermore, change the font identify, font measurement, daring, and/or italicize the axis label as you want. When you don’t need to present the axis label, choose Textual content No Fill.
Be aware: The Secondary Horizontal axis has no tick labels and axis label.
Modify Chart Structure
It’s attainable to regulate the chart format in order for you. Simply choose the entire chart. Then, entry the chart Properties pane > Dimension & Properties > Container Structure.
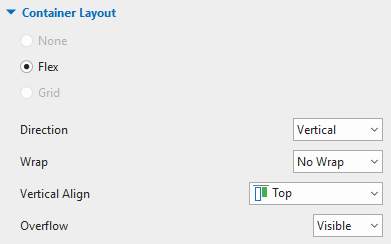
Be aware {that a} Bubble chart has 3 elements, specifically chart title (on the high), chart space (within the center), and chart legends (on the backside). You can not regulate them manually as a result of nature of the Flex format. As an alternative, simply choose every chart half then customise it within the Properties pane > Dimension & Properties > Flex Baby.
So lastly, your chart ought to appear like the beneath chart.
Preview and Export Bubble Charts
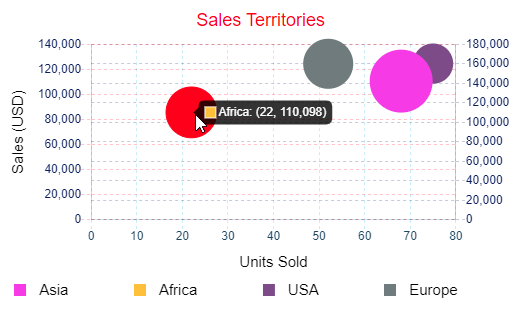
Truly, viewers can work together with the chart within the HTML5 output. That’s to say, when viewers hover the mouse over the datasets, information values will likely be labeled and highlighted. That helps viewers interpret the info extra simply.
All issues thought-about. That’s how you’re employed with the Bubble charts in ActivePresenter 9. Don’t hesitate to obtain the app and provides it a strive.

Associated articles: