
What You may Want


- Pencil
- Pencil sharpener
- Eraser
- Ballpoint pen or gel pen (any pen with good ink move)
- Apply sheet
1. Heat Up With the Fundamental Strokes
Earlier than we dive into cursive script writing, let’s heat up our palms.
Step 1
Print out 4 or 5 of the apply sheets on clean paper.
Step 2
Apply the fundamental entrance/exit stroke for one or two strains to heat up. Understand that cursive script is all about joined letters; to make sure straightforward connecting, all lowercase letters have entrance and exit strokes.


Step 3
Apply the fundamental upward stroke for one or two strains to heat up. This stroke is a bit new however very straightforward. You begin simply above the underside line. Then, you shoot as much as the highest line.


Step 4
Apply the fundamental curve stroke for one or two strains to heat up. This one hasn’t modified, however it’s possible you’ll curl up a bit greater than earlier than. Beginning somewhat below the dashed line, go up and round anticlockwise towards the underside line and curve up, leaving somewhat hole.


Okay! Now we’re prepared to start out. On this lesson on find out how to write in cursive for newbies, we will study a really acquainted alphabet referred to as Cursive Script.
2. The best way to Write the Cursive Script Lowercase Alphabet


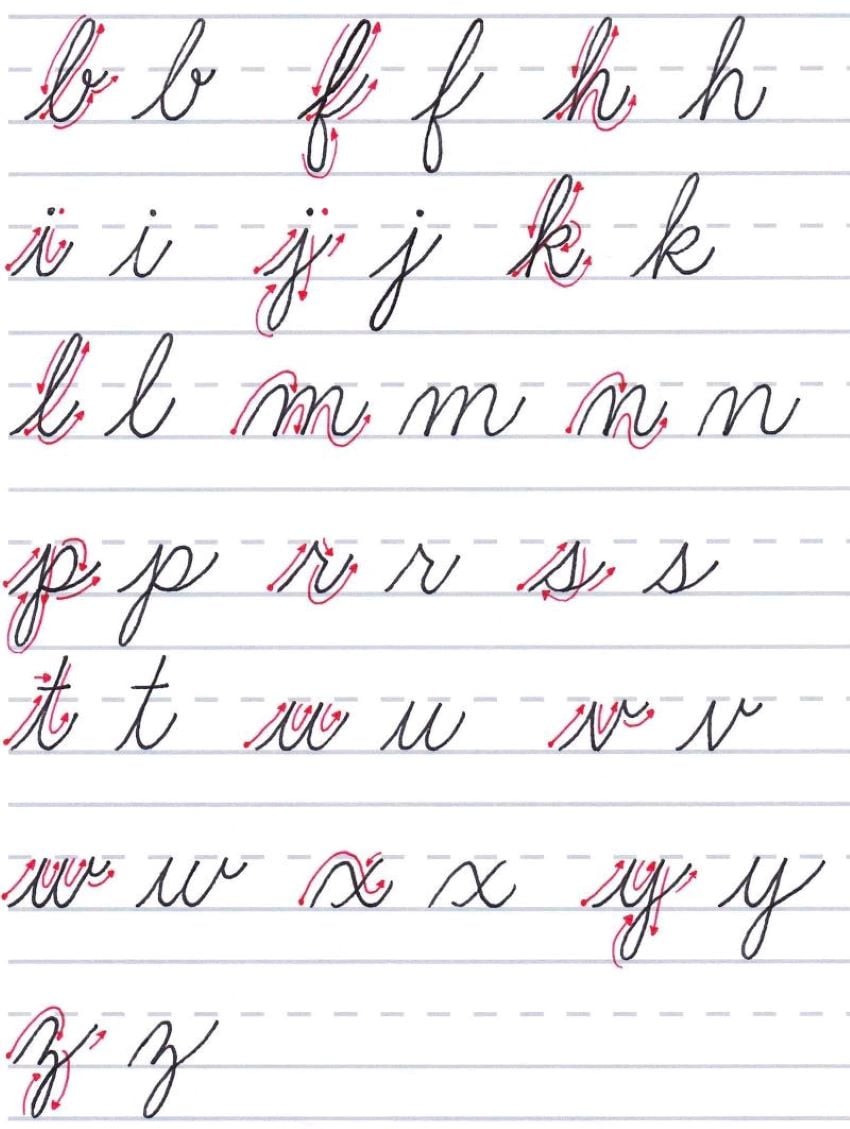
Let’s check out the cursive script alphabet in lowercase. As you possibly can see, it appears to be like nearly an identical to the cursive you discovered in elementary faculty. The crimson arrows above present the instructions of the pen strokes.
Cursive script is all about effectivity, so when writing a lot of the letters, the pen stays on the paper. Most letters shall be made with only one stroke as cursive is all about effectivity. We’ll begin with the lowercase alphabet and break it up into two sections: upward stroke letters and curve stroke letters. So let’s begin with the upward stroke letters!
Print out a duplicate of the cursive calligraphy alphabet above, so that you’ve got it useful for reference.
3. The best way to Write the Upward Stroke Lowercase Letters
Step 1
Let’s begin studying some cursive calligraphy letters. The letters b, f, h, i, j, ok, l, m, n, p, r, s, t, u, v, w, x, y, and z all start with an upward stroke. Some have strokes that replenish the whole peak of the road, and others solely attain to the dashed line. Some, just like the “f”, even attain beneath the underside line.
To start out, I’ll present you the path of every stroke. If you’re writing out the letters your self, you possibly can sketch them out utilizing your pencil first. Then you possibly can merely comply with the pencil strains together with your pen. That is additionally useful for studying to write down a “ok” in cursive.


Step 2
Let’s begin with the “u” because it’s best. Place your pen tip on the underside line. Make an upward stroke to the dashed line. Then make a downward stroke that dips to the underside line after which swings again up once more. Subsequent, make one other downward stroke and finish slightly below the dashed line. Voila! You’ve a Cursive Script “u”. It type of felt like drawing waves on the ocean, proper?


Step 3
Repeat the method of creating the letter “u” 3 times so that you just get the texture of it. Many letters, such because the i, j, m, n, r, v, w, and y, are similar to the “u”. Upon getting the “u” down, it is simple to see how different letters are made.


Step 4
Let’s strive a more durable letter: h. The “h” begins the identical because the “u”, however its stroke reaches all the way in which as much as the highest line. You then arc to the left and make a downward stroke to the underside line. You may cross over your earlier line proper close to the underside. Now arc as much as the dashed line and make a downward stroke again all the way down to the underside line, curling up and ending slightly below the dashed line.


Step 5
Repeat the method of creating the letter “h” 3 times so that you just get the texture of it. Many letters, such because the b, f, ok, and l, are similar to the “h”.


Step 6
Slowly make your approach by way of the remainder of the curved stroke lowercase letters, utilizing the information of the strokes as a reference.
4. The best way to Write the Curved Stroke Lowercase Letters
Step 1
Now, let’s apply some extra lowercase cursive script letters. The letters a, c, d, e, g, o, and q all start with an entrance stroke that begins on the backside line and ends slightly below the dashed line. After finishing our entrance stroke, we then curve anticlockwise and spherical.
To start out, I’ll present you the path of every stroke. You’ll be able to all the time sketch out the letters utilizing your pencil first to really feel extra comfy. Then you possibly can merely comply with the pencil strains together with your pen.


Step 2
Let’s begin with the “o”, because it’s best. Place your pen tip simply above the underside line. Arc up slightly below the dashed line and curve spherical anticlockwise, closing the hole slightly below the dashed line. Then come down barely and flick out ending on the dashed line. Voila! You’ve a Cursive Script “o”. Not too arduous, was it?


Step 3
Repeat the method of creating the letter “o” 3 times so that you just get the texture of it. Upon getting the “o” down, it is simple to see how the opposite downward curve letters are made.


Step 4
Let’s strive a more durable letter: g. Make the identical begin to the “g” as you probably did the “o”, however as an alternative of making a round form when coming spherical, go straight up, closing the hole. Then make a downward stroke and go previous the underside line. Curl to the left and make an upward, diagonal stroke that continues up towards and ends slightly below the dashed line. It ought to intersect the downward stroke of your “g” proper on the backside line.


Step 5
Repeat the method of creating the letter “g” 3 times so that you just get the texture of it.


Step 6
Slowly make your approach by way of the remainder of the curved stroke lowercase letters, utilizing the information of the strokes as a reference.
5. The best way to Write the Lowercase Cursive Alphabet
Now that you have written every letter a number of instances, it is time to put all of it collectively and write out the cursive script alphabet in lowercase.


6. The best way to Write the Cursive Script Uppercase Alphabet
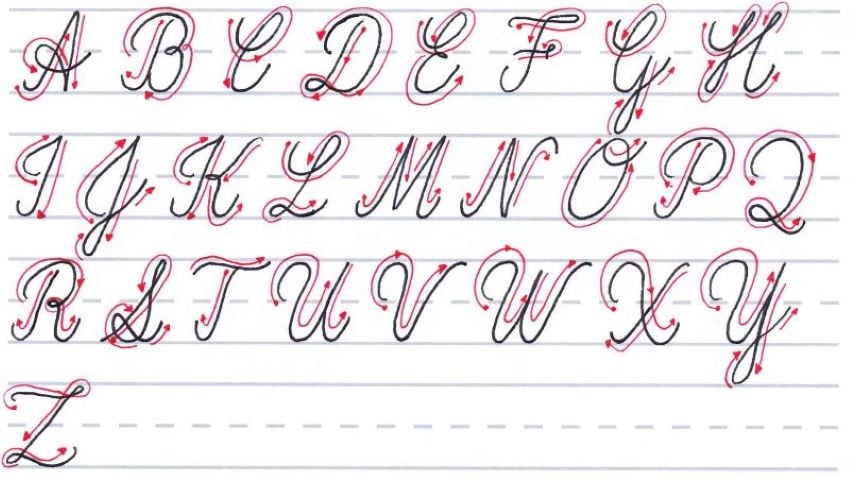


The uppercase cursive script alphabet all the time performs by completely different guidelines and is mostly way more elaborate. The curved strokes are a lot larger, and the upward strokes have extra curls and slant to them. Moreover that, the uppercase letters are simply as easy to write down because the lowercase.
You’ll be able to all the time sketch out the letters utilizing your pencil first to really feel extra comfy. Then you possibly can merely comply with the pencil strains together with your pen. With regards to uppercase letters, I favor to pencil mine out beforehand.
Step 1
Since a lot of the cursive script letters start with a curved stroke, I did not divide the alphabet into teams. As an alternative, we’ll merely work our approach by way of it, utilizing the information above to see what path the strokes go.
So let’s begin with a straightforward letter: the letter “L”. Place your pen tip slightly below the highest line. Arc down simply above the dashed line and round anticlockwise, coming as much as the highest line. Then arc over to the left and make a downward stroke to the underside line. Your line shall be slanting to the proper. If you attain the underside line, curl up and round. Lastly, sweep your line out to the proper, making a pleasant, light curve. Voila! You’ve a Cursive Script uppercase “L”. Bear in mind, it is all about curls and slants. The larger, the higher.


Step 2
Repeat the method of creating the letter “L” 3 times so that you just get the texture of it. As I stated earlier than, on the subject of uppercase letters, the extra flourish, the higher, so do not be scared to make some large curls and sweeping strains. Upon getting the “L” down, it is simple to see how different uppercase letters just like the C, E, G, O, and Q are made.


Step 3
Let’s strive a more durable letter: R. Begin together with your pen tip on the highest line. Make a downward stroke to the underside line, arcing barely to the left and ending in a flowery curl. Then raise up your pen and place it on the dashed line. Make a curved stroke up and round clockwise towards the highest line. Then curve all the way down to the dashed line once more and go up and over ever so barely, making a loop. Now make one other curved stroke out to the proper and all the way down to the underside line, once more ending in a flowery curl. A bit tough however not too arduous, proper?


Step 4
Repeat the method of creating the letter “R” 3 times so that you just get the texture of it. The letter “R” is similar to the letters B, D, F, I, J, P, and T. So after you have this one down, you are able to do the remainder!


Step 5
Slowly make your approach by way of the remainder of the uppercase letters, utilizing the information of the strokes as reference.
Now that you have written every letter a number of instances, it is time to put all of it collectively and write out the uppercase cursive script alphabet.


7. An Train in The best way to Write in Cursive
Step 1
Cursive script is extremely widespread and is used for on a regular basis writing. Now that we’ve got discovered each the lowercase and uppercase cursive script alphabet, let’s put our new expertise to work and write out a easy sentence.


Step 2
To start out, replicate the primary stroke within the uppercase “R” we discovered earlier. Then, beginning somewhat beneath the highest line, from the left, make a barely waved horizontal line to the proper. Then, write the letter “h” as we discovered earlier, bringing its exit stroke all the way in which to the dashed line. With out lifting your pen off the web page, proceed your line straight down towards the underside line and dip, swinging proper again as much as the dashed line.
Lastly come again down with a slight curve going to the proper and shut the hole on the backside line, reverse path and finish with an exit stroke slightly below the dashed line. Dot your “i” and, voila, first and second phrases full! This phrase will will let you write “is” with ease.


Step 3
Once more, as we did earlier, write an “h”, bringing its exit stroke as much as the dashed line, however in a slight arc vogue, and write the letter “o” as we did earlier. Then from its little flick, come straight down, dip, and swing again as much as the dashed line. Repeat this yet one more time, and on the dashed line, make somewhat flick. Third phrase down—nice work!


Step 4
Beginning with an entrance stroke, go to write down the letter “u”, however as an alternative of swinging up from the underside line, shoot straight all the way down to the final line and loop up like within the letter “g” we discovered earlier. Then, coming straight up and barely arcing towards the dashed line, write the letter “o”, connecting to the letter “u” as we did within the earlier phrase. Fourth phrase down—easy, proper?


Step 5
With an entrance stroke, write the letter “w”, utilizing the earlier phrase as a reference. On the finish, on the dashed line, make a brief diagonal line coming all the way down to the proper, pause and are available straight down, dipping and swinging again as much as the dashed line to make the letter “i”. Then swing up towards the highest line, not fairly reaching it, and reverse, coming straight all the way down to the underside line. Then dip and swing again up towards the dashed line and make the letter “e”. Fifth phrase down!


Step 6
For this phrase, write the letter “i” like in our earlier phrases, and on the dashed line, arc down. Then arc up and down once more to the underside line and finish with an exit stroke, slightly below the dashed line. Sixth phrase down!


Step 7
For our uppercase “C”, begin slightly below the highest line and curve all the way down to the proper towards the dashed line. Then come again as much as the highest line, curving to the left and coming straight all the way down to the underside line. End by curving again as much as the dashed line.
Holding our pen on the web page, write the letter “u”, coming straight as much as the dashed line, after which write the lowercase “r” like within the earlier phrase, ensuring to finish on the dashed line. Then write the letter “s”, ending on the dashed line, and are available straight all the way down to make the letter “i”, additionally ending on the dashed line.
From this level, make a slight diagonal line to the proper, ending on the backside line, and are available up, making one other slight diagonal line to the proper, as much as the dashed line, and flick out like our “w”. As an alternative of our flick ending on the dashed line, we wish to deliver it somewhat decrease and curve to the proper and spherical anticlockwise, to write down the letter “e”.
Sixth phrase down—we almost have a full sentence written!


Step 8
For our uppercase “s”, begin on the backside line and make an upward stroke as we discovered earlier, looping barely to the left on the prime line. Then come straight all the way down to the underside line, curving to the left, and up somewhat—midway down from the dashed line. Curve again all the way down to the underside line and instantly write the lowercase “c”, adopted by the lowercase “r”, “i”, “p”, and “t”. And that is it—you’ve got performed it! 


You’ve got Mastered the Cursive Script!
This fashion of calligraphy is the one most frequently utilized in on a regular basis writing because it makes for quick and legible handwriting, whereas trying elegant. I hope that you have found it is really fairly a easy font to write down, regardless of trying very fancy. The extra you apply, the better it will likely be to ink the letters and the sooner you may be at writing. In future tutorials, we’ll study a barely extra difficult script that appears even fancier.


5 Prime Cursive Calligraphy Fonts From Envato Parts
Now you understand how to write down in cursive for newbies. Subsequent up, I will share with you a number of the greatest cursive calligraphy fonts from Envato Parts.
In case you’re engaged on a number of digital artistic tasks, you may love our subscription-based market. For a low month-to-month charge, get pleasure from limitless downloads of the most effective calligraphy fonts. You may as well get limitless premium fonts, graphic templates, actions and presets, and extra.
Let’s examine some prime cursive script fonts:
1. Montheylin – Calligraphy Font (OTF, TTF, WOFF)


Montheylin is a chic cursive script font. These cursive calligraphy letters characteristic a pure handwritten look. This cursive script font options lovely ligatures, stylistic units, and multilingual assist.
2. Quenyland – Cursive Script Font (OTF, TTF)


Are you on the lookout for traditional cursive calligraphy fonts? Quenyland is an attractive cursive script font, excellent for branding and stationery.
This calligraphy font is suitable with software program just like the Adobe suite and MS Phrase. Quenyland contains alternates and ligatures, together with PUA-encoded characters.
3. Hargalia – Cursive Calligraphy Font (OTF, TTF)


Hargalia is a traditional cursive script font. It is impressed by Renaissance fashion and the well-known Lucida calligraphy font.
This cursive script font appears to be like nice in headlines, branding, quotes, and different artistic tasks. If you would like an alternative choice to the Lucida calligraphy font, you’ll want to do this one!
4. Butterscotch – Cursive Calligraphy Font (OTF, TTF)


Butterscotch is an attractive cursive calligraphy alphabet. In case you want a traditional and clear cursive script font for stationery and logos, that is for you. This cursive calligraphy font helps ligatures and stylistic units, in addition to multilingual assist.
5. Ralyne Lovely Cursive Script Font (OTF, TTF, WOFF)


Ralyne is one other traditional cursive script font. These cursive calligraphy letters characteristic an attractive handwritten look. The cursive calligraphy alphabet features a full set of uppercase and lowercase letters, multilingual symbols, numerals, punctuation, and ligatures.
Uncover Extra Calligraphy Font Inspiration
Right here you’ve got discovered find out how to write the alphabet in cursive. I’ve additionally shared with you a number of the prime cursive calligraphy fonts from Envato Parts. Now, I am certain you need to find extra superior calligraphy fonts:
Begin Cursive Calligraphy Writing Immediately
In case you like a digital resolution that allows you to create elegant invites with that hand-written look, browse the choice of cursive calligraphy fonts on Envato Parts.
This tutorial was initially created by Megan Eckman of PopLush Embroidery. It is since been reworked with new photographs and ideas by Naselle Anderson.