
Loads of editors are inclined to get a bit careless with how they work with mono or stereo audio, and it could actually have a damaging affect on how the ultimate combine finally ends up sounding when exported. This in-depth tutorial for Adobe Premiere Professional will aid you perceive the right strategy to work together with your audio.
Mono Audio and Stereo Audio – What’s the Distinction?
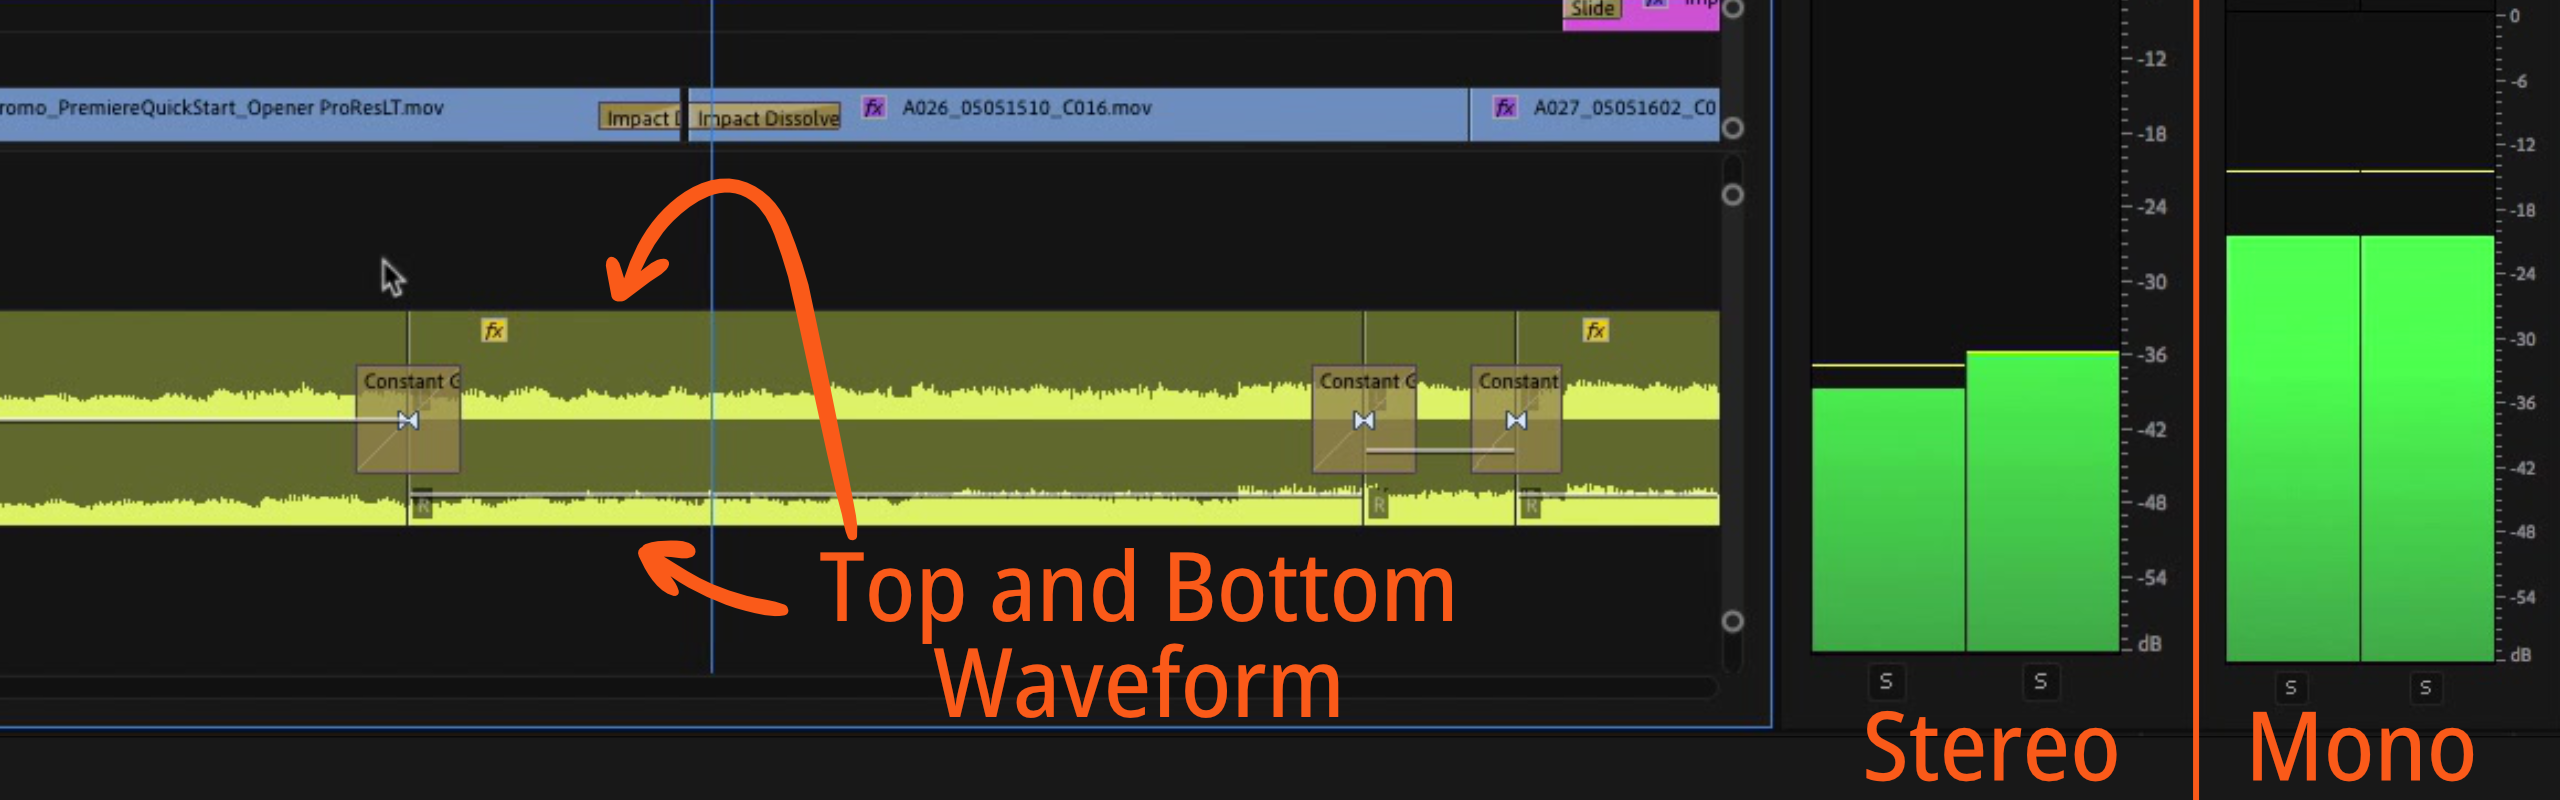
In Premiere Professional, in case you had been to click on on any stereo audio clip, it should spotlight each the highest and the underside waveform. What this implies is that the audio is popping out of each the left speaker and the best speaker. If you happen to play again a stereo audio clip, do you discover how the left aspect and the best aspect of the audio meters are bouncing at totally different ranges? That’s as a result of in a stereo monitor, the audio popping out of the left speaker is barely totally different than the audio popping out of the best speaker. Now if we used a mono monitor, these could be precisely an identical and even.
Methods to Sync Audio to Footage
For this instance, we have now a video clip of our Premiere skilled Brian, standing exterior, recording on his iPhone. Moreover, we even have some audio that he recorded individually for this footage. So, in our timeline we have now the video, the video’s audio monitor, one other audio monitor recorded individually. Firstly, let’s go forward and sync up the audio. Within the clip you noticed Brian clap his fingers one time. Now hearken to the audio that we recorded.
If you happen to establish the precise body that Brian’s fingers clap, you may make an edit level proper there. Subsequent, have a look at the recorded audio visually on the timeline the place that clap really happens, and I could make an edit level there as effectively. Lastly, you may merely drag the audio alongside the timeline in order that the 2 edit factors line up to one another. You might have to do some little bit of shuffling round, like shifting the video clip over, however now you have got the audio lined as much as the video recorded. It is a very ‘poor man’s’ approach of syncing up the audio, however for our demonstration functions proper now, that is all we have to do.

Working with a number of audio sources
Subsequent, you’ll most likely wish to take away the audio from the digital camera (blue), because it doesn’t sound superb in comparison with the audio monitor that was recorded utilizing a Zoom H4n Recorder (Inexperienced). Take heed to the identical audio clip under, however this time with some headphones on, since you’re going to listen to a really clear distinction between the 2 totally different audio sources on this clip.
Let’s work out what’s occurring with the audio right here. If you happen to had been listening together with your headphones, you most likely realized that sooner or later you heard Brian bump the lavalier microphone with my hand whereas he was discussing it. The lavalier microphone must be in your left ear whereas the growth microphone must be in your proper ear. If you happen to didn’t hear that, play again the clip once more.
It is a actually good demonstration of what a stereo monitor really is, It signifies that the audio on the left aspect of the monitor is totally different from the audio on the best aspect of the monitor. On this instance, what occurred is that the growth microphone was plugged into the best channel of Brian’s two channel recorder, and on the left channel of that very same recorder was the lavalier microphone.
It’s not splendid you could hear the lavalier out of your left ear and the growth out of your proper ear. The truth is, that is really a typical drawback that you could be run into when you’re starting to do work on totally different initiatives, particularly within the documentary or company area the place it’s possible you’ll be conducting an interview with one growth microphone and one lavalier microphone.
On this instance a stereo monitor of dialogue was recorded, nevertheless music is one thing that must be stereo. It’s supposed that you just hear totally different instrumentation on the left ear than you would possibly hear on the best ear, however in relation to one thing like dialogue, you wouldn’t need that to be the case, as demonstrated right here, as a result of we would like to have the ability to do a few various things.
The very first thing that we would like to have the ability to do with this explicit clip is repair the issue that’s occurring with my lavalier after I smack it with my hand. The second is you wish to separate the lavalier and the growth into their very own particular person channels, in order that I can hear the identical dialogue out of each ears.
Changing Stereo to Mono

The very first thing you’ll wish to do is to proper click on on the audio clip within the bin, and within the menu go to Modify, Audio Channels. This clip was imported as a stereo clip, so what this menu is saying right here, primarily, is that this clip was imported as stereo utilizing the properties of the file when it was imported. If you happen to needed to show this right into a mono clip, what you are able to do is change the preset from ‘Use File’ and inform it to grow to be ‘mono’.
That is going to alter the file a bit of bit – now the primary and second channel of the clip will grow to be particular person clips, so will probably be two mono clips versus a single stereo clip. Whenever you click on ‘Okay’, a warning message seems which principally says that this clip is already being utilized in a timeline, and that if you go forward and apply this clip modification, it’s not going to have an effect on the clips which might be already within the timeline. Therefore, if you click on ‘Okay’, nothing’s going to occur – nothing has modified.
Nevertheless, what has modified is the best way that this clip works within the bin, so now in case you had been to take this clip and drag it again into the timeline you now have two utterly distinctive clips, the left channel and the best channel. Take heed to the edited clip under very rigorously together with your headphones and take a hearken to the way it sounds a bit of bit totally different now:
You most likely observed that this time round if you performed the a part of the video the place Brian smacks the lavalier microphone, now you can hear it out of each ears. Right here’s what occurred: the tracks are each mono, which signifies that the audio that you just hear from this monitor is gonna be heard on each ears evenly.
However right here’s why that is actually necessary, as a result of now the left monitor is barely the lavalier microphone, and the best monitor is barely the growth microphone, which suggests you could repair this audio difficulty on the lavalier microphone when Brian smacks it by merely reducing the audio of the left monitor for that part, or disabling this clip fully.
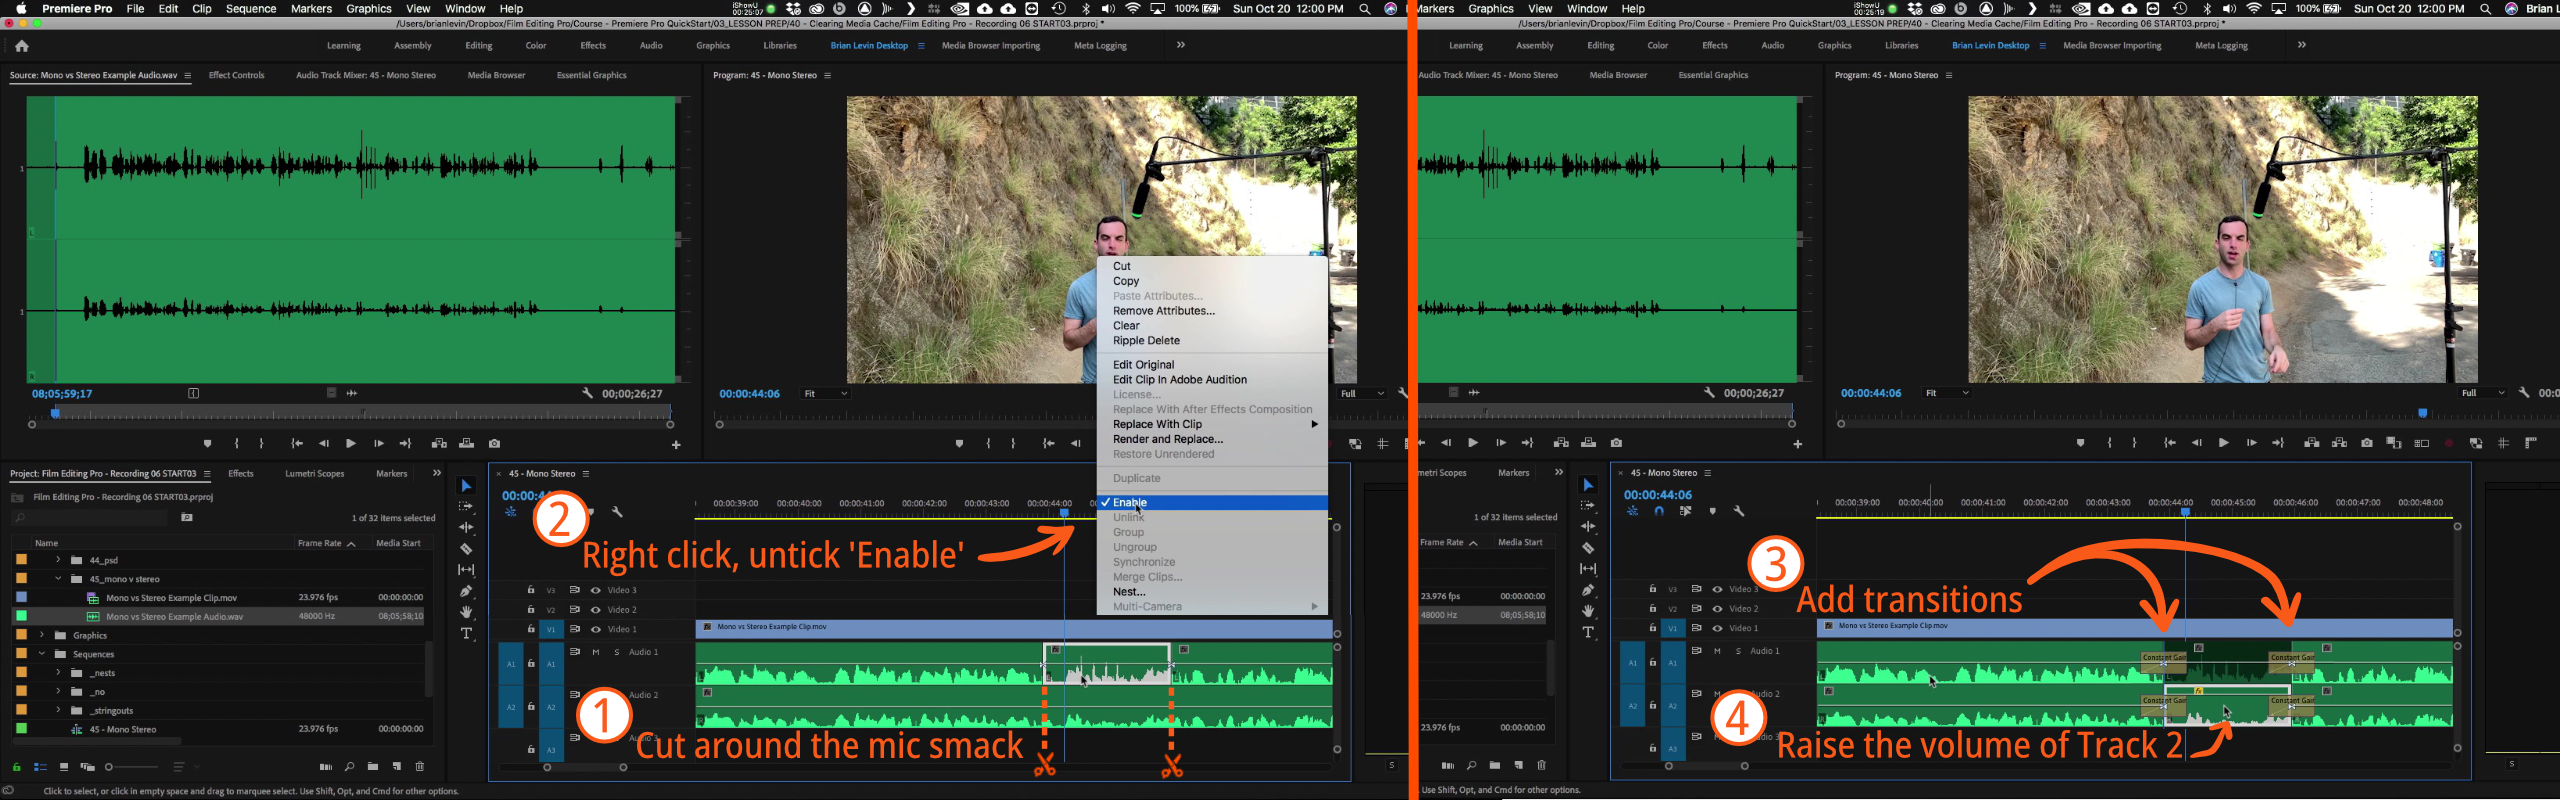
So go forward and duck out this audio. Ducking is if you take a chunk of audio and decrease it or take away it from the opposite audio in your scene. If you happen to make cuts within the audio across the part the place Brian smacks the lavalier and choose the clip, proper click on, and uncheck ‘Allow’ – this turns the clip off only for the smack. And since we don’t wish to have a pointy second the place it turns off, you’ll wish to add an audio transition earlier than and after the silence. It will primarily go away the lavalier on after which fade it out fully, earlier than fading it again in. Take heed to the clip once more now:
You’ll be able to undoubtedly hear that there’s a distinction, proper? With the lavalier turned off, it sounds a bit of bit totally different as a result of on this second proper right here, we’re solely listening to the audio from this one growth microphone. What you would possibly do to resolve that is to lift up the amount of the growth mic, by slicing in the identical locations because the lavalier mic audio monitor and elevating the audio for that small part. Pay attention as soon as extra to simply the mic smack, however earlier than and after we’ve corrected the audio:
That is one thing that you’ll have to do usually when you have got a number of audio sources in a scene, and it’s an amazing demonstration of what the distinction is between mono and stereo audio; mono audio is one thing that you just hear out of each ears evenly, and stereo audio is one thing that you just hear out of every ear independently.
Modifying Audio Mid-Undertaking
However what if it is advisable convert some dialogue audio to mono after it’s been lower and edited right into a venture? Will it’s a must to convert every edited clip individually? Sure and no – there’s a very quick strategy to cope with this, utilizing the match body operate. Firstly, go to the Premiere Professional menu, discover the ‘Preferences’ drop-down menu, and choose ‘Timeline’. You’ll wish to discover the ‘Match body set in level’ checkbox and uncheck it, and click on ‘Okay’. Now this can be a nice instance of how one can use match body in a barely totally different approach than we’ve seen earlier than. Let’s say you realized a bit of bit too far into the modifying course of that the audio ought to really be two mono tracks and never one single stereo monitor, however you’ve already performed numerous work, so that you don’t wish to redo it. There are two methods to unravel this – let’s begin with the unhealthy approach so you may see the distinction.

Duplicate the audio clip you wish to convert to mono and place it on the monitor under, as proven within the image above highlighted with an orange field. Subsequent, go to audio results, and Fill Left with Proper and Fill Proper with Left. If you happen to’re confused, don’t fear, it’s complicated – you wish to apply the ‘Fill Left with Proper’ impact to one of many audio clips, and ‘Fill Proper with Left’ to the opposite clip, which converts the dialogue clip to mono. Now, right here’s why this isn’t nice – If you happen to’re wanting on the audio tracks and also you’re questioning which one among these is which microphone, don’t fear, you’re not alone. It’s tough to inform what you’ve really performed right here, and there’s a lot of audio on display screen to concentrate to. It does technically work, however you’d do effectively to keep away from this methodology of adjusting your audio tracks. As a substitute, let’s do this work a bit of bit extra manually, however with a barely higher visible outcome in your timeline to cut back litter.

We’re going to make use of the facility of match body and three-point modifying to repair our drawback. Choose the primary audio, go to the start of it, and push the F key. That matches the in level and out level of the clip on the timeline. Now you may use the audio dragger, to tug it into your timeline or, higher but, use a shortcut key. The shortcut key must be the interval (.) key in your keyboard. Subsequent, push the down arrow to go to the subsequent clip and repeat – push F to match body, after which the interval key to overwrite. Down once more, F to match body, interval key to overwrite, repeat this till all of the audio clips have been overwritten. It is a fairly fast methodology, particularly in case you had a very massive timeline with a complete bunch of this that wanted to be performed to it, and it produces a significantly better outcome visually in your timeline.
Importing Audio
If you happen to’re in a scenario the place what sort of audio components you’re going to be importing into your venture, you would possibly wish to go into your Timeline Choice menu earlier than you do any precise importing. On this menu below ‘Default Audio Tracks’, we have now a number of drop-down choices which determine how Premier handles the importing course of. If Premiere detects that the media is mono, it is best to use the properties of the file, so the ‘Mono Media’ possibility ought to keep as ‘Use File’. However in some circumstances, it’s possible you’ll import stereo media, and you’ll inform Premiere to import your stereo media as a mono file. This may be helpful if, for instance, you had that piece of dialogue recorded from the film set, and the left channel had a microphone hooked up to it and the best channel didn’t, making it utterly clean or empty. We wouldn’t really want that proper channel, and it will solely get in the best way of our timeline, so that you would possibly select mono earlier than you import these recordsdata.
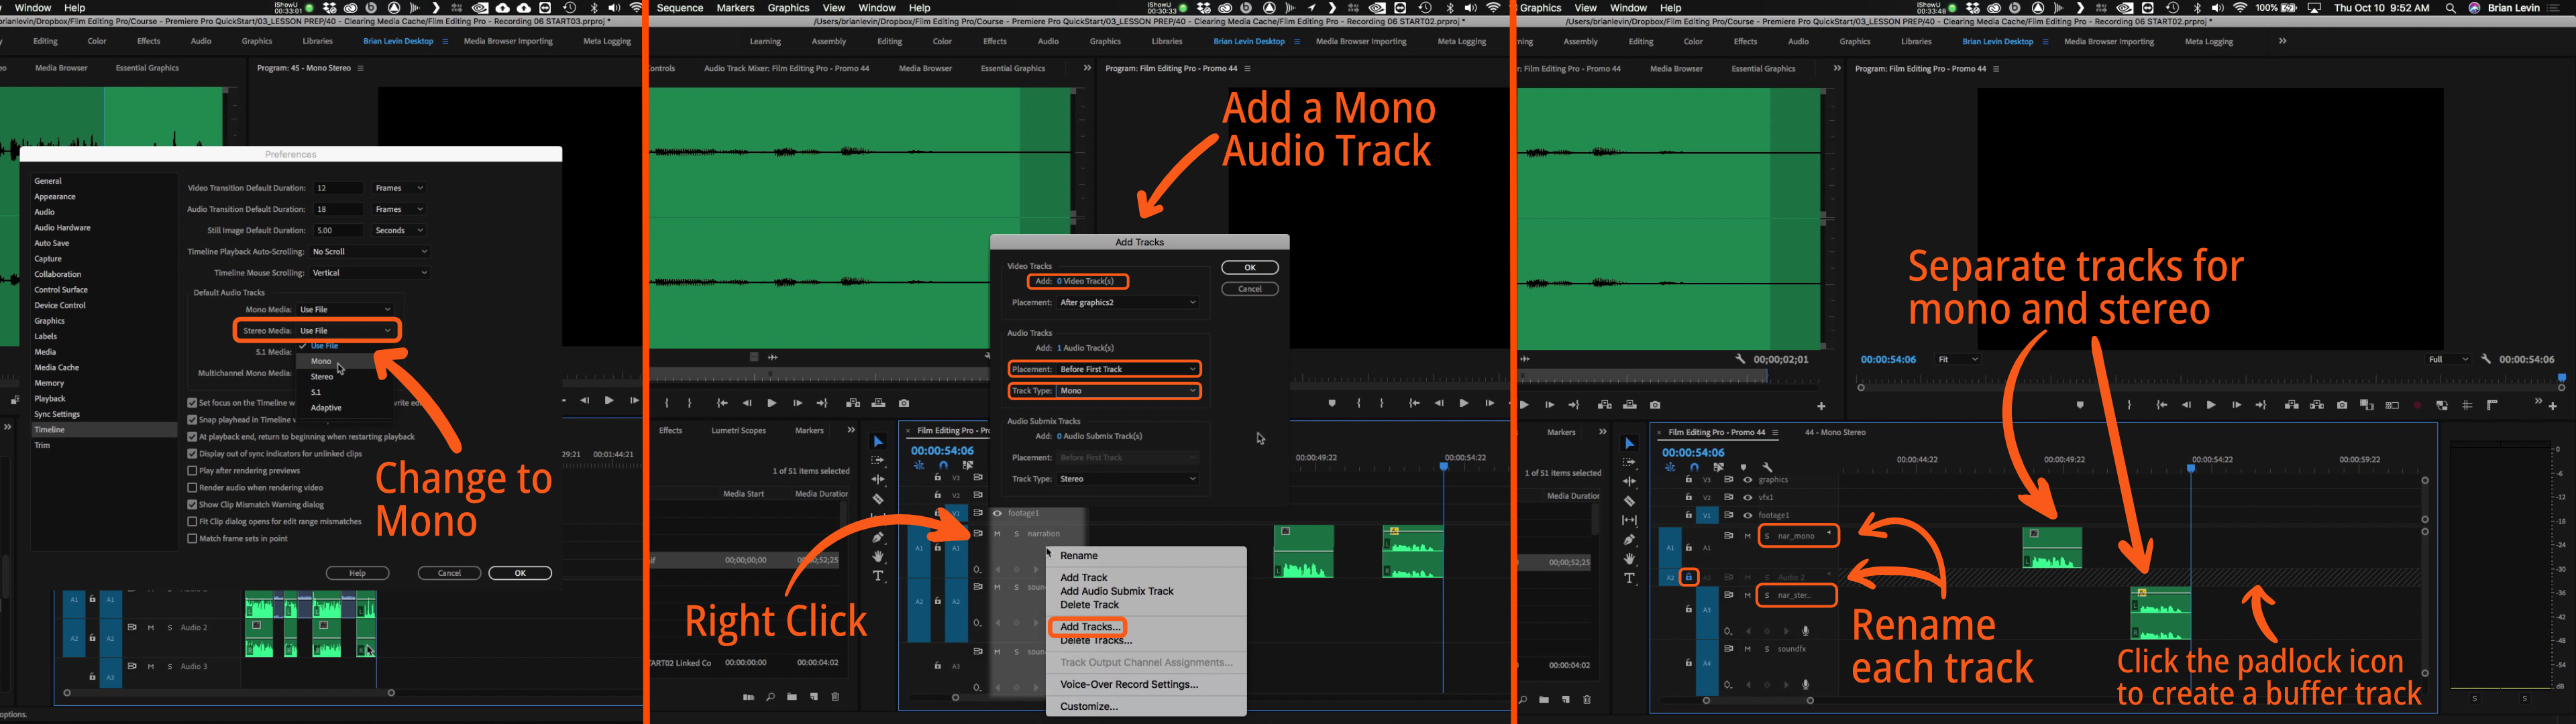
Mono and Stereo audio want to enter their very own separate audio tracks in your timeline. To do that, proper click on the area to the left of the Timeline and choose ‘Add Tracks’, you’re going to get a dialog field exhibiting what sort of tracks you wish to add. You’ll be able to select so as to add video tracks, however in case you simply need audio, you’d want to alter that quantity to zero. Subsequent, we will select the place to position it, after which the monitor sort. A typical monitor sort means it should tackle the properties of your timeline. On this case, we have now a stereo timeline, so it should make a stereo monitor, however in case you click on on the drop-down menu you may change it to mono. After altering it to mono and clicking ‘Okay’, you may then transfer all of your mono audio into that monitor to separate it out of your stereo audio.
The distinction between these two tracks is how Premiere goes to output that audio if you’re performed. If you happen to had been to take mono audio and put it in a stereo monitor or put stereo audio right into a mono monitor, when Premiere outputs it, it’s going to lift or decrease the amount of that audio relying on which monitor you dropped it in, and it’s possible you’ll not discover that in your headphones when you’re really modifying, though it should happen on the ultimate output. So, it’s necessary to get the best audio tracks in the best locations, and to essentially perceive this idea between mono and stereo.
To visually separate the mono and stereo tracks, what you are able to do is add a monitor between them, after which lock the monitor. This fashion, you may’t by accident transfer a mono clip right into a monitor that it shouldn’t be in, and there’s a visible divider in your timeline between the several types of tracks. It’s necessary to maintain these labelled, so that you would possibly rename them ‘Narration Mono’, and ‘Narration Stereo’ for instance. You can even shorten them to ‘nar_mono’ and ‘nar_stereo’, and now it’s simple to establish which tracks are which.
Extra Audio Info
One great way of understanding what sort of audio monitor you have got is to go over to your bin, choose an audio file and push the tilde (~) to develop this. You’ll see plenty of knowledge fields on this menu, and one among them says Audio Information. This tells me the specifics of your Audio – for instance the narration audio file is 48 kilohertz, 24 bits, and it tells you that it’s a stereo monitor that’s mapped to 2 mono tracks. So this can be a good strategy to see what format your tracks initially are, and in case you realise you’ve made a mistake, you may proper click on the file, choose ‘Modify’, ‘Audio Channels’, and you’ll then flip it again right into a stereo monitor by selecting the related preset for that clip.

Wrap Up
That was plenty of data on what looks as if a easy matter! Nevertheless as you’ve learnt via this text, it’s actually necessary to grasp how Premiere handles Mono and Stereo audio in another way, so you may accurately use each to nail that edit you’ve been engaged on. For extra tutorials about Premiere Professional or inventive modifying generally you should definitely go to our coaching web page. There, you may join hours of free pattern movies and extra details about our full programs.