
A mouse click on object is likely one of the interplay objects in ActivePresenter 9. You possibly can add a mouse click on to a spot the place customers should click on to take the following motion.
For instance, you wish to instruct customers to click on the New button to create a brand new Saola Animate mission. So, place a mouse click on on the New button.
This object is usually utilized in interactive simulations to show tips on how to use an utility. Once you document interactive simulations, ActivePresenter 9 robotically inserts mouse clicks wherever and everytime you make a click on.
On this article, let’s discover tips on how to add and work with it.
Insert Mouse Clicks
Observe both of the next methods to insert a mouse click on object:
- Open the Insert tab > Mouse Click on.

- Open the Dwelling tab > Interactions > Mouse Click on.
Then, it seems on the slide with three elements
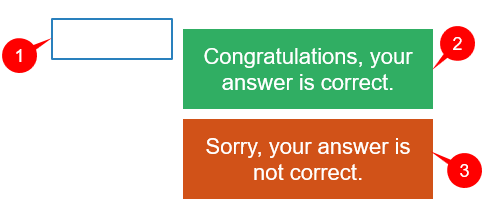
- (1) the goal space
- (2) a Right Message
- (3) an Incorrect Message
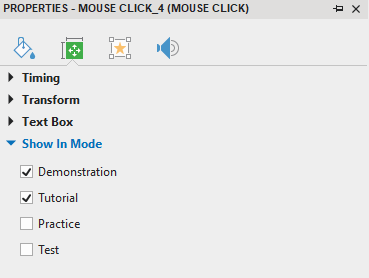
Within the output, the goal is about to be seen within the Demonstration and Tutorial modes and hidden within the Observe and Take a look at modes. You could find this setting within the Properties pane > Dimension & Properties > Present In Mode:
If customers click on on the goal space, the Right Message (2) will seem. In any other case, the Incorrect Message (3) will seem if customers click on outdoors the goal space.
Customise Mouse Clicks
You possibly can customise its appearances like Fill, Line, and Shadow as you do with form objects. Entry the Format tab or the Model & Impact tab of the Properties pane to carry out this process.
Notice that within the default setting, the modifications are solely utilized to the goal space within the Demonstration and Tutorial modes.
Set Right Values for Mouse Clicks
To set appropriate values to mouse click on objects, do as follows:
Step 1: Choose the goal space > Properties pane > Interactivity tab > Normal > Right Values > Add Worth. Then, a clean field will seem.
Step 2: Place the cursor over the clean field and left-click it.
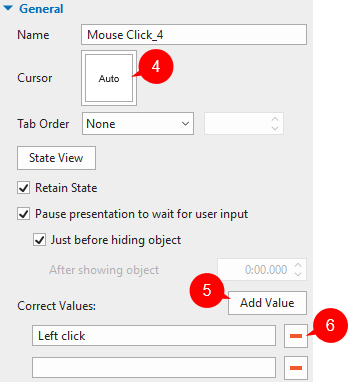
The right values may be with or with out modifier keys (SHIFT, CTRL, or ALT). For instance, you wish to set the mixture of the CTRL key and left click on as the right worth. Simply maintain the CTRL key and left-click the clean field.
In case you wish to add extra appropriate values, click on the Add Worth button (5) and repeat step 2. Alternatively, if you wish to take away any appropriate worth, click on the (6) button.
Apart from, you may change the picture of the mouse cursor to make the clickable space identifiable when customers hover the mouse over it. To do this, click on the (4) button and choose the hand cursor picture.
Set Rating and Reporting
Mouse click on objects cannot solely validate customers’ actions but in addition give customers factors for proper actions. To set factors for proper actions, choose the goal space > navigate to the Properties pane > Interactivity tab > Rating & Reporting.
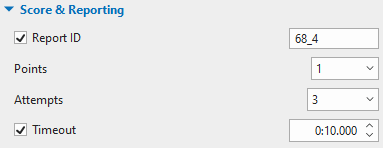
This part offers you with sơm properties to customise:
- Report ID: Observe customers’ actions. You possibly can rename it to a significant identify.
- Factors: Set factors for proper actions.
- Makes an attempt: Set the utmost makes an attempt that customers can do the clicking motion.
- Timeout: Set a time restrict that solely permits customers to click on within the given time.
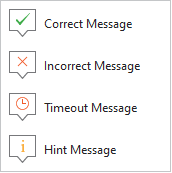
Insert and Customise Suggestions Messages
As talked about above, two default messages are added to the mouse click on if you insert it into the slide. Other than them, you may add two different kinds of messages which are Timeout Message and Trace Message:
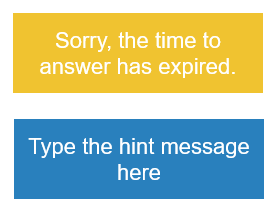
- Timeout Message: This seems when customers don’t full an motion within the predefined time.
- Trace Message: This seems when customers hover the mouse over the goal space.
So as to add these messages, open the Questions tab > Message. Or, right-click on the goal space > Insert > choose the message you need.
Then, you may customise suggestions messages as you want.
For extra data, see Tips on how to Work with Suggestions Messages.
Add Occasions – Actions
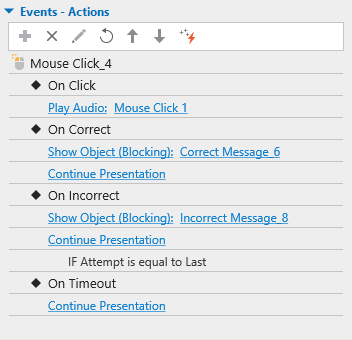
Once you add a mouse click on object to a slide, ActivePresenter 9 robotically add default occasions – actions to it as under:
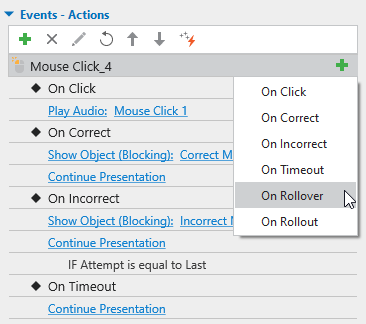
Apart from, the app presents you different occasions so as to add: On Rollover and On Rollout:
Beneath is the reason for the that means of every occasion:
- On Click on: Happen when customers click on on the goal space.
- On Right: Happen when customers click on on the goal space.
- On Incorrect: Happen when customers click on outdoors of the goal space.
- On Timeout: Happen when customers don’t reply inside the specified time.
- On Rollover: Happen when the mouse rolls over the goal space.
- On Rollout: Happen when the mouse rolls out of the goal space.
After including occasions, proceed including actions to occasions, and situations to actions if obligatory.
For extra particulars, see Work with Occasions – Actions.
That’s tips on how to work with a mouse click on object in ActivePresenter 9. Obtain this app and make your course extra interactive.

Apart from, observe our Tutorials web page and YouTube channel for extra useful articles and movies.
See extra: