
The DJI Air 3, one in all DJI’s newer drones, has usually been known as top-of-the-line all-around drones launched in 2023 for novices and fanatics alike.

Let’s have a look at this drone’s pictures and videography finest settings to convey out the Air 3’s highest-quality imagery.
On this article, we will probably be going over picture and video-related definitions, ideas, and one of the best settings for ISO, Body Fee, Shutter Pace, White Stability, and Coloration Profile settings for the DJI Air 3.
Finest Video Settings at a Look
On the subject of “Finest” for any topic, it could possibly all be very subjective.
In gentle of this, our “Finest” video settings are merely settings that we advocate or counsel for getting essentially the most out of the Air 3 digicam.
Be happy to check and mess around with varied video settings to get one of the best setup to your fashion of video capturing.
- ISO 100
- 24/30 FPS
- 1/50 or 1/60 Shutter Pace
- Handbook White Stability
- D-Log M (10-bit shade), H.265
- MP4 video format
- 4k Decision
» MORE: DJI Air 3 Evaluation – Is This the Drone for You?
Professional Mode (Images and Movies)
Similar to a DSLR or Mirrorless digicam, the Air 3 has varied settings that may be manually modified to your liking to realize one of the best and {most professional} photographs and cinematic video footage.
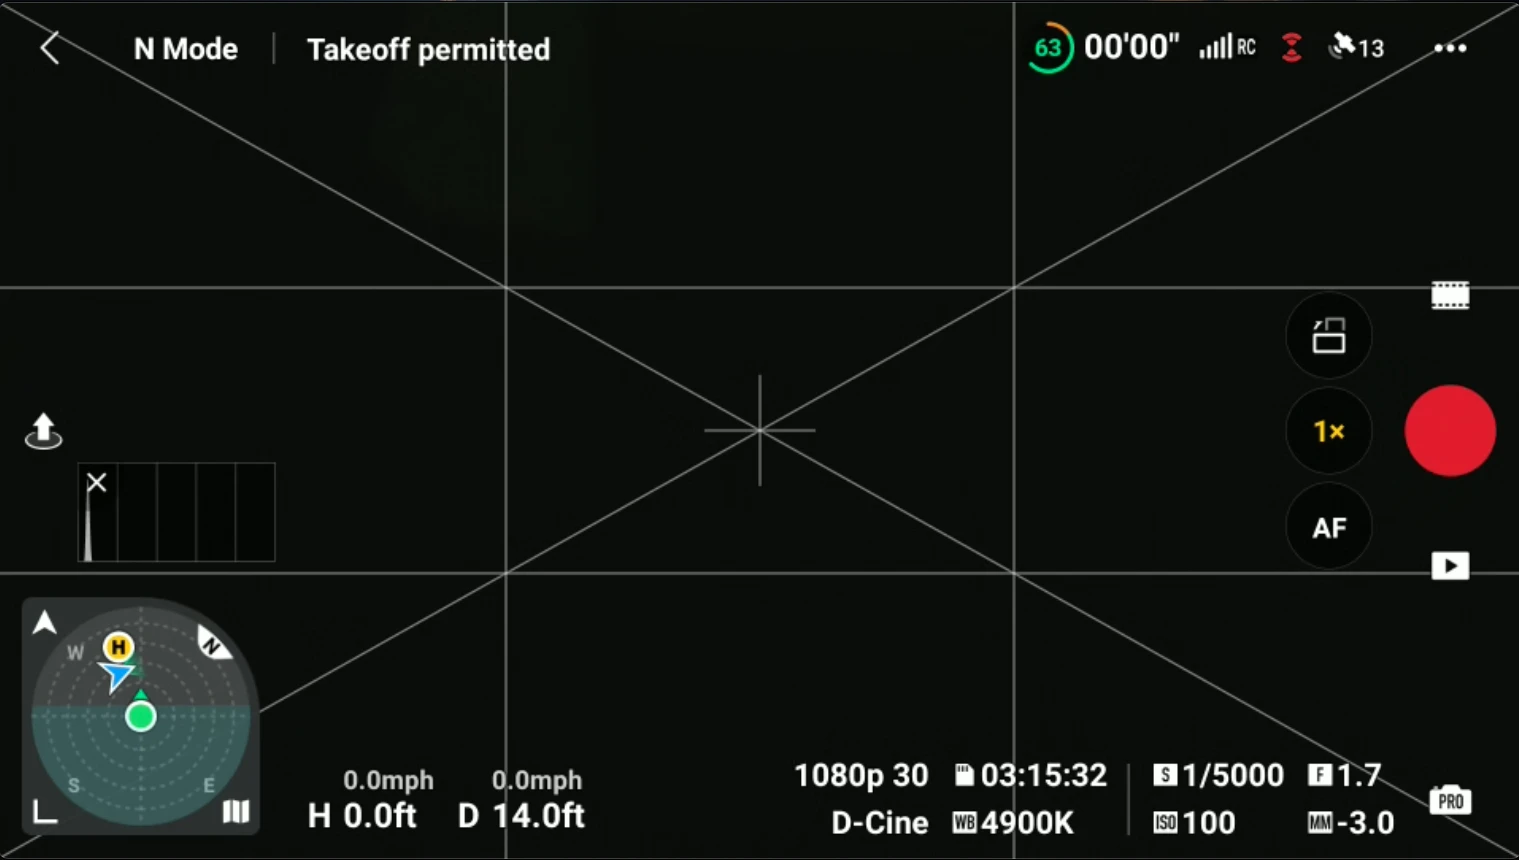
To realize one of the best picture and video settings on the Air 3, will probably be important to get out of Auto/Automated settings and into DJI’s Handbook digicam settings, known as Professional mode.
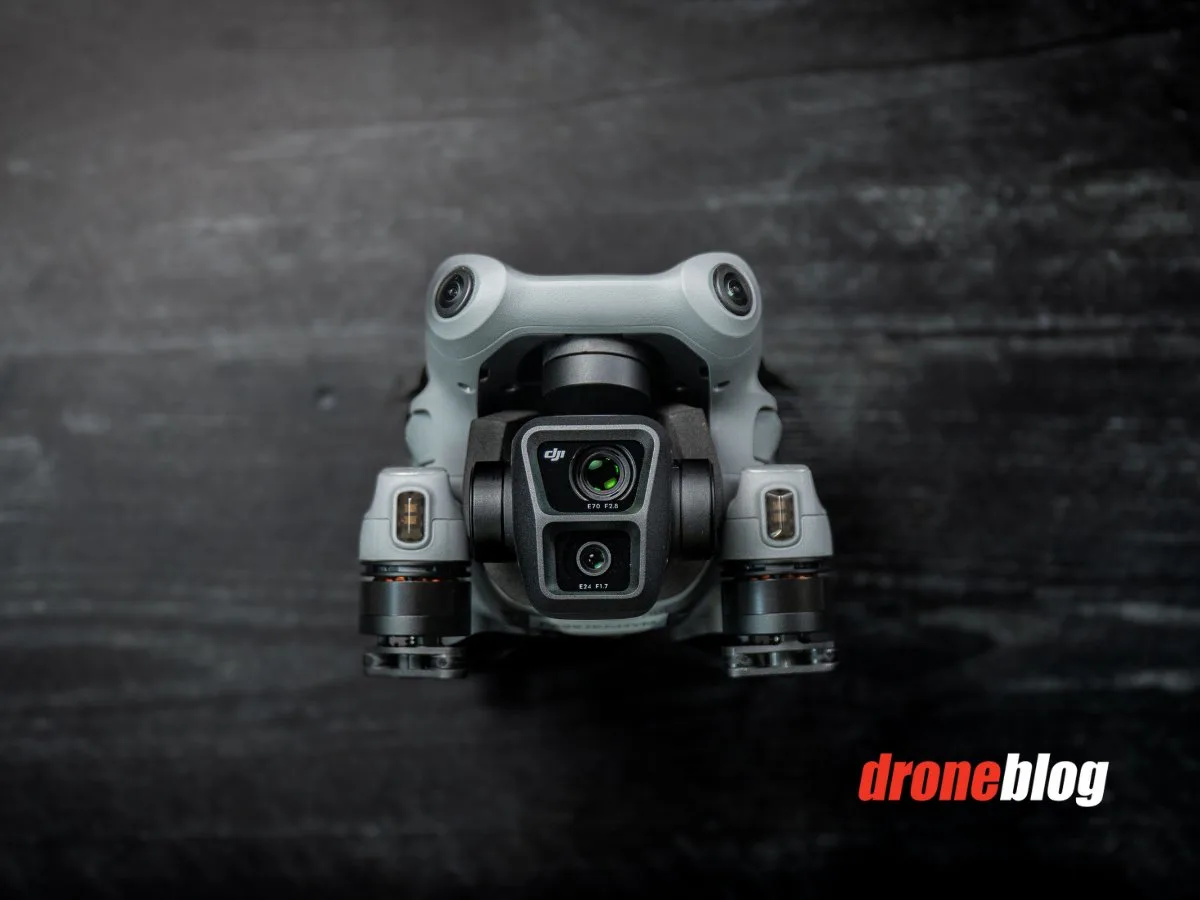
To get to Professional mode when capturing video:
Step 1: Whereas in video mode, faucet the digicam icon on the underside proper of the DJI Fly app reside view display.
Step 2: If the video settings are presently set to Auto, tapping the digicam icon will then change the mode to Professional.


» MORE: DJI Air 3 Freshmen Information (Step-by-Step Information)
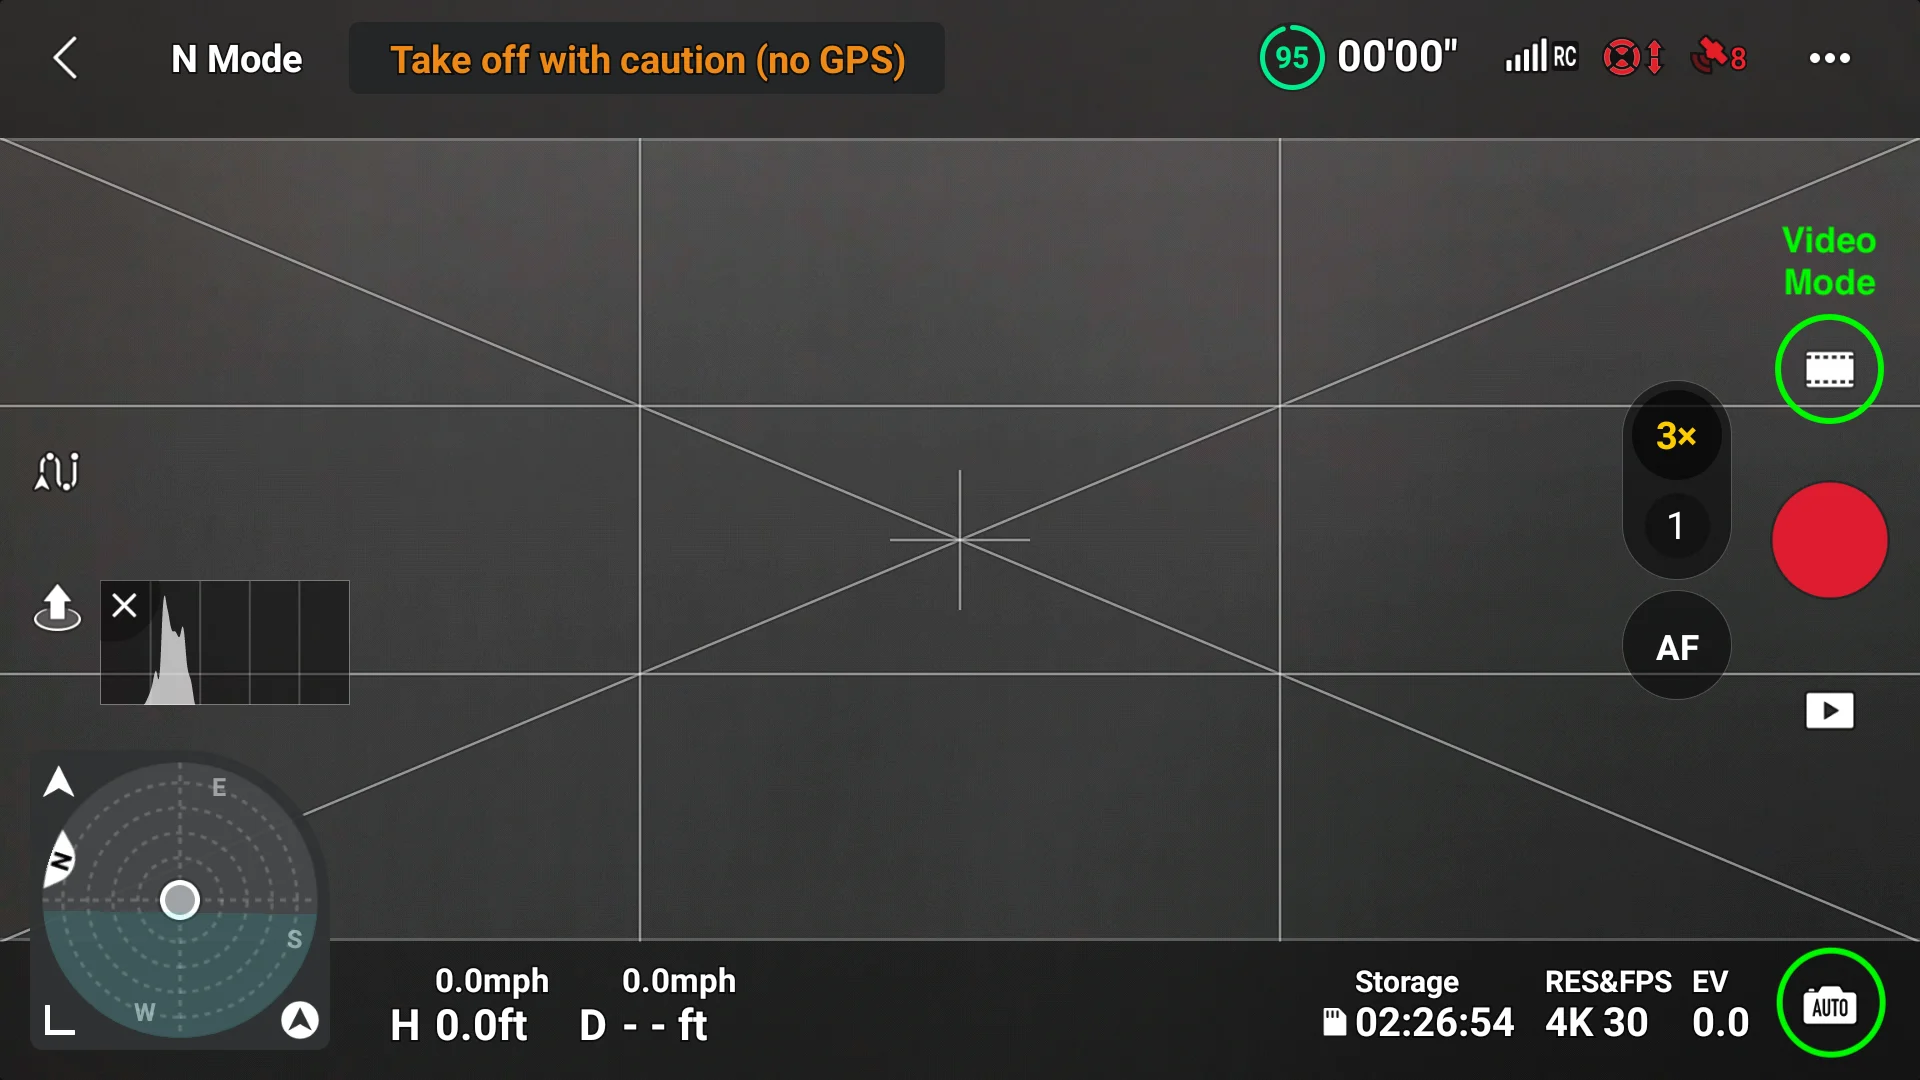
To get to Professional mode when taking photographs:
Step 1: Whereas in picture mode, faucet the digicam icon on the underside proper of the DJI Fly app reside view display.
Step 2: If the picture settings are presently set to Auto, tapping the digicam icon will then change the mode to Professional.


» MORE: Find out how to Join the DJI Air 3 to a Pc (Video)
Aperture
Right here’s a fast phrase in regards to the aperture on the Air 3.
The Air 3’s twin digicam system makes use of two separate apertures for the cameras. The 24mm wide-angle digicam has a hard and fast aperture of f/1.7 whereas the 70mm tele digicam has an aperture of f/2.8.
Can the aperture on the Air 3’s cameras be adjusted?
No. In contrast to the cameras on the professional-level Mavic 3 Collection, the aperture on each of the Air 3 cameras is mounted, in order that they can’t be adjusted in any respect to assist in correctly exposing pictures or altering the depth of discipline.
» MORE: Digital camera Know-how in Drones (Defined)
ISO
ISO is the title for the perform that measures a digicam sensor’s sensitivity to gentle. This can be utilized and adjusted for each photographs and movies.
On the Air 3, ISO 100 is the bottom, or darkest worth, and when capturing video it may be as excessive as 12800 in night time mode (brightest).
Typically, whether or not capturing video with the Air 3, or any drone, the decrease the ISO the higher.
Low ISO values be certain that the video footage shouldn’t be noisy or grainy. It’s recommended that, each time the state of affairs permits, shoot with an ISO worth of 100.
In fact, like with something in pictures and videography, you may must make exceptions to this rule.
There could also be occasions when the “keep at ISO 100 rule” will must be damaged, to realize higher scene publicity.
With the Air 3’s fundamental 24mm large digicam having such an open and quick aperture of f/1.7, capturing at ISO 100 is good.
» MORE: Drone Pictures Planning (Defined for Freshmen)
To alter the ISO when capturing video:
Faucet ISO on the Professional Settings. As soon as within the ISO choices, use the slider to decide on ISO.

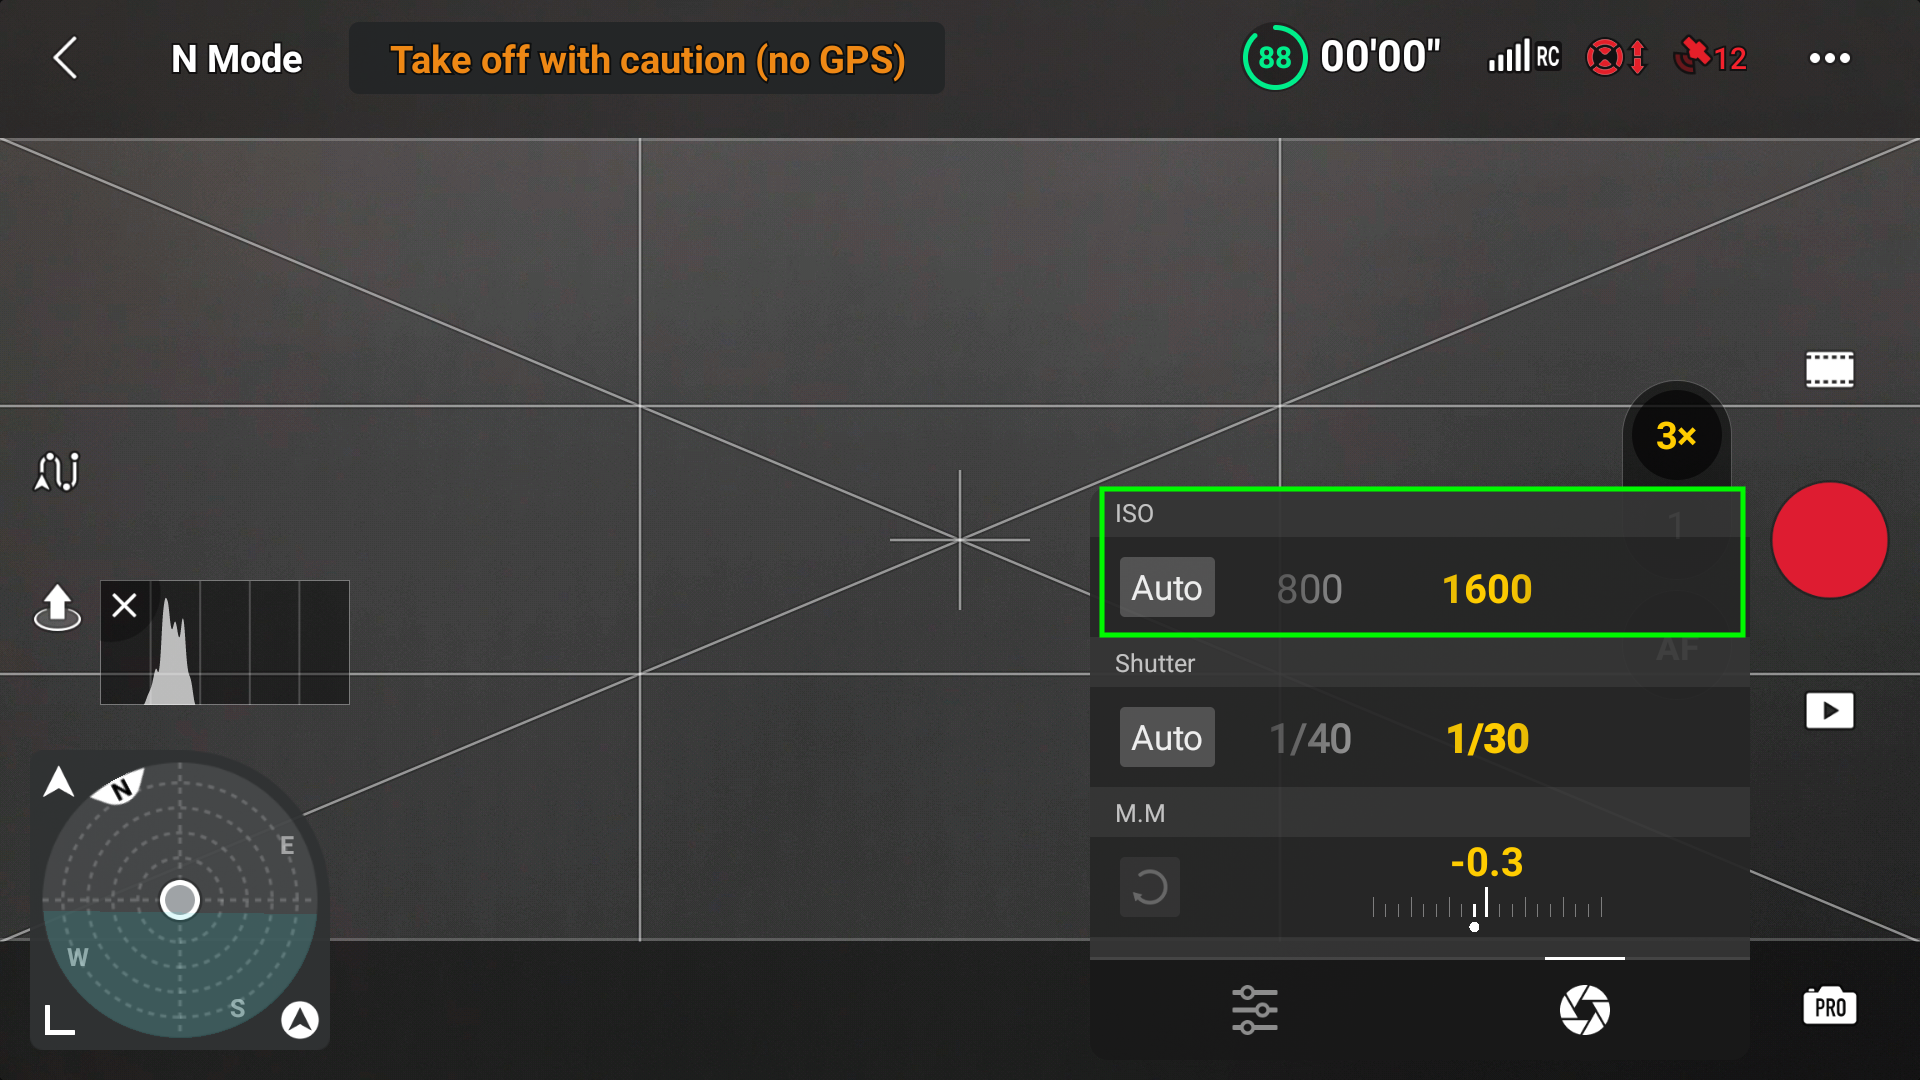
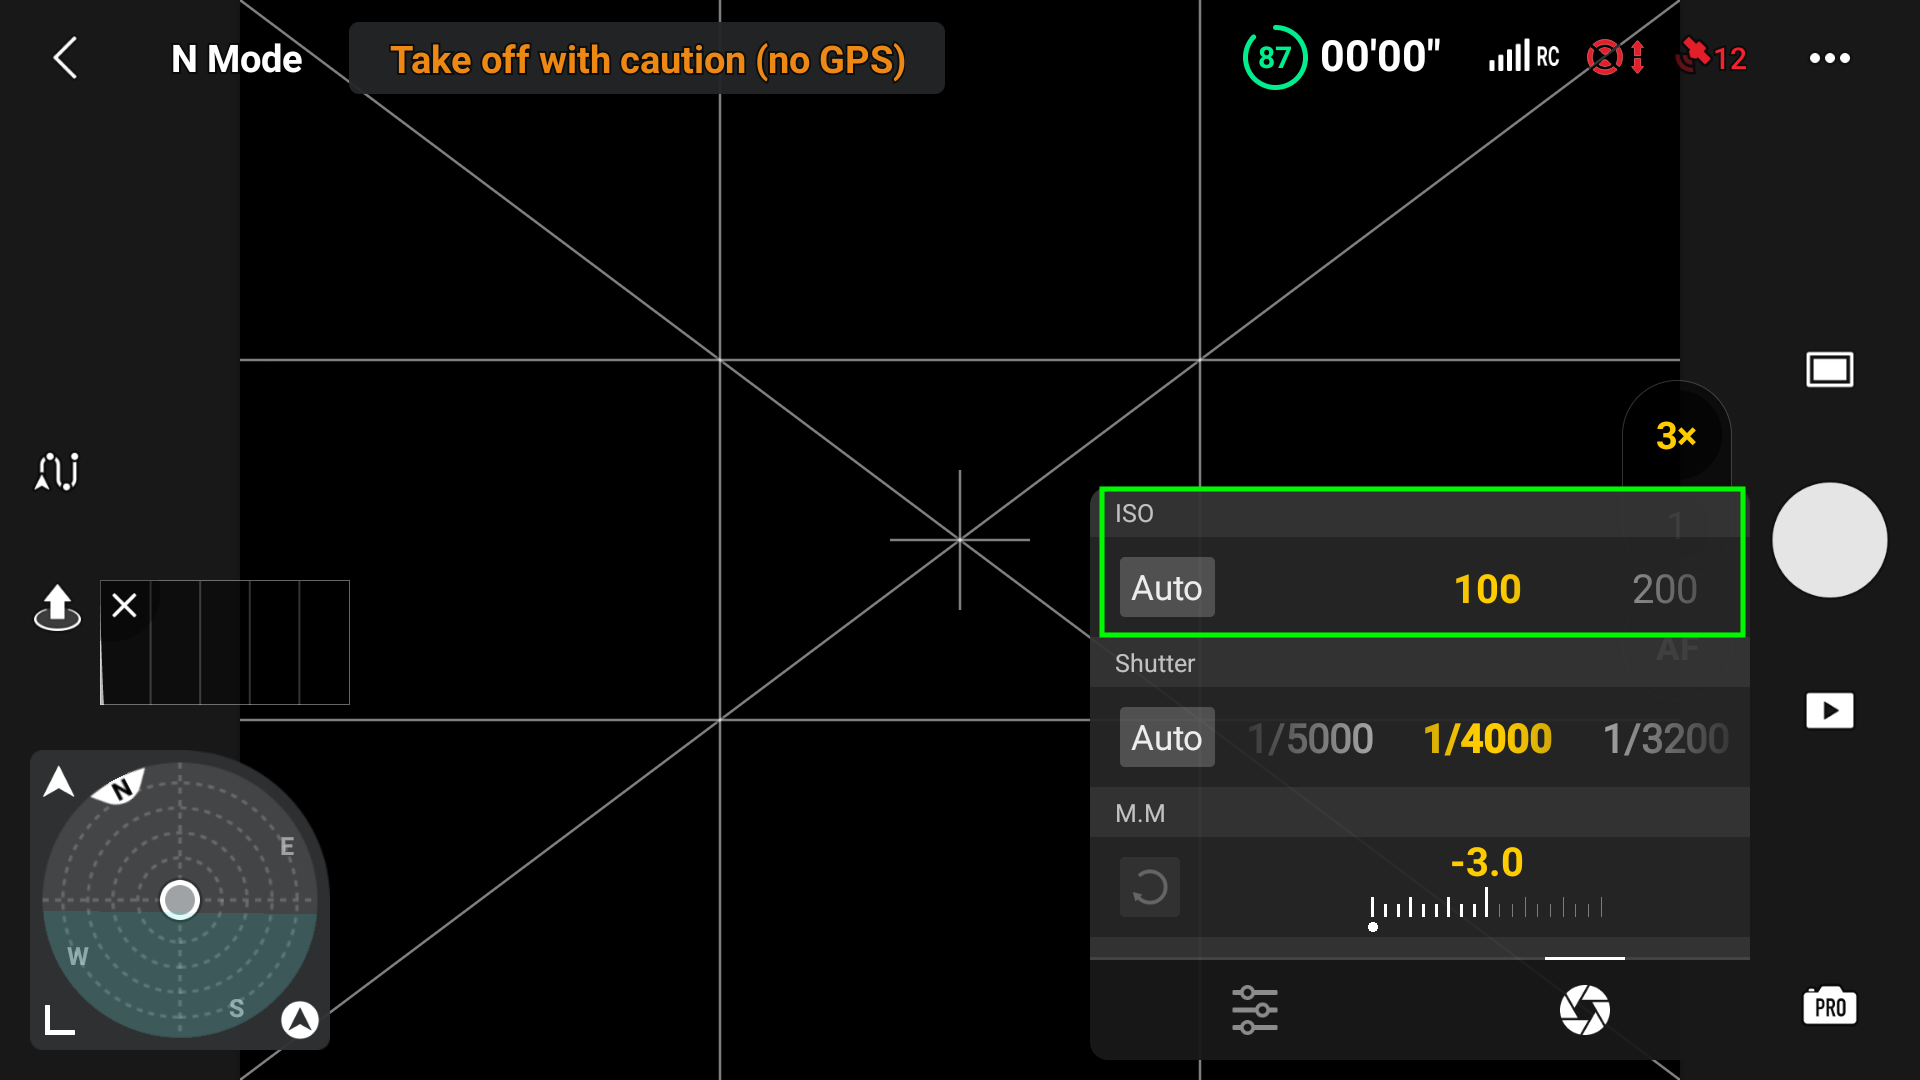
To alter the ISO when taking photographs:
Faucet ISO on the Professional Settings. As soon as within the ISO choices, use the slider to decide on ISO.

» MORE: What Is Drone Pictures? (Defined for Freshmen)
Frames per Second (Video Solely)
The body price of a video or its FPS means what number of frames are shot throughout a given second. The upper the worth, the extra frames are in that given second.
When it comes to drone footage, frames per second aren’t as crucial as it’s for floor digicam footage the place one may be filming live-action sequences that must be slowed down or precisely rendering dialogue between characters.
That isn’t to say FPS shouldn’t be necessary in any respect relating to drone video. Typically, drones are filming scenes from a good distance, showcasing complete areas, so oftentimes a low frame-per-second price of 24 or 30 is ideal.
We’ll have a look at a number of capturing situations and the proper frames per second to seize the footage.
» MORE: DJI Mini 3 Professional for Actual Property Pictures (All You Must Know)
Sweeping Scenic Views
When capturing areas with broad and delightful vistas, mountains, and lazy water views, 24 or 30 frames per second works nice.
24 frames per second is the common cinematic video normal and one thing that we’re accustomed to seeing in motion pictures.
When capturing at 24 FPS, it’s good to take into account that there’s little or no room for slowing the footage down, as that’ll end in uneven and jittery video footage.
When capturing in 24 frames per second, you will have to be very clean on the management sticks to keep away from jerky flight motion exhibiting up within the footage.
30 frames per second can be utilized whenever you’d wish to barely decelerate the footage in video modifying software program, to provide it a smoother general look. Movies shot in 30 FPS might be slowed down by 80% in put up.
The good thing about capturing in 30 frames per second and barely slowing the footage down is that the footage is then smoothed out some.
That is particularly helpful if the drone operator is a bit jerky on the flight sticks.
» MORE: 3 Tricks to Market Your Enterprise With Drone Pictures and Videography
Gradual Movement Footage
The Air 3 has upped the ante by having full 4k 100 fps video, as a regular. The precise slow-motion footage is 2.7k 200 fps.
If planning to shoot slower-motion footage, and utilizing it in a 24 fps timeline, this may be achieved by capturing at both 60 or 100 fps.
You may wish to shoot at these body charges to seize close-up views of operating water, fast-moving boats which are kicking up giant wakes and spray, and even faster-moving individuals and animals.
In case you are on the lookout for much more drastic slow-motion pictures, the Air 3, as talked about, is able to capturing video at 200 fps.
If trying to decelerate 60 fps footage on a 24 fps timeline in your video editor, you are able to do so at 40%, whereas the 100 fps footage might be slowed all the way down to 24%.
Be aware: To get one of the best video high quality, you’ll wish to set your Air 3 to document in 4k decision in case you are planning on capturing footage between the 24 fps and 100 fps vary. If capturing at 200 fps, the Air 3 will drop all the way down to 2.7k decision.
» MORE: Finest Drones for Night time Time Use (Pictures & Video)
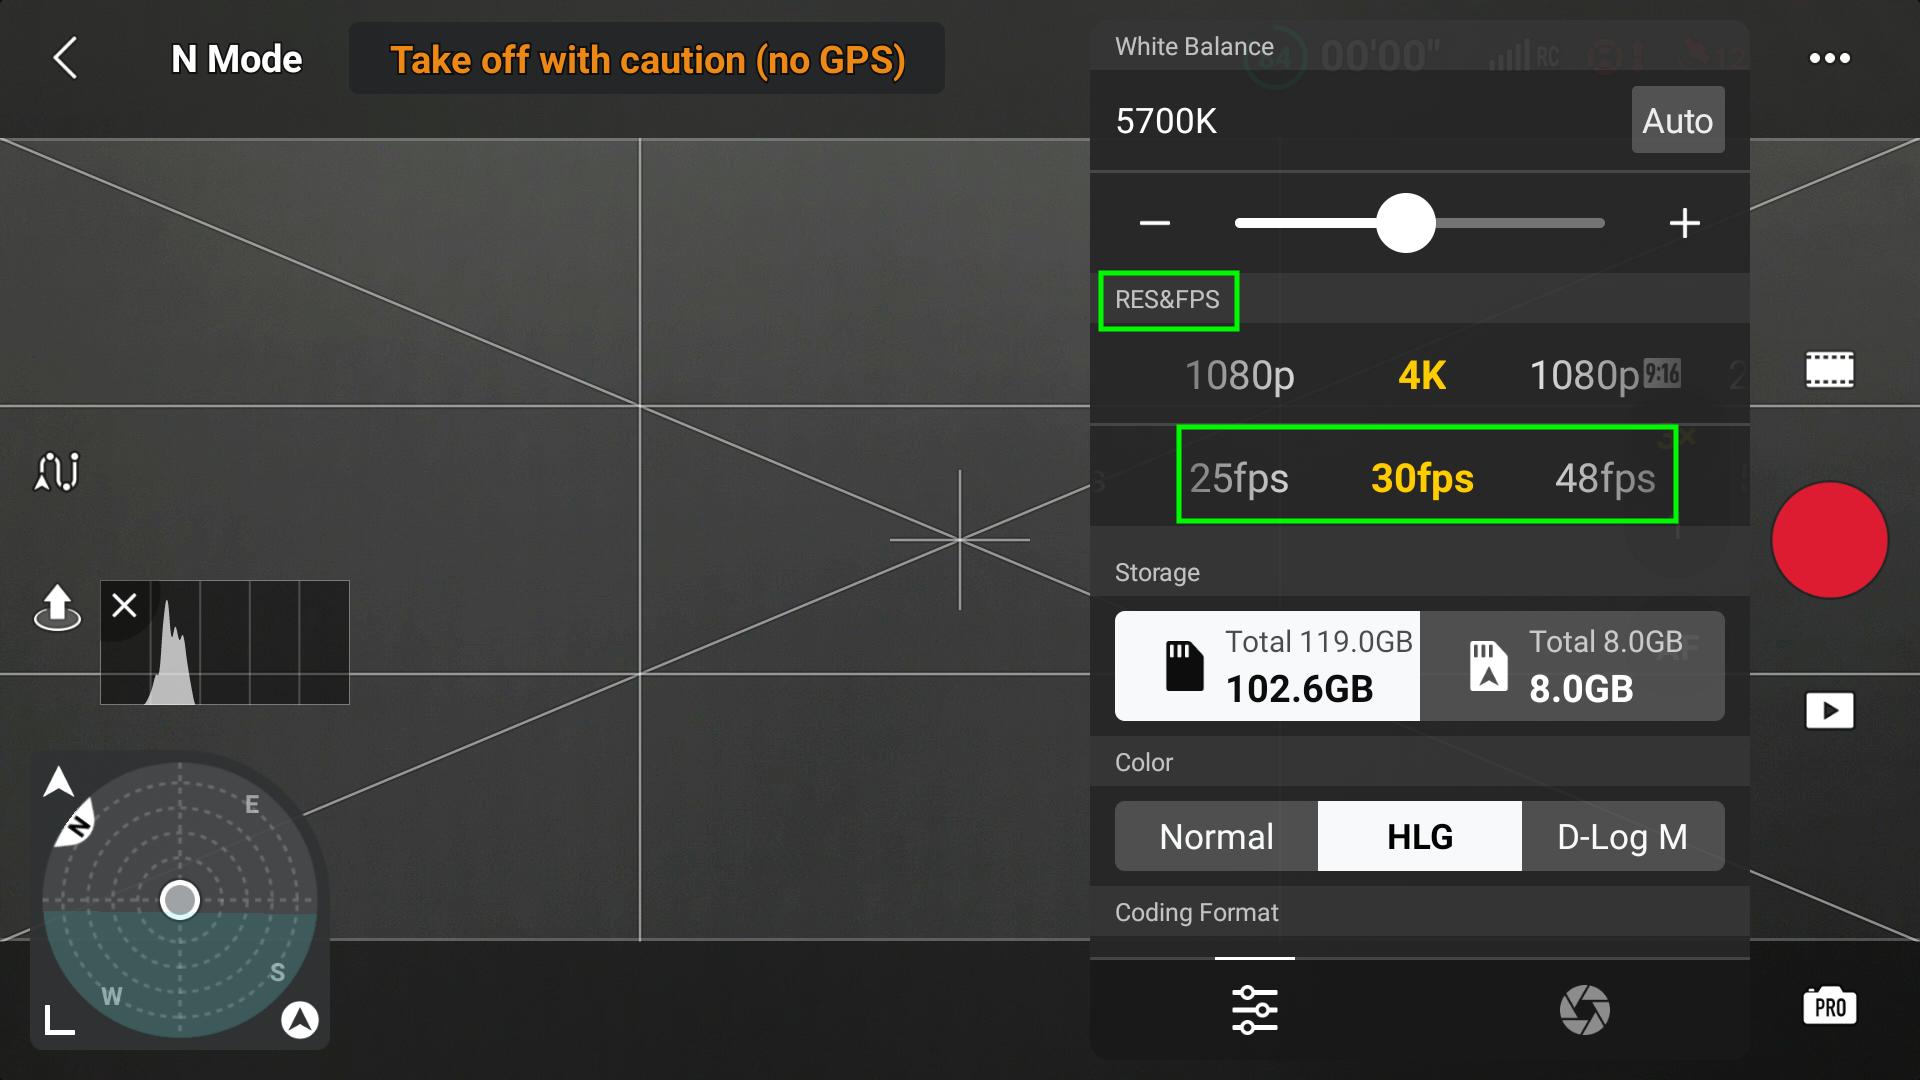
To alter the FPS (Frames per Second) when capturing video:
Step 1: Faucet the video decision and fps on the Professional Settings. On this instance, mine is 4k 30.

Step 2: Within the RES&FPS part, use the slider to decide on FPS.
Shutter Pace
Shutter pace serves two very distinct functions relating to photographs and movies: publicity and movement blur.
» MORE: Pictures with Mini 3 Professional (For Freshmen)
Publicity
In case your photographs or video must be brightened or darkened, outdoors of the ISO values, you possibly can up the shutter pace, which can darken the footage, or sluggish the shutter pace, which can brighten the footage.
The Air 3 will routinely alter the shutter pace when in Auto Mode, to brighten or darken the scene.
Movement Blur (For Images)
For drone photographs, you may wish to seize one thing in movement as a blur.
You’ll significantly see this in panorama pictures the place there’s operating water within the type of waves or waterfalls, and the water has a dreamlike tender impact.
This comes from utilizing a excessive shutter pace.
» MORE: Autel vs. DJI – Which Drones Are Higher?
Correct Movement Blur (For Video)
Movement blur is an important side of capturing movie. If the shutter pace is just too low, then video footage will look extraordinarily blurred, whereas too excessive a shutter pace will end result within the footage being uneven.
On the subject of capturing video, the shutter pace shouldn’t be used to correctly expose the video, however as an alternative, it needs to be used to obtain correct movement blur.
To do that, the 180-degree rule comes into play.
The 180-degree Rule
On the subject of shutter pace and attaining the correct movement blur for the FPS you’re capturing in you’ll must have your shutter set to double (180 levels) your body price.
This implies in case you are capturing at 24 frames per second, you’d need your shutter pace to be double that, on this case, 1/50 of a second, because the Air 3 doesn’t have a 1/48 possibility.
For 30fps, 1/60, and for 120fps, 1/240.
With the 180-degree rule utilized, all your footage may have the correct movement blur the attention is accustomed to seeing in video footage.
» MORE: Drone Cinematography- Getting Began in Drone Filmmaking
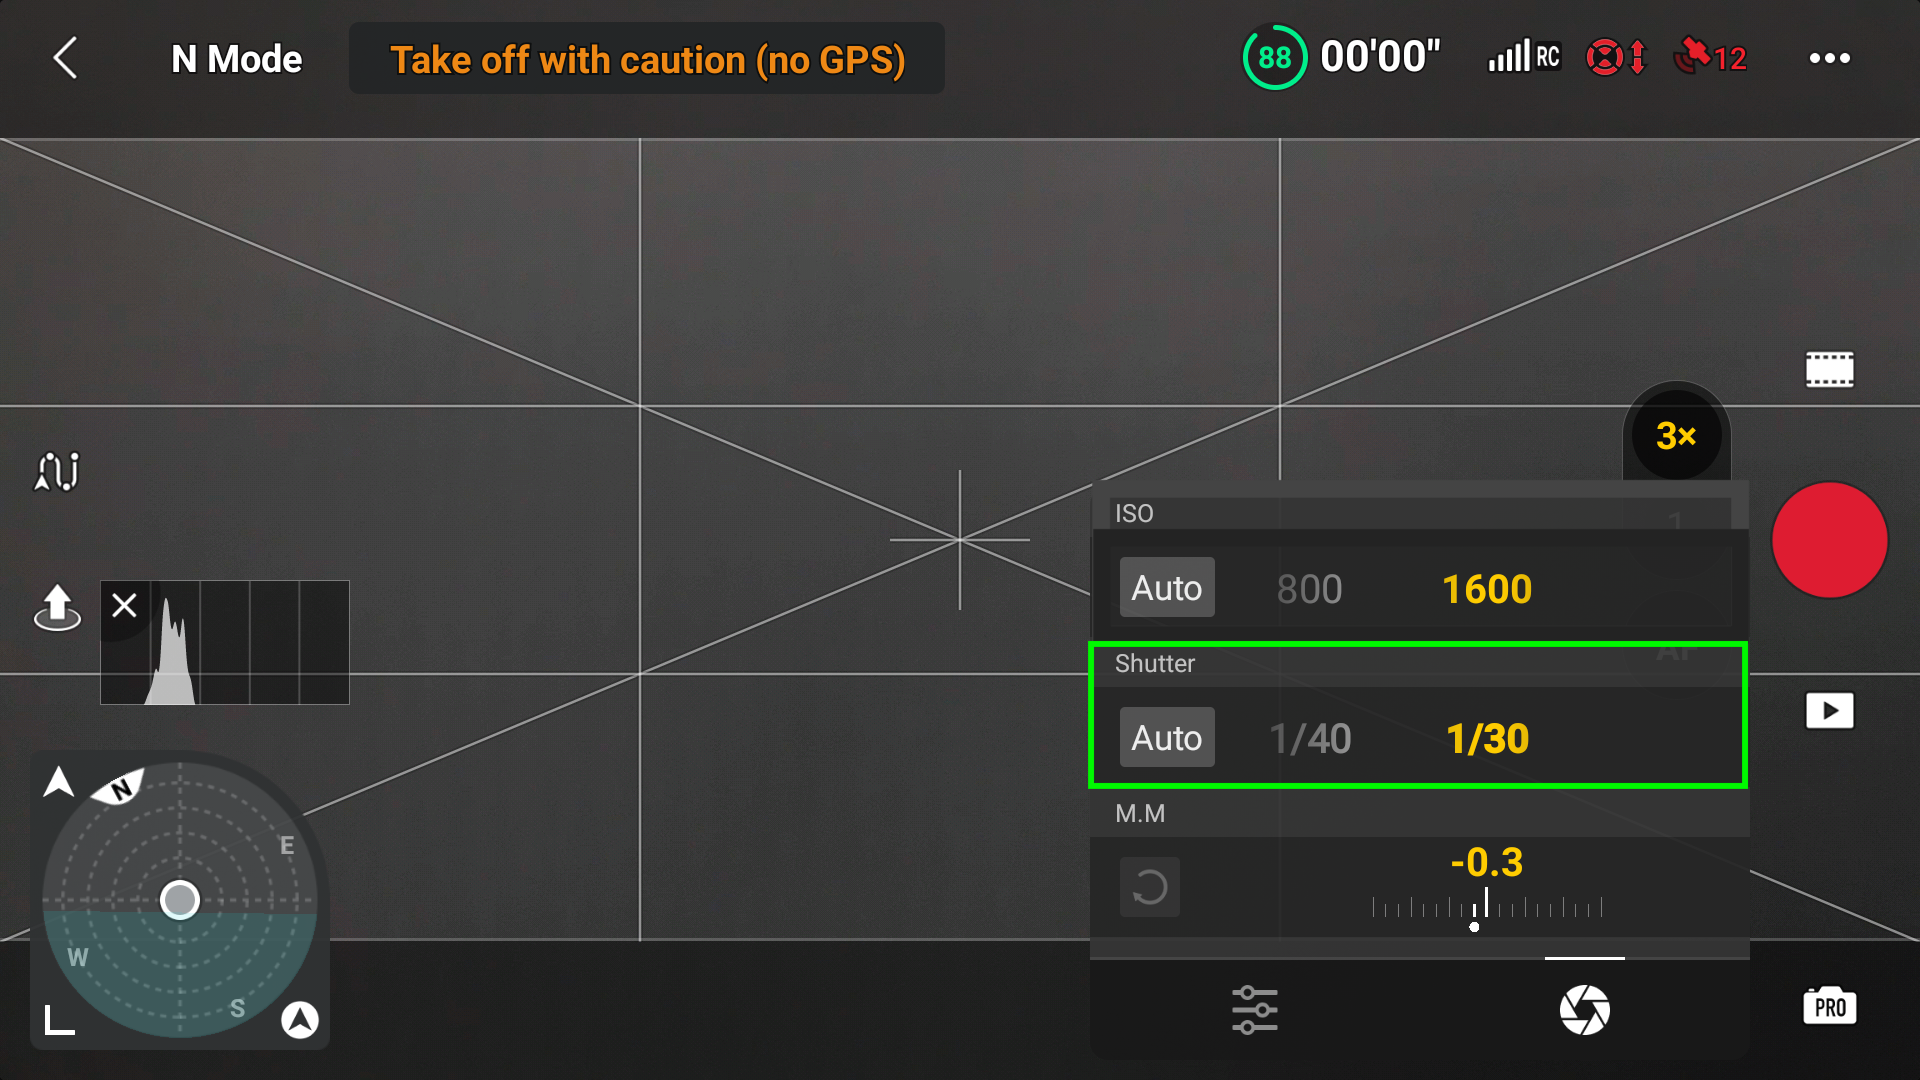
To alter the Shutter Pace when capturing video:
Step 1: Faucet the shutter pace. In my instance, it’s 1/30.

Step 2: Underneath the Shutter part, change the slider to the worth you’d like to make use of.
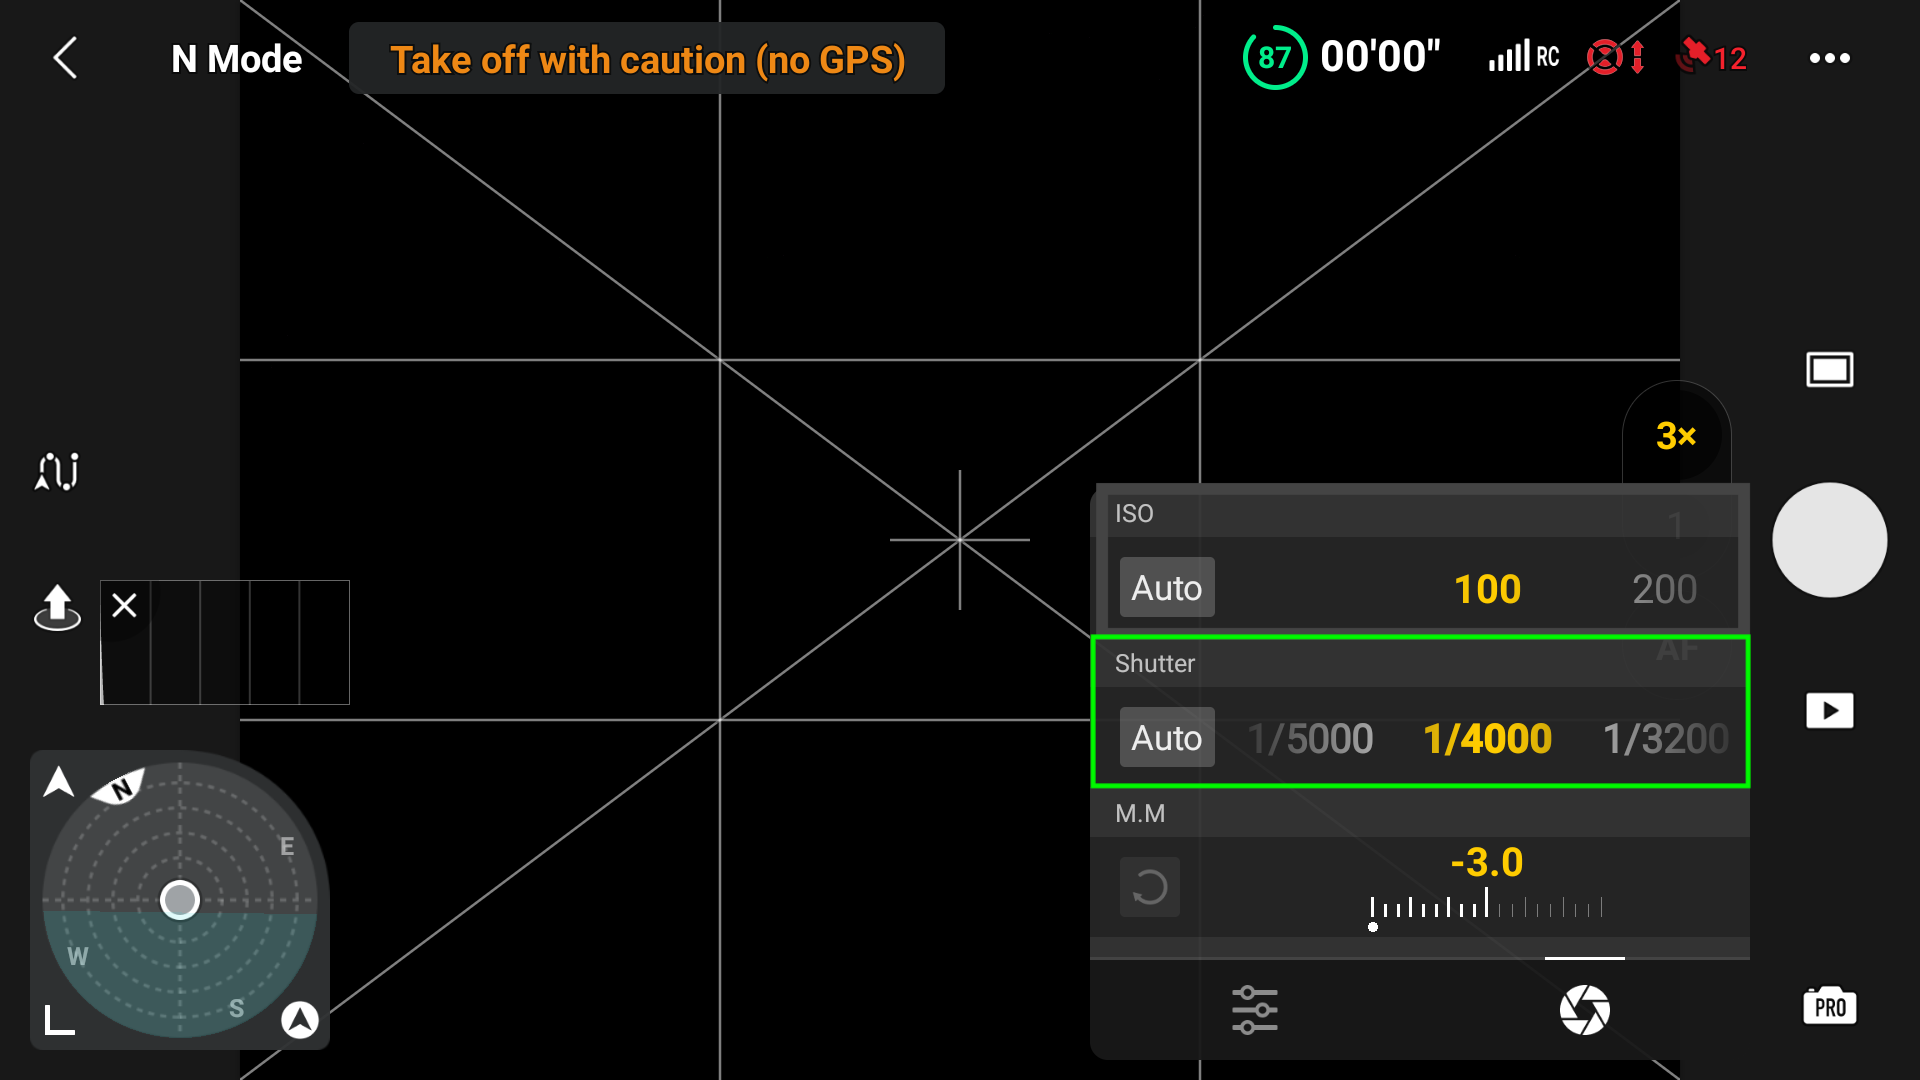
To alter the Shutter Pace when taking photographs:
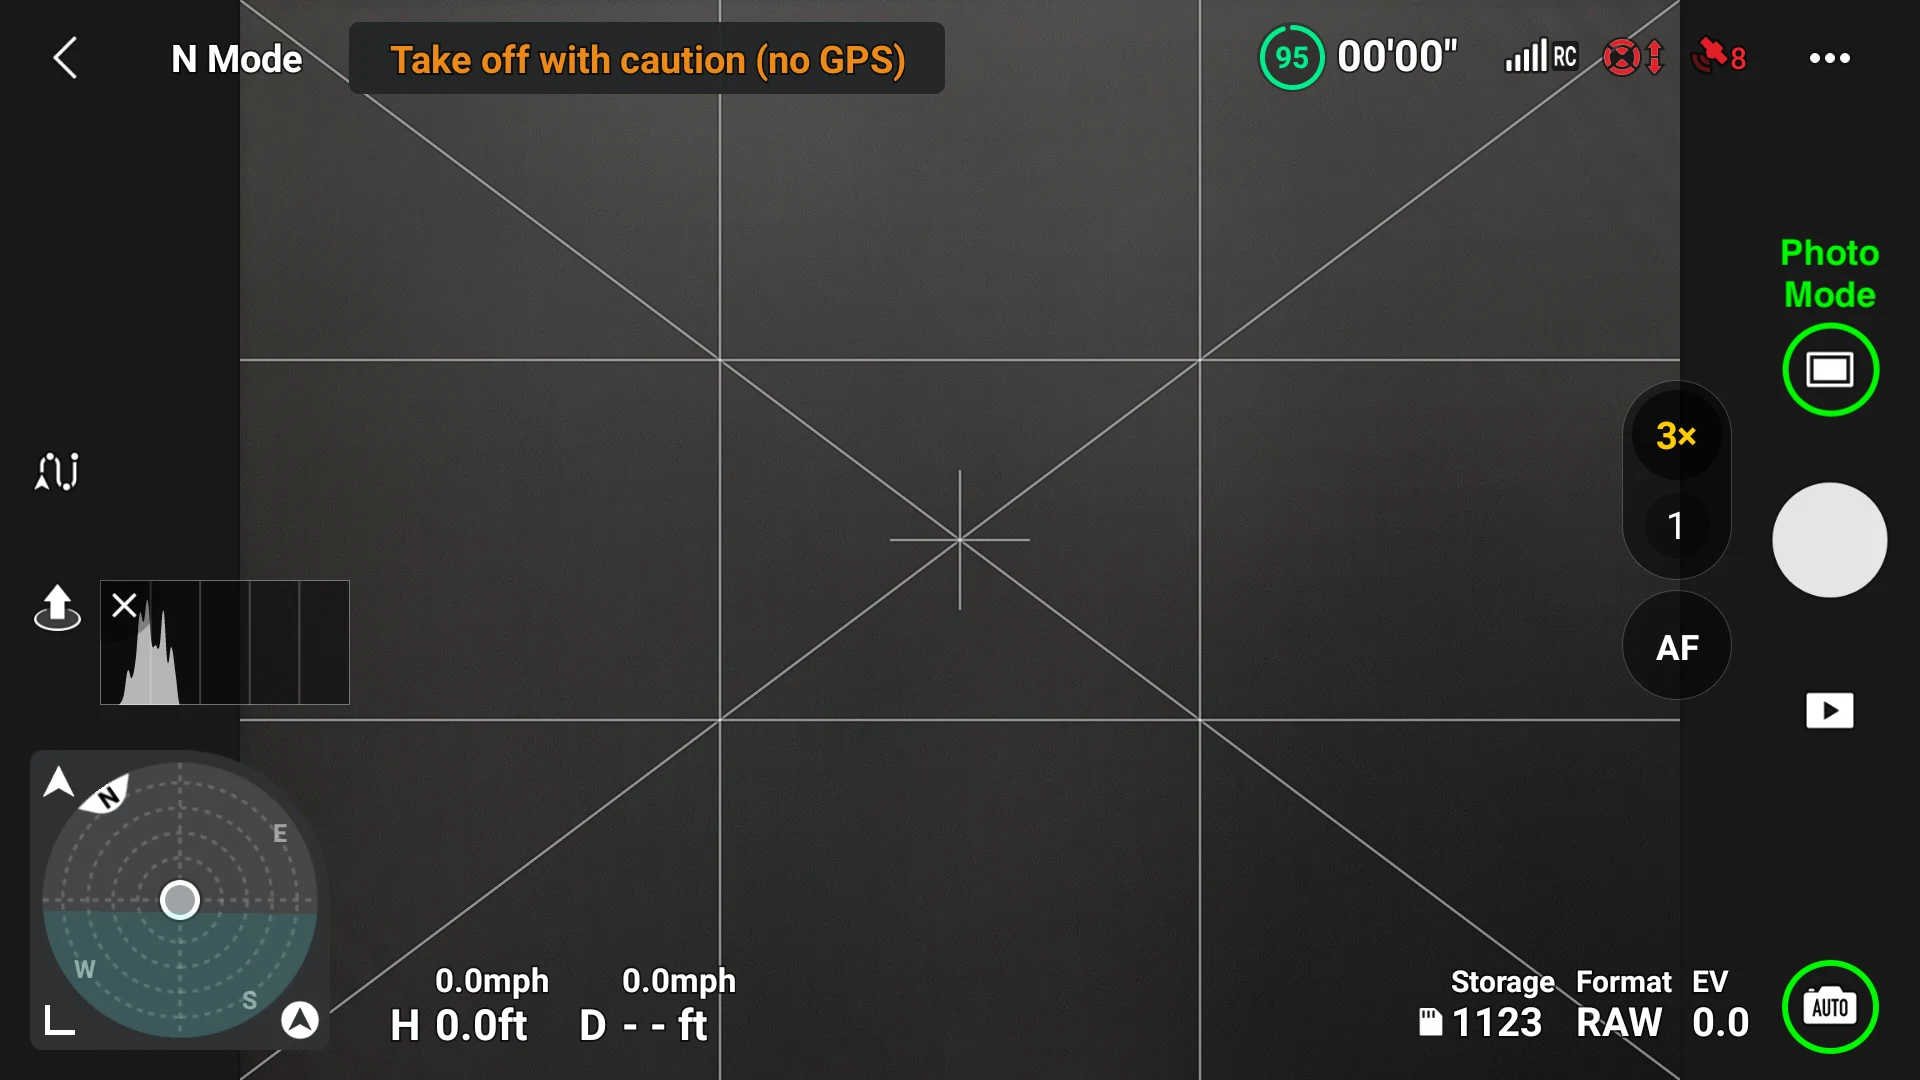
Step 1: Faucet the shutter pace. In my instance, it’s 1/4000.

Step 2: Underneath the Shutter part, change the slider to the worth you’d like to make use of.
» MORE: Finest Drone Video Editor (With Screenshots)
White Stability
The white stability possibility within the Air 3, as with each digicam, evens out the colour temperature in a picture or video to make the picture look extra pure (eradicating extreme yellow or blue casts).
That is executed by bringing in reverse shade temperatures that assist convey the whites again to impartial, which impacts all the shade of the footage.
The Air 3 permits the white stability to be set to Auto, even when capturing in Professional mode, so that you’ll need to concentrate on this.
Manually Choose White Stability
When selecting one of the best settings for video, you’ll wish to take the white stability out of auto mode and set it manually.
This may occasionally appear tough at first because the Air 3 doesn’t have a selected set of white stability profiles like Sunny and Cloudy, which was within the DJI Go 4 app many may keep in mind.
Why ought to the white stability be set manually, as an alternative of letting the Air 3 select it?
It’s because because the lighting circumstances change periodically the Air 3 will attempt to change the white stability of the footage whereas flying by a scene.
This could generally be jarring if too drastic or seem unprofessional for these delivering paid content material to purchasers.
As a substitute, it’s higher to set the white stability, shoot the scene, and if the sky will get cloudy or sunnier, cease capturing, alter the white stability, after which proceed capturing.
» MORE: Advantages of Drone Videography (Defined for Freshmen)
To set the white stability manually when capturing video:
Step 1: Faucet WB.

Step 2: Use the slider to manually alter the white stability.

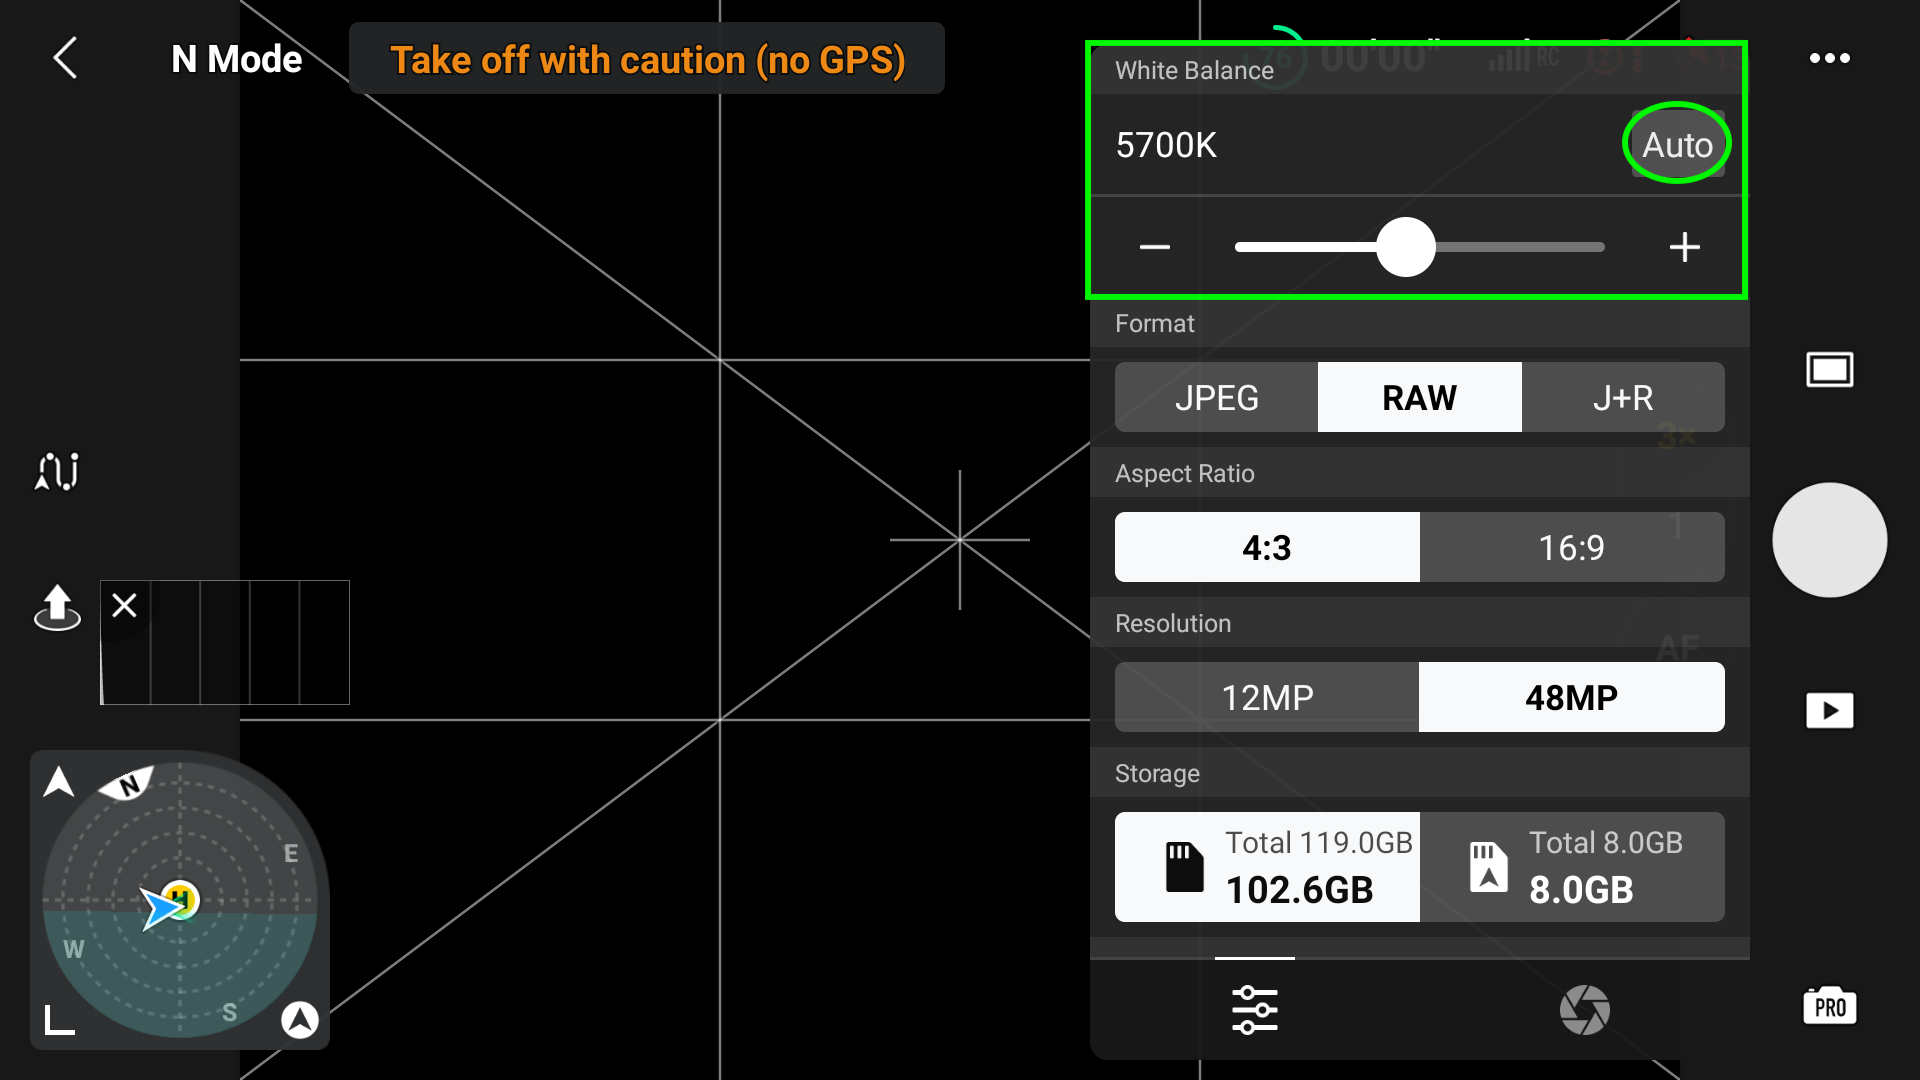
When taking footage, you might both select to set the white stability manually or let the Air 3 select the white stability routinely.
To both set the white stability manually or to auto when taking photographs:
Step 1: Faucet WB.

Step 2: To manually alter the white stability, use the slider. To set the white stability routinely, faucet Auto.
» MORE: Enhance your Aerial Pictures with these useful ideas
Coloration Profiles (Video Solely)
The Air 3 presently has three shade profiles: Regular, HLG, and D-Log M. The Regular shade profile is 8-bit, whereas HLG and D-Log M are each 10-bit.
On the subject of shade depth (8-bit or 10-bit), we’re referring to the quantity of shade and the number of shades a digicam can document in.
The upper the bit depth, the extra colours can be utilized to reinforce a video’s element and visible high quality. With this comes higher, extra real looking, or much more creatively color-graded footage.
Movies recorded in 8-bit make the most of RGB utilizing 256 colours per channel, that means 8-bit can show a little bit over 16 Million colours (16.7 Million to be precise).
As compared, movies recorded in 10-bit use 1024 shade ranges per channel, displaying over 1 billion colours (1.07 Billion). With all of this entry to paint and shades, footage might be extra true to life.
Be aware: Since we’re speaking about one of the best video settings for the Air 3, we encourage you to shoot within the 10-bit shade profiles, which might be HLG and D-Log M.
» MORE: DJI Air 3 Vertical Mode (Video)
D-Log M
D-Log M is a toned-down variant of D-Log and a reasonably flat video shade profile used particularly in DJI drones.
The D-Log M 10-bit shade profile incorporates extra data and dynamic vary than the conventional shade profile.
Due to this, it may be modified and adjusted and is good for making use of Cinematic LUTs (lookup tables) for a extra movie-like look.
When D-Log M is chosen, the footage will probably be recorded in 10-bit. Moreover, when recording in D-Log M, the h265 codec (high-efficiency video coding) is routinely utilized. You can’t change it to h264.
Be aware: Though the h265 codec is of upper high quality, it does take up extra SD card house than the h264 codec. This may trigger the machine you’re utilizing for modifying to work tougher and probably slower.
Capturing in a 10-bit shade profile allows you to extensively color-grade your footage in a video editor with out the concern of destroying the footage, resulting from shade artifacts associated to pushing the colour too far.
» MORE: Suggestions for Capturing & Modifying Drone Movies (Information for Freshmen)
HLG (Hyper Log Gamma)
HLG is even simpler to work with in video editors if you wish to color-grade. Like D-Log M, HLG can be a 10-bit, h265 shade profile, with a better dynamic vary than the conventional shade profile.
HLG additionally has a punchier, much less flat picture than D-Log M, making shade manipulation simpler. For HLG, including slight distinction and saturation improves the general footage in comparison with that of the conventional shade profile.
Like with D-Log M, you possibly can select from a wide range of LUTs to get the cinematic look you are attempting to realize.
» MORE: Find out how to Fly DJI Air 3 Drone (With DJI RC 2)
To decide on shade profiles on the fly with no need to enter the principle DJI Fly settings:
Step 1: Faucet on the present shade profile. Mine is ready to HLG right here.


Step 2: Underneath Coloration, select the profile you wish to use. Bear in mind, HLG and D-Log M use the h265 codec.

A Tip for Capturing Higher Video
ND Filters
ND filters are a type of merchandise that for those who by no means have to make use of one, you won’t even know they exist. ND filters act as sun shades for cameras.
In case you are utilizing the settings recommended on this article, outdoors of ISO, there aren’t many issues one can do to alter the publicity of the video footage being shot.
The apertures on the Air 3 cameras are mounted at both f/1.7 (24 mm) or f/2.8 (70 mm). They’ll’t be used to darken the footage by selecting a extra clamped-down f-stop like you possibly can on the Mavic 3 collection.
Additionally, to take care of correct movement blur, the shutter pace must be double the body price, so the shutter pace can’t be used to darken the footage both.
Within the case of the Air 3, when correctly capturing video, the one out there possibility for footage that’s too vivid is to make use of an ND filter. The filter will reasonable the quantity of sunshine coming into the digicam.
There are fairly a number of producers that make ND filters for the Air 3.
We propose the next:


» MORE: Drone Pictures: Newbie’s Information to Getting Began
Photograph Associated Settings
For many of this text, we talked in regards to the settings that have an effect on each photographs and movies. We’ll now contact on one of the best settings for taking photographs.
For the picture taken under, I used all the settings talked about on this part.
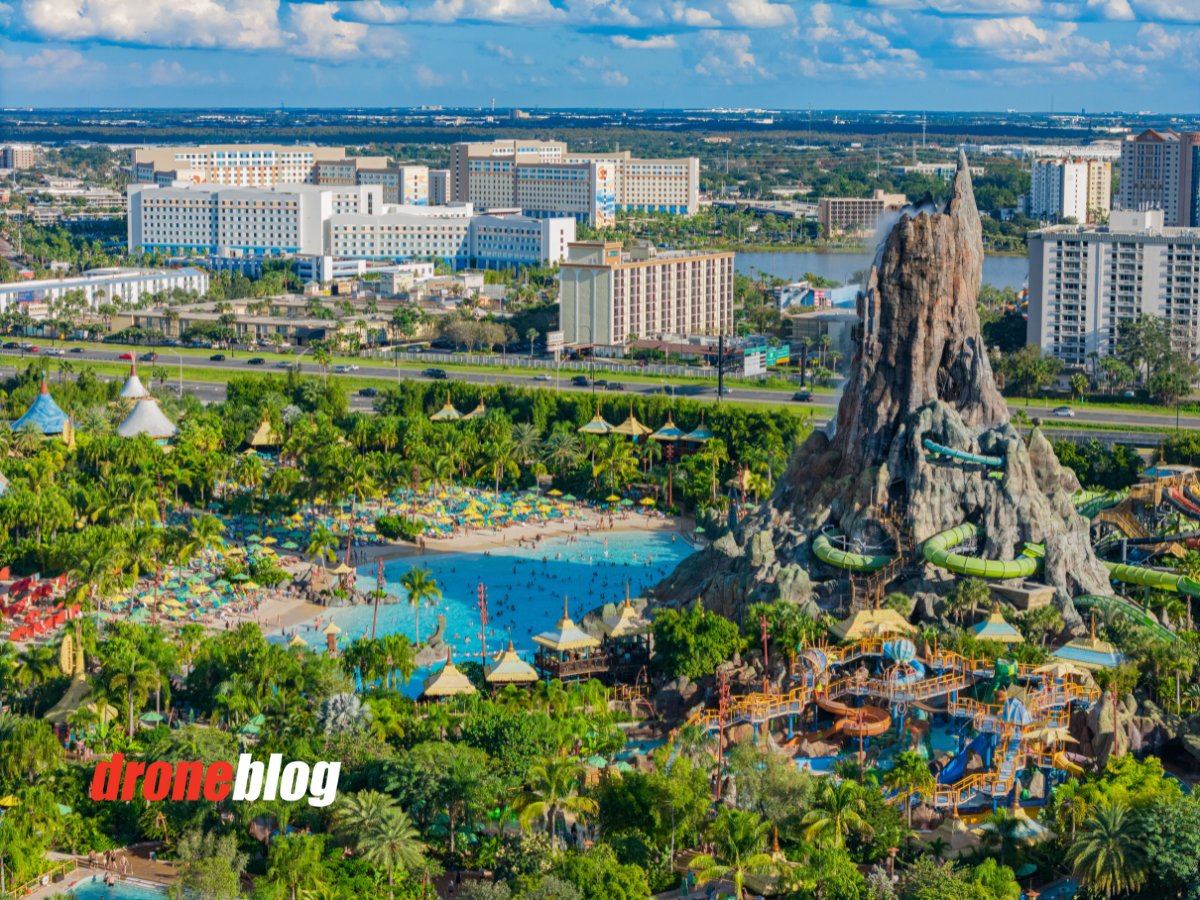
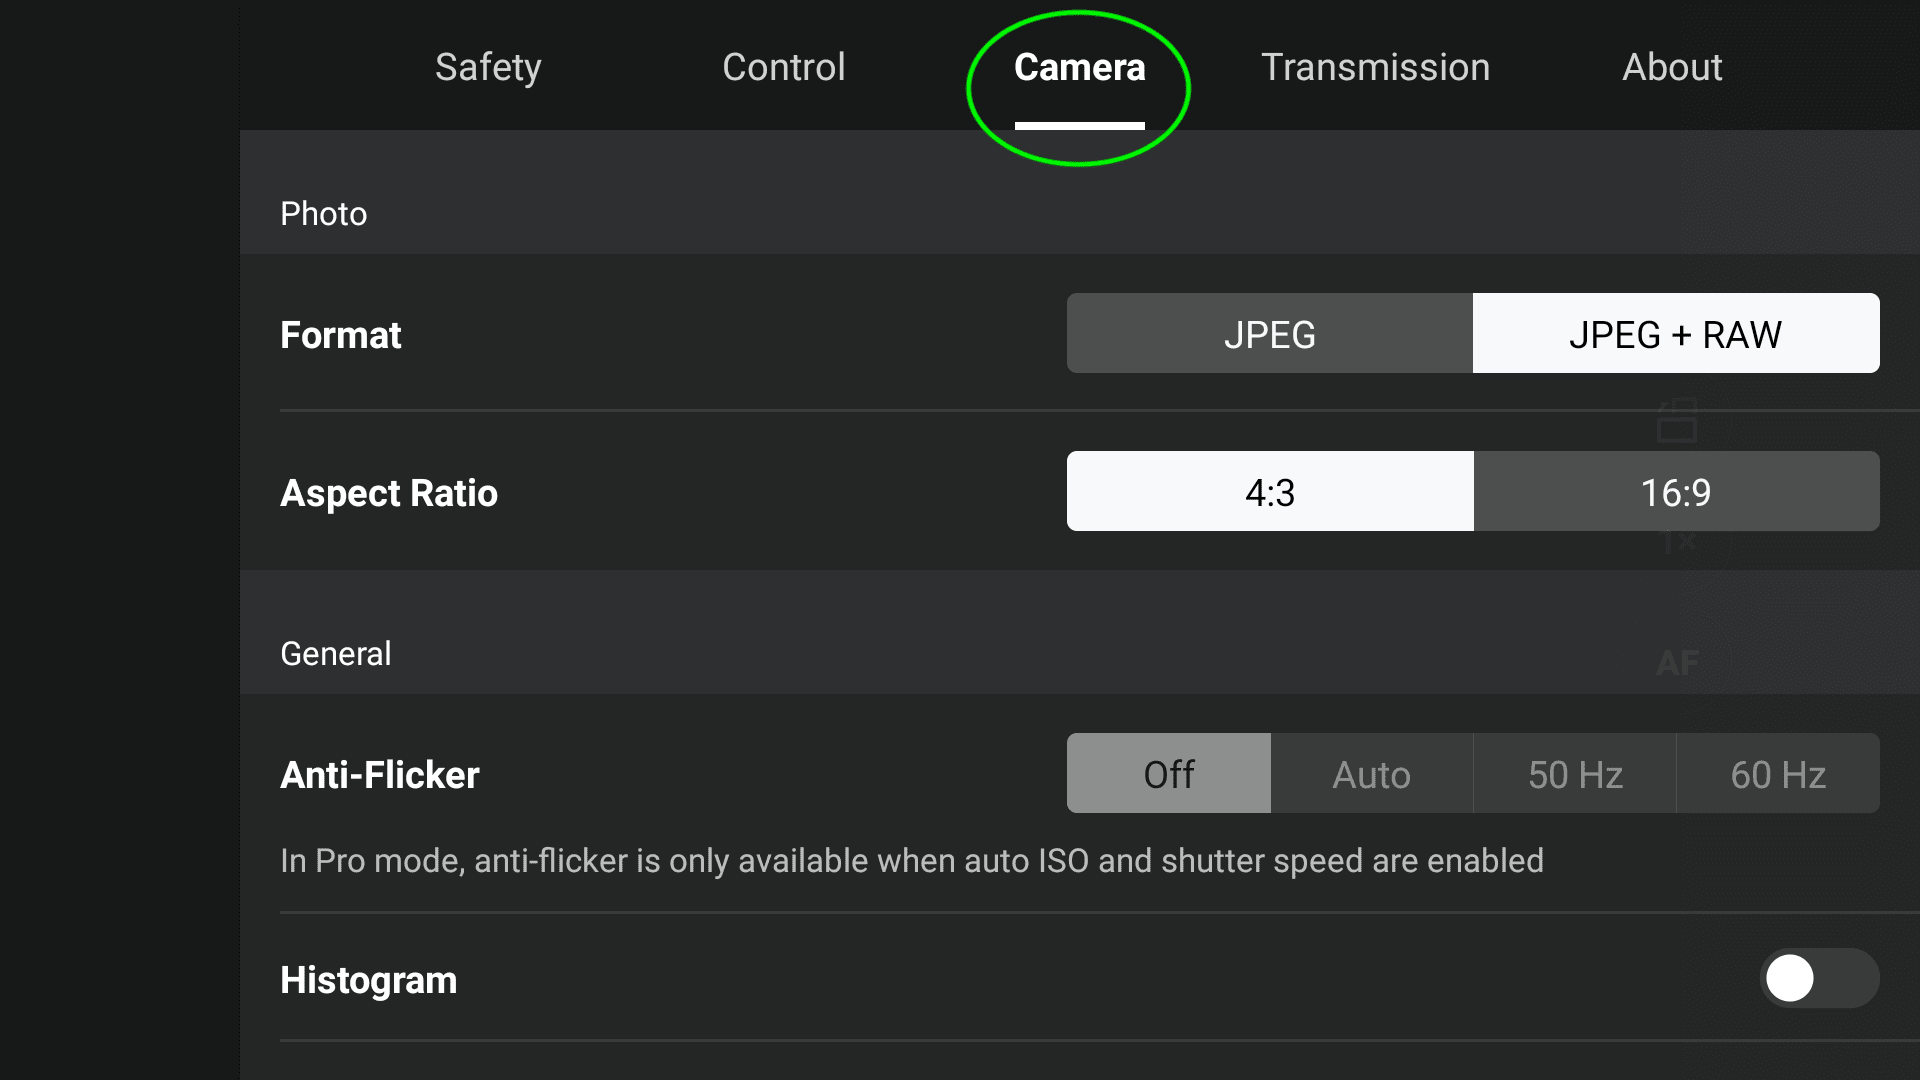
Image Format (RAW)
Like with all DJI superior and prosumer drones, the Air 3 has the choice to shoot photographs in JPG or RAW codecs.
For one of the best photographs on the Air 3, it’s recommended the RAW format be used.
RAW recordsdata are uncompressed, unprocessed recordsdata that include all the data the Air 3s twin digicam system collects.
This data would come with picture colours, dynamic vary (highlights & shadows), white stability, and so on., all of which it is possible for you to to regulate inside picture modifying software program.
RAW recordsdata additionally take up extra space than the less complicated JPG format, by greater than 20 occasions as a lot in some situations.
» MORE: Drone Pictures for Actual Property (Finest Drones and Practices)
Facet Ratio (4:3)
For pictures (and cinematography), the side ratio of a picture is the proportional relationship between a picture’s width and peak.
The Air 3’s picture side ratios are both 4:3 or 16:9.
The 16:9 side ratio is usually acknowledged as a large panorama ratio and solely makes use of a particular portion of the digicam sensor to crop the picture to suit the large ratio.
We propose utilizing the 4:3 ratio.
Whereas the 4:3 ratio produces a extra square-looking picture, all the picture sensor is getting used. Should you’d wish to crop the picture to the ratio you’d wish to put up in picture modifying software program, this will simply be achieved.
» MORE: DJI Mini 3 Professional – Find out how to Change Video Settings (Video)
Decision (48 MP)
Though the Air 3s cameras are technically 12 MP, DJI has employed the utilization of Quad Bayer expertise.
Quad Bayer expertise makes use of the small pixel aperture of the Air 3’s twin cameras and will increase decision by breaking every pixel into 4s, which then will increase sharpness.
As a substitute of only a 12 MP sensor, the digicam can act as a 48 MP sensor.
The one problem I’ve observed with utilizing the 48 MP picture possibility is that, in some situations, randomly, the image may endure from chromatic aberration.
Chromatic aberration is the place there’s noticeable purple or inexperienced fringing. This could simply be diminished in picture modifying software program.
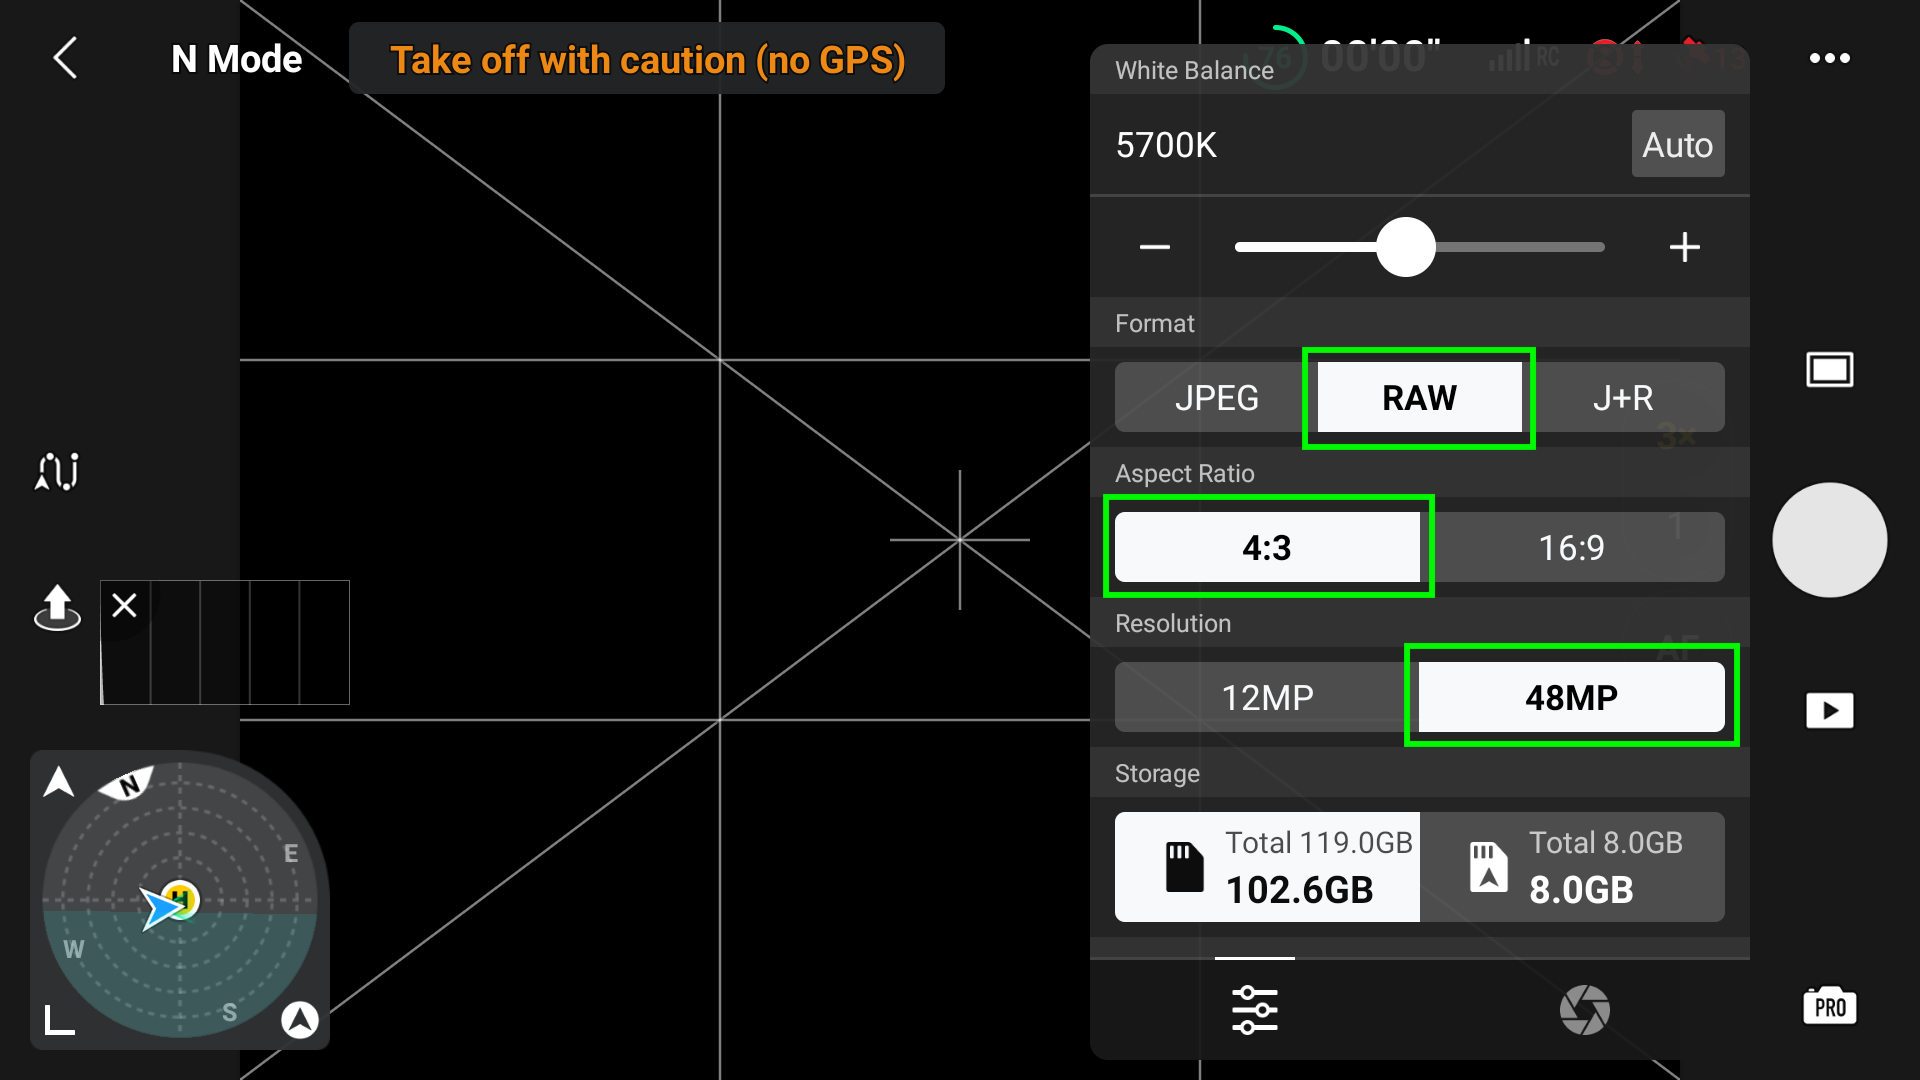
To set or change the picture settings from throughout the reside view display:
Step 1: Faucet wherever on the left aspect of the Professional mode part.

Step 2: Select the Format, Facet Ratio, and Decision choices you prefer to modified.
» MORE: The place Is the Serial Quantity on DJI Air 3 (Answered)
Composition Associated (Images and Video)
The DJI Fly app has fairly a number of instruments to assist within the composition of picture and video footage. Turning these on can help in framing your pictures and retaining topics center-frame if that’s what you’re going for.
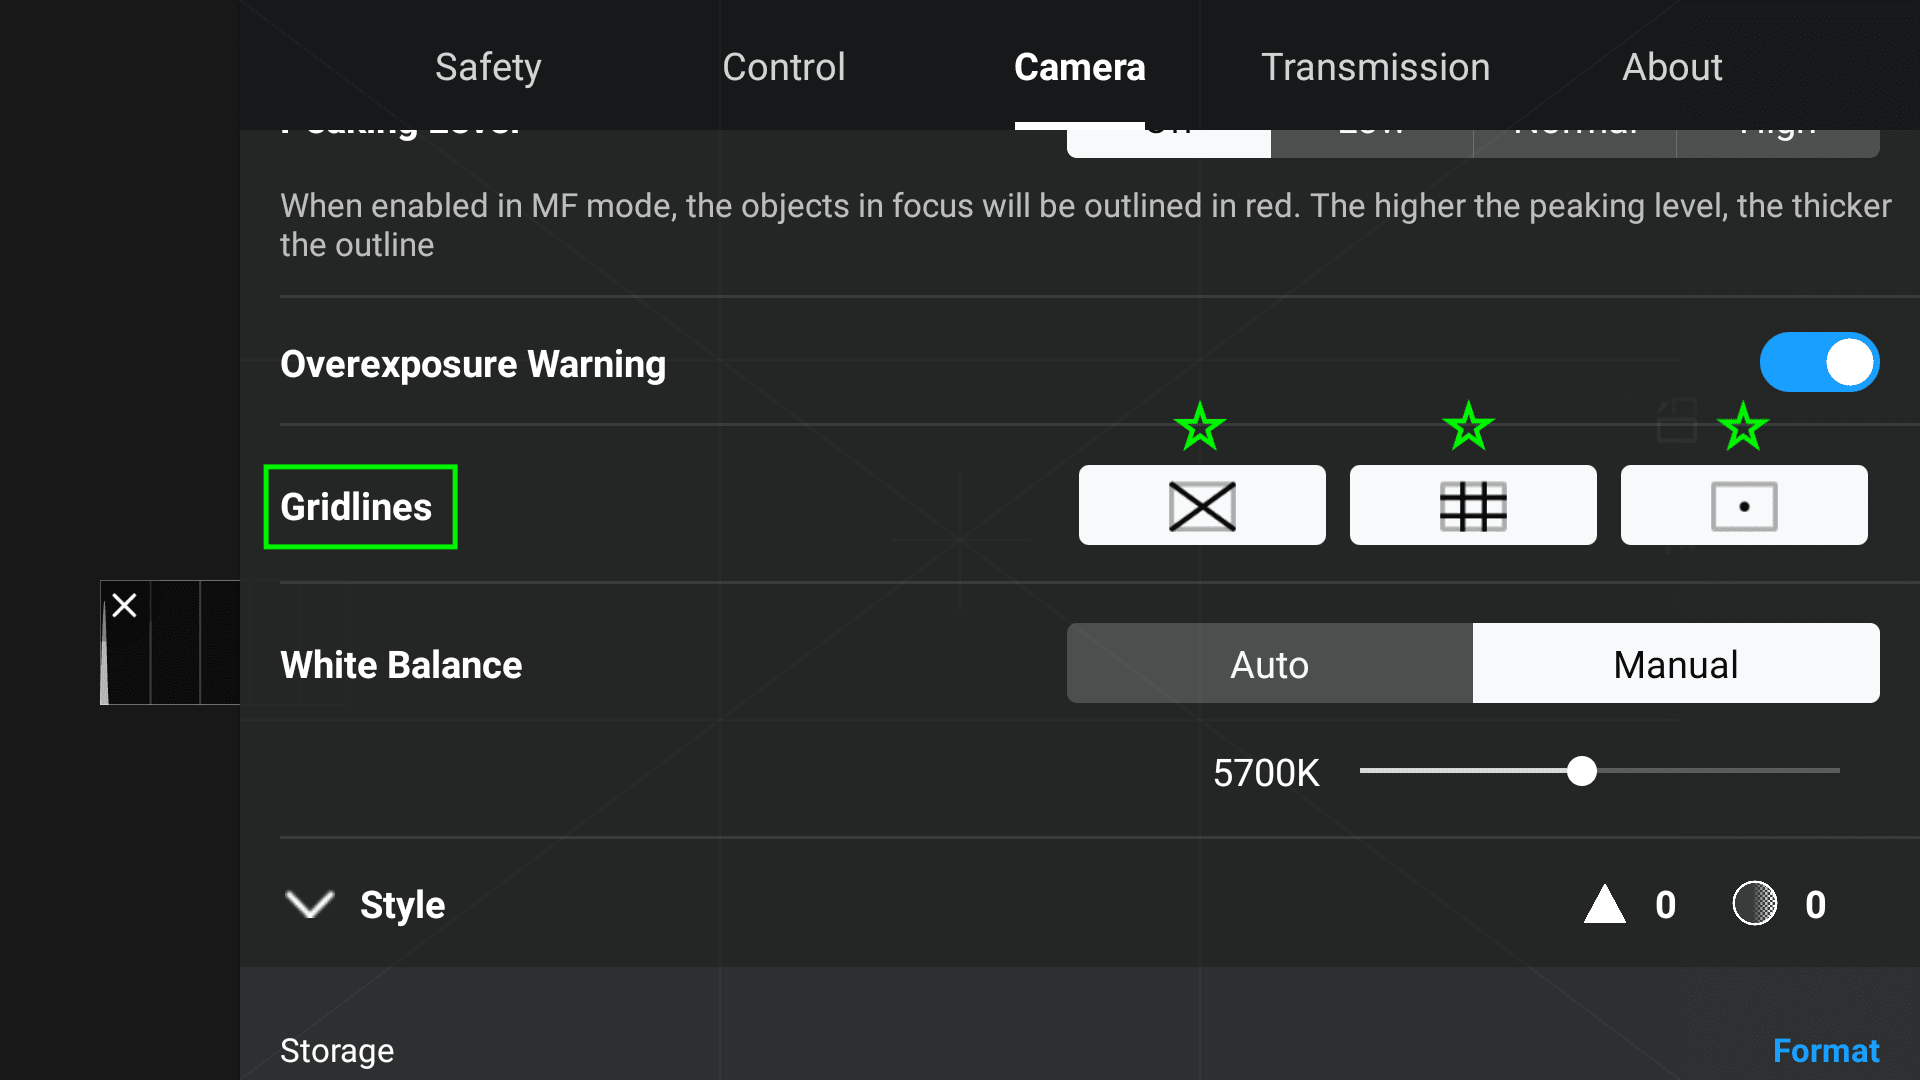
Grid Strains
Gridlines are damaged into 2 sorts, with the addition of a middle goal.
These being:

Rule of Thirds
The Rule of Thirds overlay has 9 equal blocks that divide every body.
There are 4 intersecting factors on these strains and putting your topic on a number of of those intersecting factors creates extra compelling compositions than simply having the topic in the course of the display
Diagonal and/with Middle Goal
These strains help in framing up your shot. This may appear to be a double-edged sword.
For some, the diagonal strains could also be an added distraction, whereas, for others, they’re helpful whenever you’d like a selected topic (boat, jet skier, or one thing else) to be entrance and middle within the image.
To entry the gridlines and middle goal choices:
STEP 1: Open the choices menu within the higher right-hand aspect of the DJI Fly app reside view display.
STEP 2: Go to the Digital camera Tab.

STEP 3: Scroll all the way down to Gridlines and select both Diagonal, Rule of Thirds, Middle Goal, or all three.

Use the Tele Digital camera
One of many fundamental attracts of the Air 3, except for its cost-to-feature ratio, is the addition of a second digicam.
This second, 70 mm equal tele digicam is nice for including one other artistic dimension to each photographs and movies.
The 70 mm lens, with the usage of parallax strikes, provides a much-needed perspective and cinematic worth to video footage, in addition to giving nonetheless photographs the benefit of capturing any topic from additional away.
When capturing any content material on the Air 3, it usually pays to take action in each 24 mm and 70 mm when potential.